


No Monthly Fee Cloud Cameras
Explore a wide collection of professional cameras and surveillance systems that are cloud accessible without subscription costs.
Shop Cloud Security CamerasIf your security camera system suddenly stopped recording or your NVR popped up a hard drive error, the quickest way to figure out what’s going on is to check whether the recorder can still see the drive. Hard drives in surveillance systems are constantly writing data, so it’s normal for them to wear out or lose connection over time.
Below is a simple walkthrough that covers the exact steps you should take. I also included a full video at the end of the post where I show everything on screen so you can follow along.
Using your mouse, open the main menu on the recorder.
Go to Storage → Hard Disk.
This page shows which drives are installed and whether they’re being detected.
Your NVR may show one of the following:
If the drive shows up, that’s a good sign. If it doesn’t, keep reading.
If the NVR sees the drive but shows an error, formatting may fix it.
Just keep in mind that formatting wipes all recordings.
Steps:
Once it finishes, look at the status again to see if it cleared the error.
Most modern NVRs have a hard drive checker built in.
Go to:
Maintenance → HDD → Bad Sector Detect
Run the test on the drive you want to check.
If you see red sectors, replace the drive. It’s only going to get worse.
If the NVR says No Disk, the recorder probably can’t see the drive at all.
Before touching anything inside the unit:
Then open the chassis.
Check:
Make sure everything is fully seated. A slightly loose cable can cause intermittent detection issues.
Reconnect everything in this order:
Once the NVR boots up, go back to Storage → Hard Disk and check if the drive is recognized.
If it still shows “No Disk,” the hard drive is most likely dead.
Surveillance hard drives are designed for 24/7 use, but they still fail over time.
Replace the drive with a proper surveillance-rated model (not a desktop HDD).
If you’re unsure what size or type you need, feel free to reach out to us at CCTV Camera World.
If your NVR still is not detecting the disk after checking the connections, the drive is likely failing. We only use surveillance-grade hard drives that are built for 24/7 recording.
Browse Surveillance Hard Drives
If your security camera system suddenly stopped recording or your NVR popped up a hard drive error, the quickest way to figure out what’s going on is to check whether the recorder can still see the drive. Hard drives in surveillance systems are constantly writing data, so it’s normal for them to wear out or […]
This guide is meant for customers using the NDAA compliant AvaEye security cameras and NVR recorders from CCTV Camera World. AveEye products are professional grade surveillance equipment suitable for use not only at home, but also in businesses and government organizations that must comply with NDAA requirements. When using AvaEye PoE security cameras with an AvaEye NVR you get the benefits of using compatible equipment that provides plug and play deployment, smart event detection and notification. This is guide is a great resource for you to learn how to use your AvaEye PoE camera system by watching easy to follow videos. To get started with how to operate your system we recommend watching the videos below which provide all the useful information needed to get the most out of your system.

Before setting up remote viewing, or accessing the system over a network with a web browser, you will need to login at the NVR using a mouse and HDMI monitor. It is important to use a 1080P compatible computer monitor or TV to get started.
Log in using the graphical user password, or the written admin password that is located on the label on the top of your recorder. Please watch the video tutorial below to learn more about logging in.

It's important to note that this step (Step 2) is only necessary if your cameras do not come up 3 to 5 minutes after connecting them to the back of the NVR.
Cameras purchased with our NDAA compliant AvaEye NVRs are compatible using the "Private" plug and play protocol which makes it easy to connect cameras to the PoE ports on the back of the NVR. We demonstrate in this video how to connect the camera to the back of the recorder and add it as a camera channel using the camera list.

When you already have a PoE NVR but want to place one or more AvaEye cameras farther away on a separate PoE switch, this video shows the correct way to wire and add them. It walks through connecting the NVR’s LAN port to the same network as the PoE switch, finding the camera in the Cam Config search list, choosing the Private protocol for adding IP cameras, and entering the proper password so the channel comes online. This is the go-to tutorial for extending a PoE NVR beyond the built-in ports while keeping everything on the same local network.

If your AvaEye NVR does not have built-in PoE ports, like our 64-channel NVR models, all cameras must be connected over the network using external PoE switches or injectors. This video shows how to work in that scenario: assigning a static IP to each camera, using the NVR’s camera menu to search for devices, and adding them by IP address with the correct protocol and login credentials. It is ideal for larger or more flexible installations where all cameras live on the local network with power over Ethernet infrastructure rather than plugging directly into the back of the recorder.

The system provides multiple ways to view security cameras that are connected to the back of the NVR. Network video recorders can view many cameras in a multi-grid view, or one camera in full screen mode. If the cameras have a built-in microphone or microphone input for audio the audio can be heard when viewing in full screen mode, or by manually enabling audio for the channel on the multi-grid screen.

It is important to highlight the differences between digital and motorized optical zoom when using security cameras. Digital zoom takes a portion of video and stretches the image for slightly better detail, but causes pixelation quickly.
Optical zoom can only be used in live view mode, and is used to set up the view that the camera will record. Motorized zoom security cameras physically rotate the lens to optically zoom-in when watching video live, which does not stretch the image and does not cause pixelation. However, optical zoom does cut down on the angle of view a camera sees.
A camera must have a motorized zoom lens in order for a recorder to send zoom commands, but all our cameras and systems support digital zoom.

Last but not least are PTZ or Pan-Tilt-Zoom cameras that can be controlled from the security camera system. PTZ cameras are mainly useful for active surveillance for security guards, or a vigilant home owner. To learn how to use PTZ cameras with the system watch the video below!

Recording resolution and encoding settings are what determines how well a camera is viewed and recorded to the NVR. Our AvaEye Series security camera systems support resolutions ranging from 1080P to 8MP (4K). For the most part these settings can be left alone if the customer is satisfied with the image quality and the amount of video storage they are getting. However, optimizing encoding settings can result in increased video storage. Lowering the resolution of cameras will also greatly increase the amount of video that can be stored, as the video takes up less space on the hard drive. To learn more about encoding settings and resolutions watch our video.

Most cameras are usually fine with their default image settings from the factory. However, there are unique situations where image settings can make a world of difference in how well a camera can see. IP cameras generally offer more options for image settings when compared to coaxial cameras. Watch our video below to learn more about the image settings offered on the AvaEye Series systems.

By default our systems are set to record video continuously 24 hours a day 7 days a week. For most people this is not necessary as they really only care about when things happen on their property. For those customers we recommend setting up a motion detection recording schedule and enabling motion detection on their cameras. There is an advanced recording method that involves recording continuously during the day while you’re at work, and only recording motion at night or vice versa. To learn more about recording methods and setting up motion detection, watch our tutorial video below.

After going through the initial setup one might be wondering how to playback video on their system. Fortunately viewing recorded footage from a AvaEye Series NVR is really easy, and there are some really useful playback controls. For more information about playback controls and how to view playback from your system watch the following video.

With a NTFS or FAT32 formatted thumb drive exporting video from the AvaEye Series of security camera systems is very easy to do. There are two ways to export video, selecting a date and time for start and ending manually, or using the timeline controls. Watch our video below to find out how to export video from.

Long gone are the days of complicated network settings and port forwarding. With the easy scan and go app you’ll be watching your security cameras remotely in no time. Watch how easy it is to connect this system using the mobile app in the following video.
Check out the app on the Apple App Store or Google Play Store by clicking the link from your smartphone below:
 |
 |

In order for the remote connection method to work you must be at the location of the recorder, and connected to the same router or local network as the NVR. After setup the app will be able to remotely view while on mobile data.

Download the AvaEye software and learn more about using it in our How to Use the AvaEye Camera Monitoring Software guide! You can click or tap directly on the image below to go to the guide.
This guide is meant for customers using the NDAA compliant AvaEye security cameras and NVR recorders from CCTV Camera World. AveEye products are professional grade surveillance equipment suitable for use not only at home, but also in businesses and government organizations that must comply with NDAA requirements. When using AvaEye PoE security cameras with an […]
Summary: Parking lots and garages see far more thefts, break-ins, and accidents than most people realize. In this guide, we break down the best parking lot security cameras to use, where to place them, and how to get clear footage day or night so you can protect vehicles, people, and your property with confidence.
When most people think about surveillance, they picture storefronts, offices, or homes. But one of the most overlooked—and most crime-prone—areas is the parking lot or garage. A surprising number of incidents, such as fender benders, hit-and-runs, repeated car break-ins, and even grand theft autos, take place in parking lots and garages. Let’s not forget the surge in catalytic converter thefts that plagued cities across America, peaking in 2022 with over 64,000 reported stolen by the National Insurance Crime Bureau.
Why? Parking lots and garages are usually open-access, poorly lit, and often unmonitored. That combination makes them prime targets for criminals, ranking as the third most common location for violent and property crimes, according to a report from the National Institute of Justice, and a significant source of liability for business owners. Installing dependable and well-placed parking lot security cameras isn’t just a good idea; it’s essential for protecting people, property, and your peace of mind.
Vehicles are among the most expensive assets people own, second only to their homes or real estate. And while homes and buildings may be vulnerable to fire or natural disasters, they generally don’t have wheels that allow them to disappear in an instant.
Unfortunately, vehicles aren’t the only liability in a parking lot. They transport people, who can become victims of slip-and-fall accidents or even violent crimes. While parking lot cameras can’t prevent every incident, they serve as a valuable deterrent and provide critical documentation that can aid in investigations and legal proceedings.

Monitoring a parking lot isn’t as simple as throwing up a few cameras and hoping they catch “good enough” footage. To build an effective surveillance system for a parking lot, you need to understand the camera features that truly matter.
Here’s what to look for in a reliable setup for parking lot cameras:
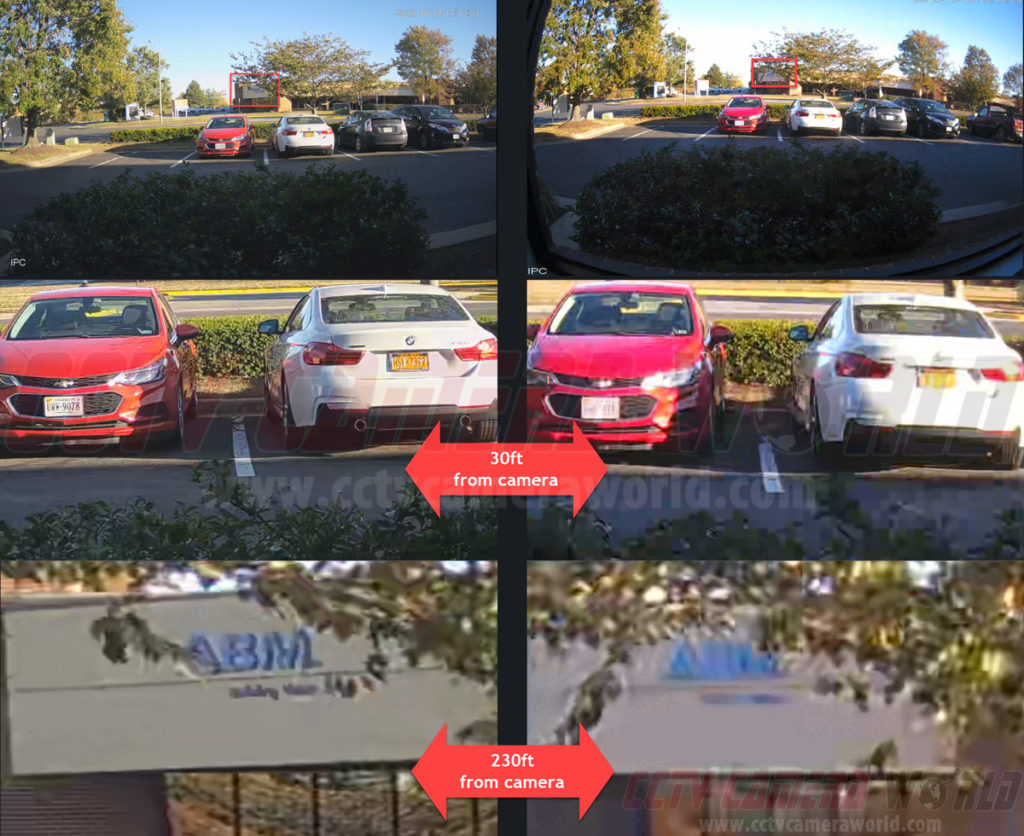
You’ll want at least 2K 4-megapixel cameras, but ideally 4K 8-megapixel cameras for optimal clarity. Higher resolution ensures better detail at a distance and enables cleaner digital zoom when identifying people, vehicles, or license plates.
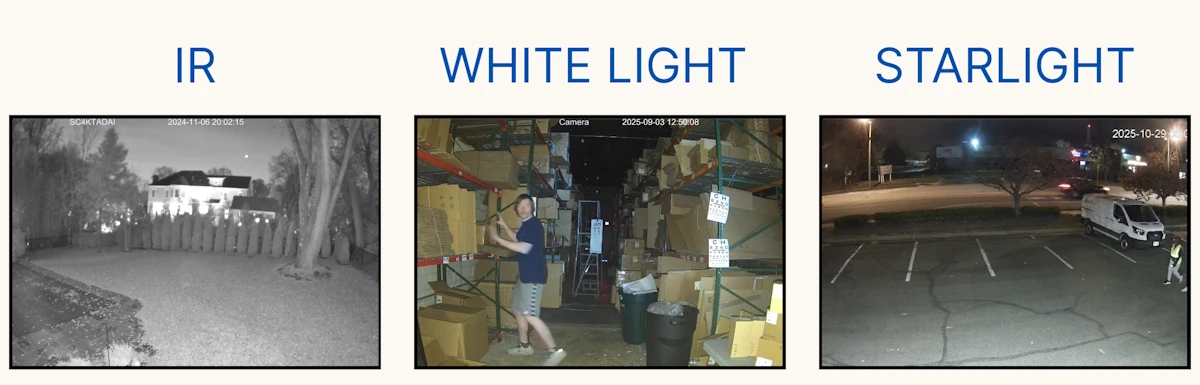
Most parking lots aren’t well-lit, which makes low-light performance critical. Look for cameras with one or more of the following features:
These features help maintain the image fidelity at night, reduce motion blur, and provide usable footage even in darkness.
While not necessary for every spot, motorized zoom and PTZ cameras are ideal for:
Cameras with wide fields of view are excellent for general capture in large areas. These are best used to:
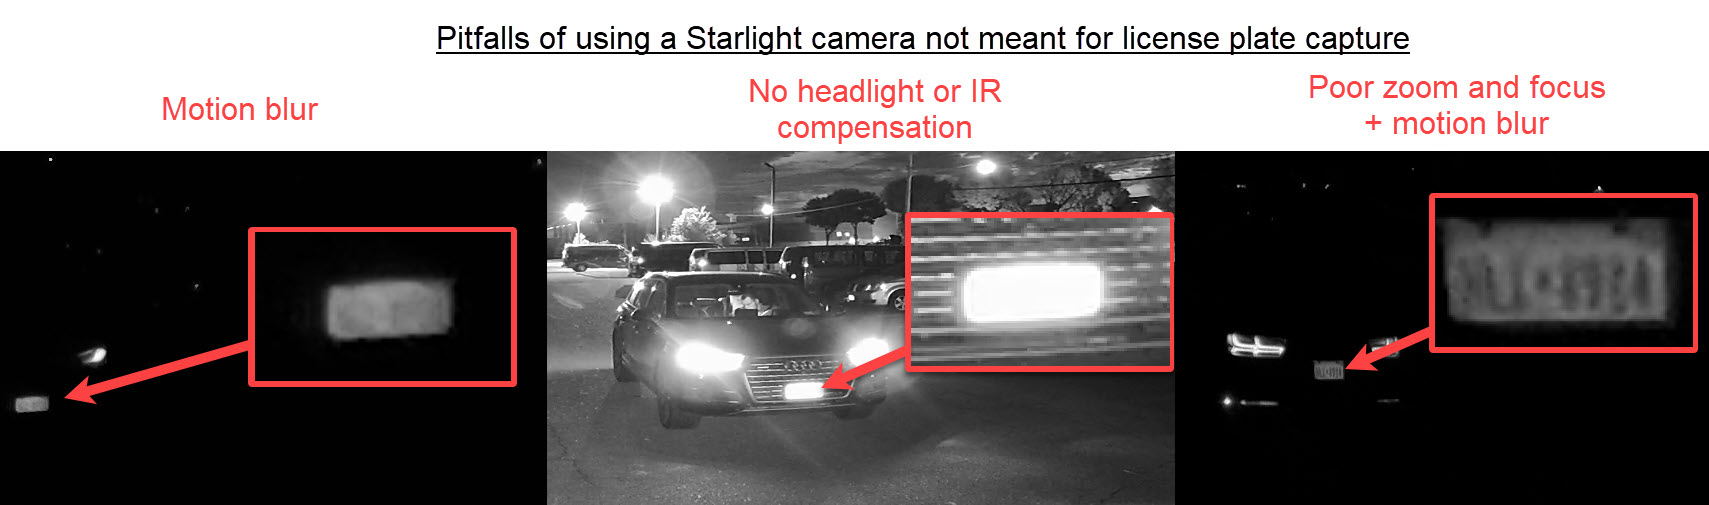
An LPR camera is a powerful tool for identifying fleeing suspects and hit-and-run drivers. Unlike standard cameras that cannot capture plates on moving vehicles:
Most outdoor cameras are IP66 or IP67 rated, meaning they’re resistant to dust and heavy rain. Still, it’s important to double-check ratings, especially if you’re installing cameras in exposed areas. Don’t accidentally use an indoor model outside.
Remote access and motion alerts are now standard, but not all apps are equal. With a security camera system from CCTV Camera World, you get:
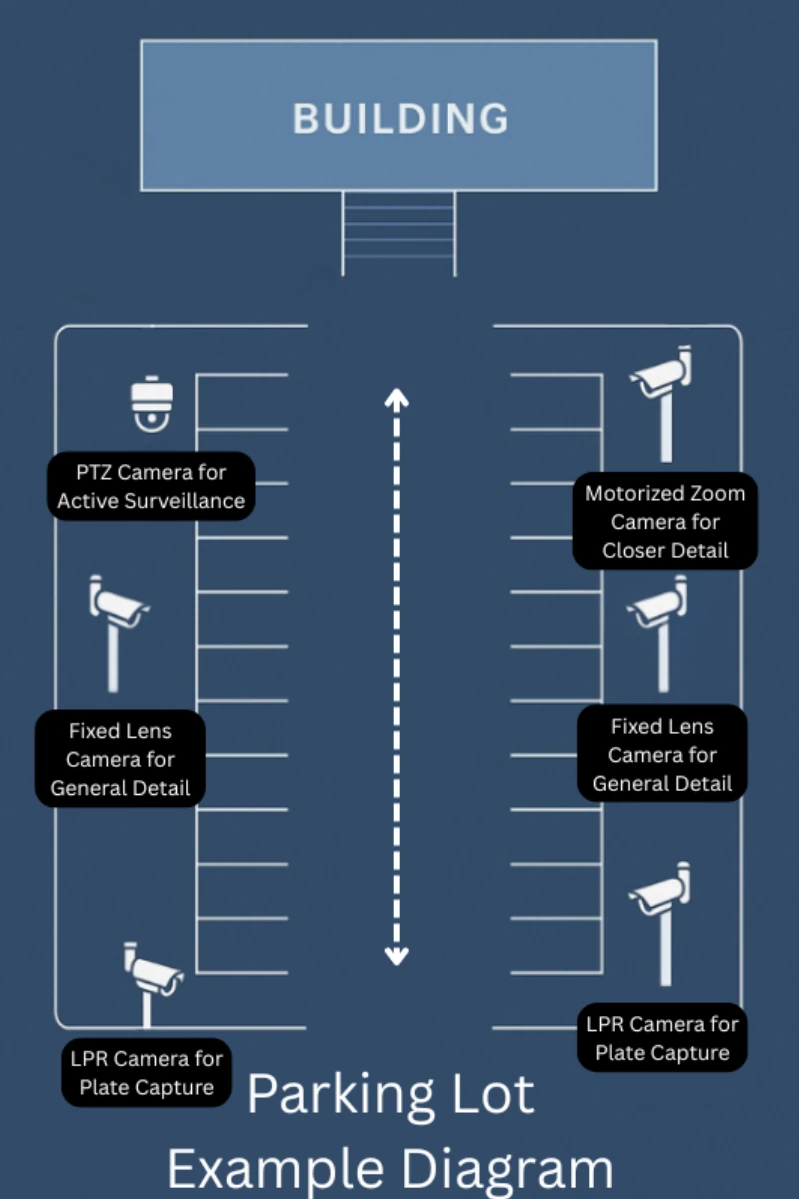
Choosing the right surveillance cameras for your parking lot or garage can be challenging with so many options available. Fortunately, we test all of our products in-house to ensure they meet the demands of real-world parking scenarios. Based on our testing, the following cameras are excellent choices. Be sure to read the summary of each type to understand its role, and you are welcome to contact our support team if you need help fitting cameras into your security plan.
The first and most important cameras to consider are dedicated models for capturing license plates placed at your lot’s entrances and exits. These cameras create a comprehensive log of every vehicle that comes and goes, which is critical for investigations. Without one, even if another camera records an incident, you may lack the evidence needed to identify the perpetrator, potentially exposing your business to insurance disputes or lawsuits.
The Avalonix ANPRVF is purpose-built for license plate recognition. Featuring automatic number plate recognition (ANPR) technology, it actively scans video feeds and logs plates for easy searching and exporting. When paired with a compatible Avalonix NVR, reviewing footage by plate number or timestamp is fast and straightforward.

Active deterrence features add another layer of security. When a banned or restricted plate is detected, the camera can trigger red-and-blue strobe lights and sound alerts, notifying staff and warning intruders.
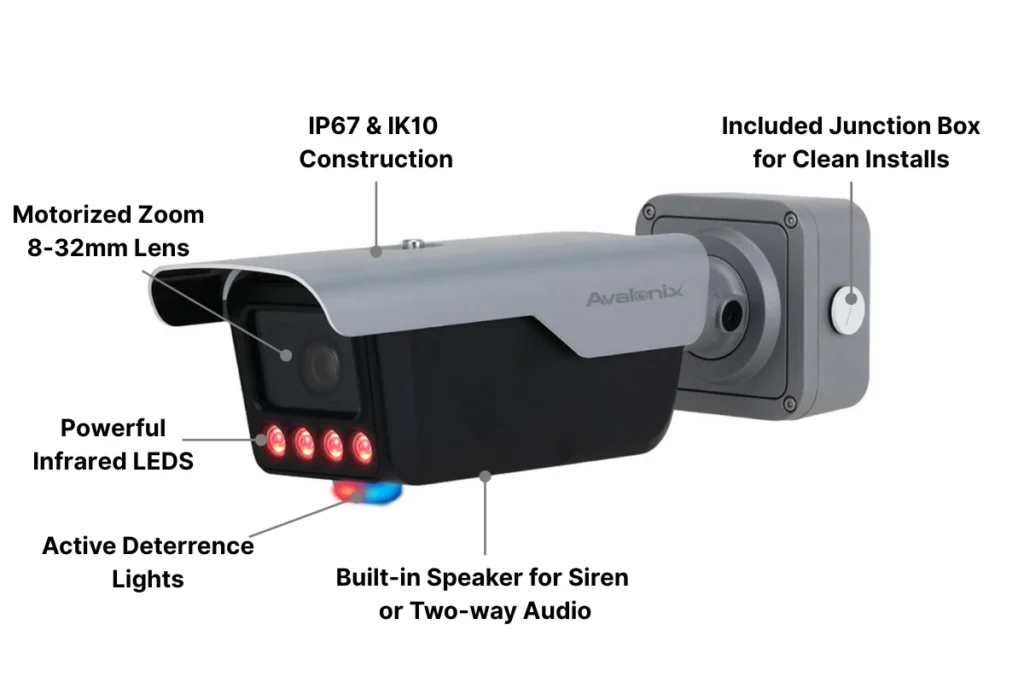
Recording at 2K 4MP resolution and 30 FPS, the ANPRVF produces sharp video suitable for plate capture. An adjustable shutter rate and advanced settings are available to optimize performance in any lighting. During our testing, the motorized 8–32mm zoom lens captured plates clearly from 27 to 100 feet. At night, the dual lighting modes provide flexibility for you to use IR LEDs for discreet recording or switch it to the white light LEDs for color capture and visible deterrence.
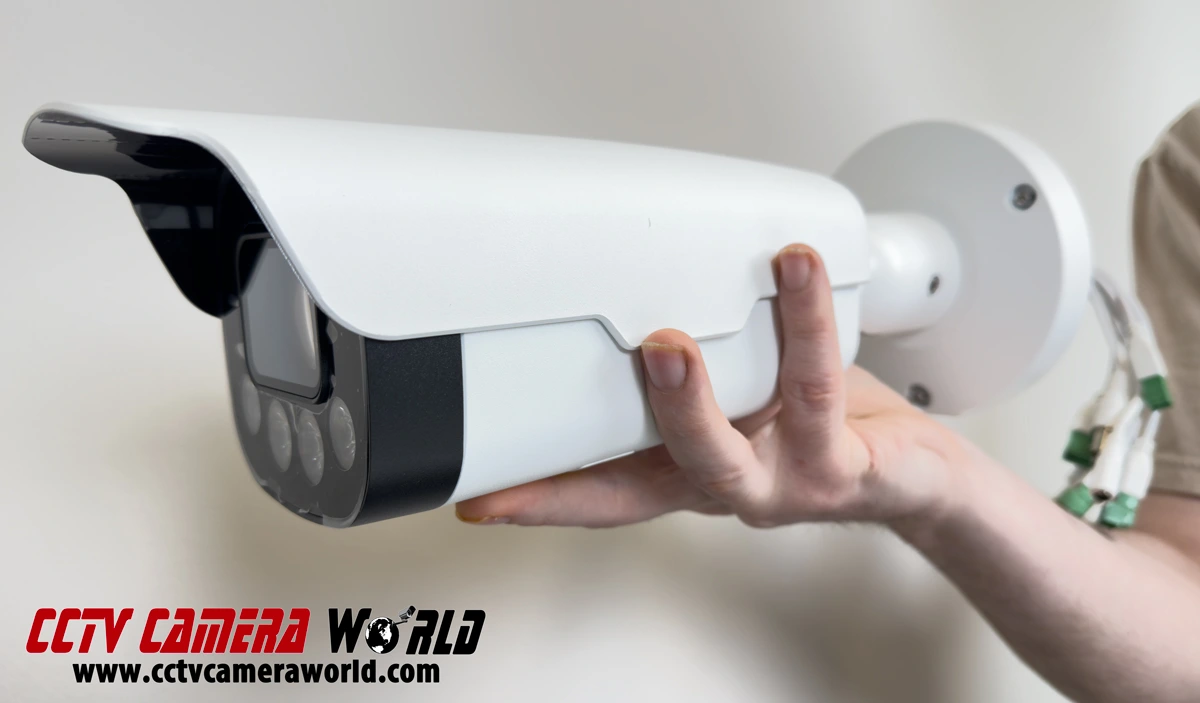
The AvaEye LPRC HC121 offers another excellent solution for capturing license plates in parking lots. Its built-in ANPR algorithm automatically detects and logs license plates, eliminating the need for external software or recorders. It stores the plates and makes them easily searchable for quick reference during investigations.
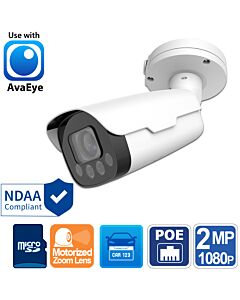
In our testing, the camera’s 2MP 1080p resolution, 60 FPS video, and 10X motorized zoom lens proved highly adaptable. At its widest, it comfortably covers up to two lanes, while at full zoom it captures plates from farther away, like large lot perimeters or down access roads. Night performance is equally impressive. With IR night vision up to 165 feet, an adjustable shutter speed, and image enhancement settings like WDR, BLC, and HLC, the HC121 captured clear plates even when vehicle headlights were glaring directly at the lens.
Wide-angle cameras, such as the panoramic models we offer, are ideal for monitoring large open areas like parking lots. These cameras capture general details, making it easy to identify the make, model, and color of vehicles as they enter and exit.
Another advantage is their ability to monitor pedestrian movement. You can observe people exiting vehicles, walking through the lot, and approaching buildings or moving into areas covered by other cameras. This broad coverage helps with general surveillance and provides useful evidence in cases of loitering, suspicious activity, or incidents away from entrances.
Panoramic coverage is essential for large parking areas, and the Avalonix 4KADPANOT delivers wide viewing as well as active deterrence all in one package. Video from two 2K 4MP sensors is combined to create a seamless 180° 4K view. In our tests, facial detail was recognizable up to 35 feet away, even at the ultra-wide angle.
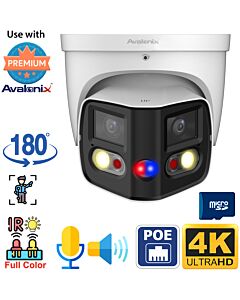
At night, two white light LEDs can provide up to 66 feet of color night vision, while the infrared LEDs beam up to 82 feet of IR for black-and-white recording for a more discreet option. By default, the camera uses infrared, though it can be configured to switch to the floodlights based on a schedule or detection trigger.
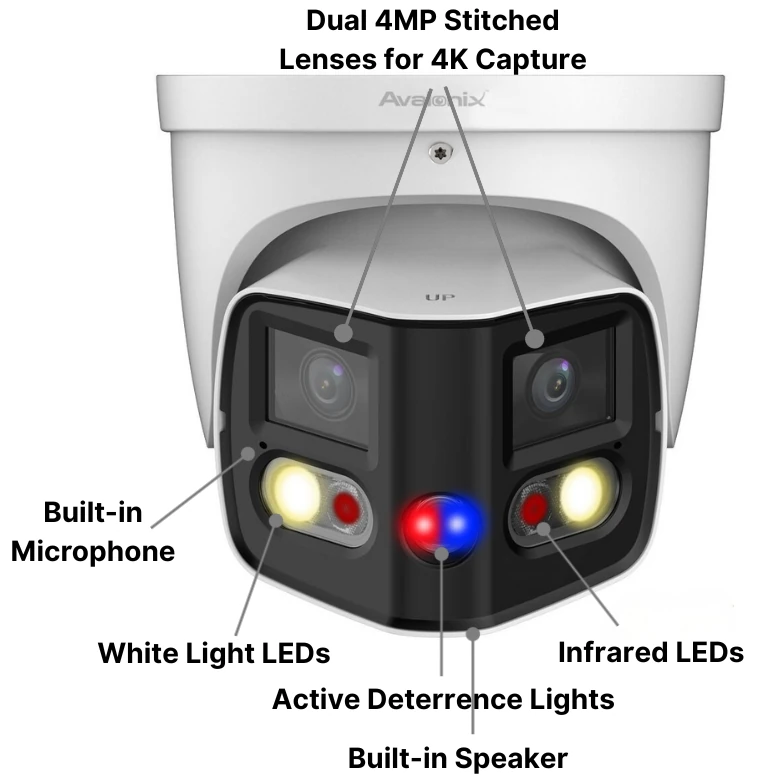
This model also features built-in Active Deterrence. Smart detection, motion, and manual activation can turn on red and blue strobe lights and a siren to deter intruders. Two-way audio support from the built-in microphone and speaker allows staff to communicate directly through the camera using the smartphone app or computer software.
For wide-area surveillance, the AvaEye AEPANO4K offers powerful panoramic coverage with advanced detection and night vision capabilities. Dual 4MP sensors produce a 180° 4K view at 5120 x 1440 resolution, capturing large scenes with impressive clarity. During testing, facial identification was possible up to 35 feet away. The camera’s rugged IP67 housing, PoE support, and NDAA compliance make it suitable for indoor and outdoor use.
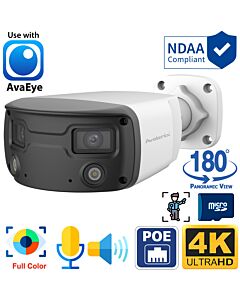
Two white light LEDs provide up to 100 feet of color night vision; conversely, the low-light sensor captures color video with ambient lighting before switching any illumination on. You can enable, disable, or schedule the lights based on preference or security needs.

Smart video analytics further enhance monitoring. The AEPANO4K includes line crossing, intrusion detection, people counting, and Smart Motion Detection (SMD) that focuses on human and vehicle activity. An integrated microphone captures audio, and two-way communication is available through the built-in speaker.
Pan-tilt-zoom cameras, or PTZs, are excellent tools for parking lot surveillance thanks to their unmatched flexibility. You or your staff can actively monitor the lot or garage by remotely moving the camera and adjusting the zoom to observe activity in real time. This makes PTZs a safer and more efficient alternative to fixed-lens cameras, which may require physically investigating to get a closer look at incidents as they occur.
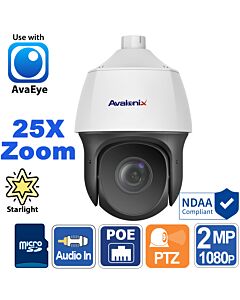
For wide areas that require both broad coverage and zoomed-in detail, the Avalonix IRPTZ4KAD is a standout choice. This PTZ camera combines an 8MP Starlight sensor with 25X optical zoom and 360° endless panning. In our testing, it tracked vehicles and people effortlessly, providing clear video even at long distances. Smart auto-tracking follows human or vehicle motion automatically, making this model ideal for parking lots and building perimeters.

The IRPTZ4KAD also includes Active Deterrence features. When triggered by smart detection rules like tripwire or intrusion, it can activate red and blue strobe lights, a warning siren, or white flood LEDs. Performance at night is excellent, with Starlight color video in low light with some lighting, up to 328 feet of infrared for black-and-white capture, and up to 164 feet of white light for full-color video in complete darkness. With two-way audio, AI analytics, and IP66 weather resistance, this PTZ provides versatile and proactive security.
The compact yet powerful Avalonix IPTZ25XIA delivers serious PTZ performance in a small form factor. Featuring a 4MP Starlight sensor and 25X optical zoom, it captures facial details up to 800 feet away at full zoom. Its wide zoom range and fast panning make it ideal for parking lots, driveways, and property lines. Smart auto-tracking automatically follows people or vehicles based on detection rules.
In addition to excellent video performance, this model has AI detection modes such as tripwire, intrusion detection, and Smart Motion Detection (SMD), which minimizes false alerts. At night, it switches between Starlight color video and up to 330 feet of IR night vision when lighting is limited. Two-way audio is supported with our optional audio kit, and alarm inputs and outputs allow for integration with sirens or sensors. With IP66 weather resistance, PoE+ or 12V DC power options, and seamless integration with NVR systems, the IPTZ25XIA fits easily into any security plan for parking lots.
Fixed-lens cameras are the backbone of any security system and play a critical role in parking lot surveillance. While they lack specialized plate capture or the flexibility of PTZs, they remain the most cost-effective and reliable solution for general coverage.
For areas where detail matters, such as entrances, walkways, or loading docks, we recommend using 4K 8MP cameras to capture faces and other features up to 50 or 60 feet away. Less sensitive zones can be monitored effectively with more affordable options like 2K 4MP or 1080p 2MP cameras.
In this section, we will highlight recommended models from the Avalonix Premium Series 4K lineup, followed by a few budget-friendly options from Security Cameras Inc.
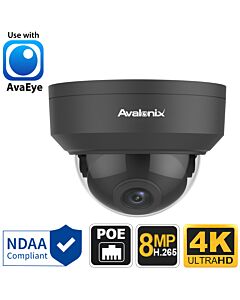
For detailed parking lot coverage, the Avalonix IPC4K18D delivers crisp 4K Ultra HD video in a compact, vandal-resistant dome. Its 8MP CMOS sensor records at 30 frames per second, and our testing confirmed facial recognition up to 70 feet away. The combined 4mm fixed lens creates an 87° field of view, while infrared LEDs provide up to 100 feet of night vision. True WDR helps maintain balanced exposure in challenging lighting conditions.
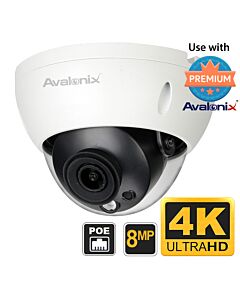
This camera, rated IP67 weatherproof and IK10 vandal-resistant, is suitable for both indoor and outdoor use. Intelligent video analytics, including Tripwire and Intrusion Detection, reduce false alarms and enhance security coverage. Incredible visual quality, along with its easy PoE connectivity, is what makes this camera ideal for 24/7 recording or smart detection in parking lot environments.
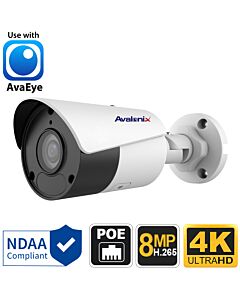
The Avalonix IPC4K19 offers advanced low-light performance in a streamlined bullet design. Its 8MP Starlight sensor produces sharp 4K Ultra HD video, while the 3.6mm lens with an 85° field of view captured facial detail clearly up to 70 feet during testing. The ability to digitally zoom during playback adds flexibility for reviewing incidents.
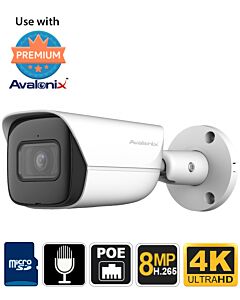
At night, the IPC4K19 excels with up to 100 feet of infrared night vision and True WDR for balanced video in mixed lighting. Its IP67-rated weatherproof housing ensures durability, while PoE connectivity simplifies integration with Avalonix NVR systems. Smart analytics, including Tripwire, Intrusion Detection, and Smart Motion Detection (SMD) with human and vehicle filtering, help minimize false alerts. Support for H.265 compression ensures efficient long-term storage.
If you’re in the market for cost-effective options for parking areas or simply need to meet insurance or regulatory compliance requirements, the Security Cameras Inc. line offers exceptional value. These affordable models balance price with solid performance, delivering the reliability needed for general parking lot and garage security. For this category, we recommend two cameras from the Active Deterrence series, which offer added features to help create a more comprehensive surveillance solution.
The SC4KTADAI combines high-resolution video with proactive deterrence, making it a perfect fit for budget parking lot security. Its 8MP sensor and 2.8mm fixed lens capture crisp 4K video with a wide 106° field of view. In our nighttime tests, infrared reached up to 82 feet for black-and-white recording, while white light LEDs extended up to 66 feet for color video. Users can configure the camera to switch between IR and white light based on schedules or detection triggers.
This turret also includes Active Deterrence features such as a floodlight, loudspeaker, and flashing red and blue lights, which can activate automatically or manually. Smart AI detection offers advanced options like human and vehicle detection, perimeter intrusion, and rare sound detection. Combined with two-way audio, IP67 weatherproofing, and simple PoE setup, the SC4KTADAI is a practical and feature-rich choice for parking lot security on a budget.
The SC4KBLADI offers professional-grade 4K video and powerful deterrence in a weather-resistant bullet design. Its 8MP sensor and 3.6mm lens provide an 85° field of view, capturing clear video day and night. During testing, it was able to capture clear facial details from as far away as 40 feet and could see in the dark up to 82 feet using infrared light and up to 66 feet with regular white. Like the turret model, IR and white light modes can be customized based on lighting conditions or detection events.
This camera also includes Active Deterrence tools, including a spotlight, speaker, and flashing red and blue lights that trigger via motion or smart detection. AI features like Human and Vehicle Detection, Perimeter Intrusion, and Rare Sound Detection help reduce false alarms. With two-way audio, IP67 housing, PoE support, and seamless NVR integration, the SC4KBLADI delivers versatile and affordable protection for parking lots and perimeter surveillance.
It depends on your goals. For identifying license plates, use dedicated license plate cameras. For general monitoring, fixed-lens or panoramic cameras offer wide coverage. PTZ cameras are ideal if you want active control and zoom capabilities, and active deterrence cameras help prevent crime before it happens.
While no camera can guarantee prevention, cameras with active deterrence features like flashing lights, sirens, or voice alerts can discourage suspicious activity. Combined with visible placement and proper lighting, they are certainly an effective deterrent.
It depends on the camera model. Most of the cameras we tested provide 66 to 100 feet of infrared or white light night vision for general coverage at night. PTZ cameras with IR can reach up to 300 feet or more in complete darkness. For identifying details 2MP is around 20 feet, 4MP is around 30 feet, and 4K is anywhere from 40 to 60 feet depending on the quality of the camera.
Color night vision helps you capture more detail, such as vehicle color or clothing, but it requires some light from either the camera's white LEDs or ambient sources. Infrared technology provides more discreet coverage, functions effectively in complete darkness, but only records video in black and white.
4K resolution is highly recommended, especially for capturing fine details like faces or license plates on parked vehicles at a distance. Lower resolutions are sufficient for less critical areas, but 4K records clearer video for digital zoom and post-event review.
It varies based on the size and layout of the lot. A small lot might only need four to six cameras to cover entrances, exits, and general areas. Larger lots often require a combination of panoramic, LPR, fixed, and PTZ cameras for full coverage.
Yes, many of the cameras mentioned have microSD card slots for standalone recording. However, for centralized control, longer retention, and full analytics features, we recommend pairing them with a compatible NVR.
Security cameras in parking lots can record directly to an internal SD card, recorder, or PC software. Their total recording time depends on what storage is used. SD card storage will only last a few days, up to maybe a week. Depending on the hard drive, recorder, and PC, storage can last anywhere from a week to several months.
Summary: Parking lots and garages see far more thefts, break-ins, and accidents than most people realize. In this guide, we break down the best parking lot security cameras to use, where to place them, and how to get clear footage day or night so you can protect vehicles, people, and your property with confidence. When […]
Although we specialize in surveillance here at CCTV Camera World, it's just one aspect of home or business security. Physical security plays a vital role in developing a comprehensive strategy to safeguard your family, guests, customers, and employees.
In today’s world of rapidly advancing technology, physical threats aren’t just about break-ins or vandalism; they can lead to identity theft, cybersecurity breaches, data loss, and other disruptions. Whether you own a home or manage a retail store, warehouse, or office building, this guide will walk you through what an effective physical security strategy looks like and how to build a strong, layered defense.
Physical security refers to strategies designed to limit exposure to risk, liability, and crime from individuals who aren't permitted to access the property. These measures can include rules, standard operating procedures, electronic systems, devices, and even physical barriers.
Ignoring or failing to implement proper security protocols can lead to serious consequences, from unauthorized access and break-ins to theft and vandalism. Installing the right security equipment and making sure you, your family, or your employees follow those protocols doesn't just provide peace of mind; it ensures you're prepared for whatever comes your way.
Every property has weaknesses, even if they’re not obvious at first glance. Before you can build an effective security plan, it helps to understand the most common threats and how they show up in day-to-day situations. Many of these aren’t dramatic or unusual; they come from simple gaps that criminals look for and exploit.
None of these threats require advanced tools or planning. Most occur because of routine habits, dark corners, or equipment that no one checks anymore. Recognizing these weak points early makes the rest of your security plan far easier to build.
Physical security goes way beyond a few cameras and a decent lock. It’s really about how the property is laid out, how people move through it, what’s protected, and what’s easy to get to. Before getting into the five pillars, it helps to look at the basic pieces that show up in almost every solid security setup.
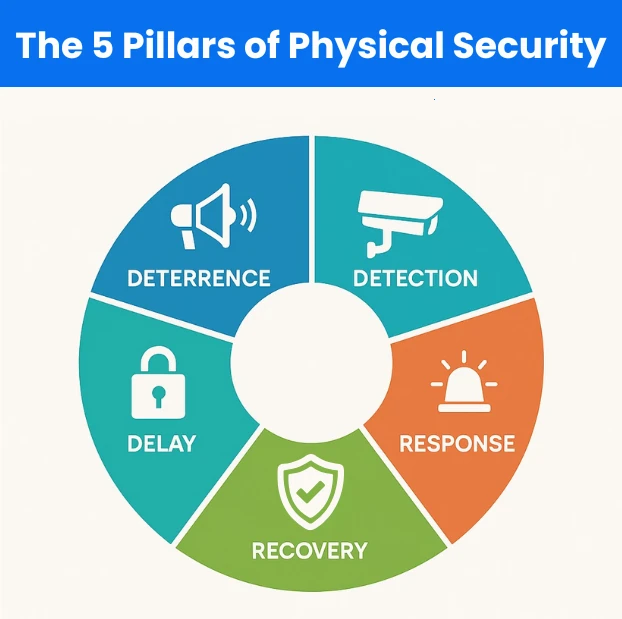
These pieces are the foundation of any good plan. The five pillars (Deterrence, Detection, Delay, Response, and Recovery) help organize these measures into a layered defense that protects people and property from multiple angles.
Now that we've defined physical security, we can dive into the specifics. To start, we’ll outline the five pillars of physical security to gain an understanding of the foundation for a successful security plan. These pillars can be thought of as preventative and mitigation measures. Preventative measures aim to deter or stop a threat from becoming an issue before something happens. Mitigation measures are taken to reduce the damage a threat can cause if an event or breach occurs.
One of the first lines of defense is deterrence, which is a preventative measure that includes signage, clearly visible cameras, and ample lighting. Having an abundance of deterrents will tell potential attackers that your building is not an easy target.
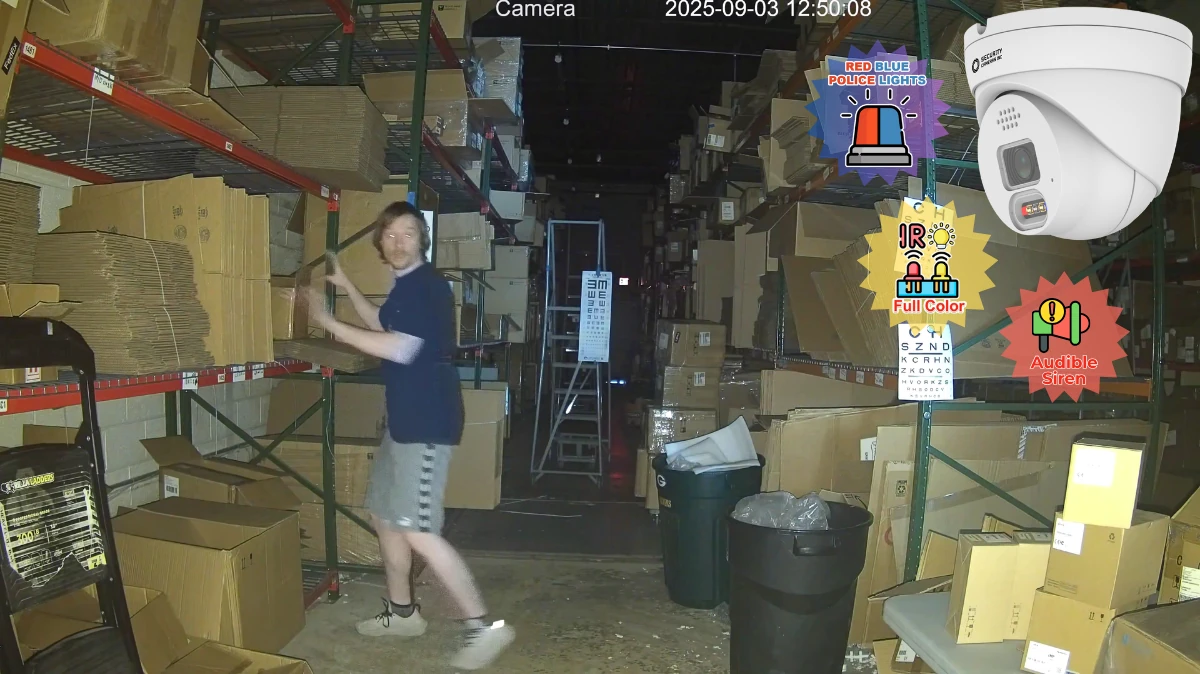
CCTV Camera World’s Active Deterrence cameras are a perfect fit for deterrence strategies. Cameras with deterrent features have built-in LEDs and loudspeakers that are activated manually or automatically via Smart Detection rules to scare off intruders or make announcements to wandering pedestrians. Our customers have had success using these cameras in various locations, including their garages and storefronts.
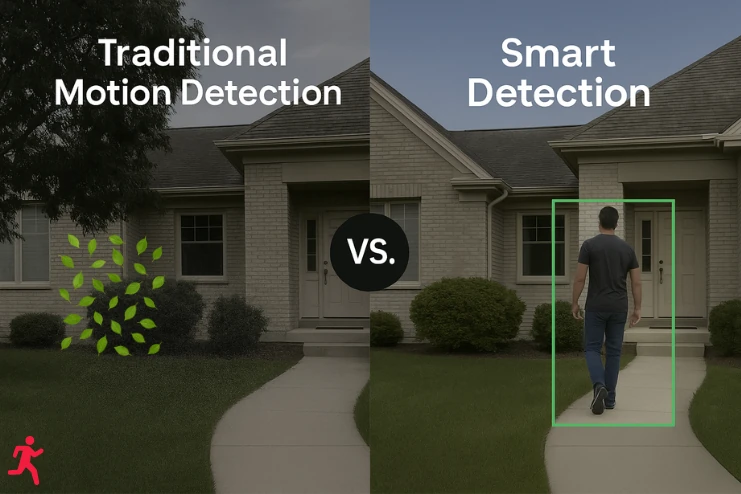
Detection is another layer of protection that’s useful for both prevention and mitigation. Detection is achieved through surveillance cameras, motion detectors, sensors, alarms, and other electronic devices that trigger when areas are breached, windows are broken, or doors are opened.
All cameras from CCTV Camera World include some form of motion detection, and several IP cameras have Smart Detection features. Smart Detection uses AI-powered algorithms that watch the video feed for people or cars to make detection more accurate. Some of these detection methods, such as digital tripwire and intrusion detection, allow users to set customized rules to protect specific areas or objects within the camera’s view. Smart Motion Detection (SMD) is like old-school motion detection, but instead of solely triggering based on changes in pixels, SMD enhances this process by analyzing the video feed for the presence of humans and vehicles.
Delay is in the mitigation category, as any devices or methods that fall under the delay pillar are used to slow the situation down, whether it’s an intruder, attacker, or other threat. Delays include locks, doors, fences, safes, and reinforced or guarded entry points, to name a few. Delay mitigation tools and strategies often also cover the detection pillar through integrated sensors.

Modern delay devices are able to be combined with security camera recorders using a built-in alarm panel to send alerts through the remote viewing apps and PC software. Quick and reliable alerts are part of the next pillar, “response,” and mean you or your security staff will be notified when your delays are approached or breached to make quick decisions and contact authorities if necessary.
The term "response" describes your ability to act swiftly and efficiently after detecting a threat. Whether it’s a break-in, loitering, or some other unauthorized access, having a plan in place ensures threats don’t go unanswered. Response plans include real-time alerts, remote camera access, and alarm-activated lights and sirens.
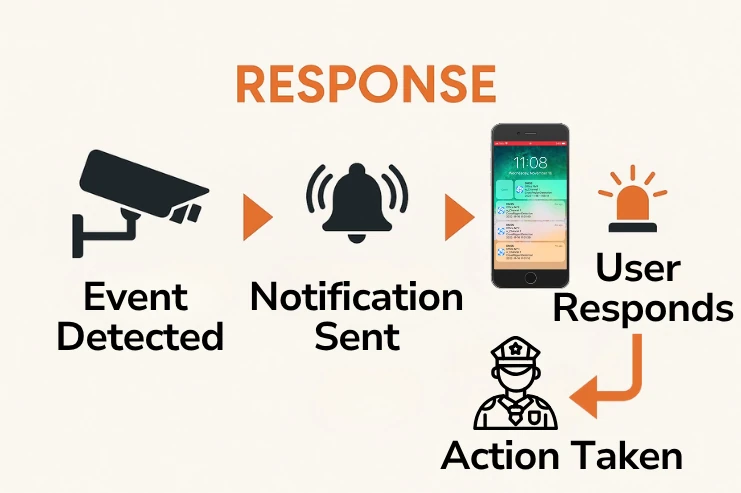
CCTV Camera World offers security camera systems that facilitate rapid responses through push notifications, live viewing, and remote control of deterrent features in cameras. Many of our customers use these tools to monitor and prevent suspicious activity before damage occurs, whether it’s speaking through two-way audio speakers or reaching out to authorities with video evidence in hand.
Recovery focuses on what happens after an incident has occurred and can be thought of as a mitigation strategy. This pillar is about having procedures in place to investigate, document, and bounce back from a security breach, whether it’s theft, vandalism, or trespassing.
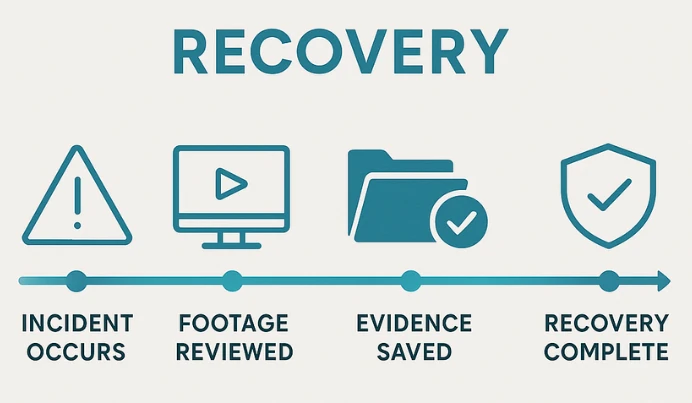
With a reliable NVR or DVR system and proper camera placement, you’ll have clear, timestamped video evidence that can be used to identify suspects, file insurance claims, or support police investigations. Many of our customers have utilized recorded footage to retrieve stolen items and collect evidence for insurance claims. Backing up storage, purchasing large recorder configurations with ample storage for long retention times, and regular maintenance are key to staying prepared.
With the pillars of physical security defined, you can begin your journey to identify your specific security risks and address them with a plan. A useful place to start is to conduct a thorough walkthrough of your property using a pen and some paper or the notes app on your phone.
Before buying equipment or making upgrades, it’s important to understand how people move around your property, where the weak spots are, and which areas would cause the most damage if something went wrong. The following steps will help you evaluate risks in a structured way so you can address the issues that matter most.
First, you’ll want to identify all of the access points, including front doors, side doors, garage bays, emergency exits, and windows.
Another beneficial step you can accomplish while you’re noting access points is to also evaluate your security camera coverage.
If you don’t have security cameras, now may be a good time to survey your property and estimate how many you need. If you already have cameras, it may be time to start thinking about upgrading them to benefit from the latest advancements in video quality and Smart Detection features.
It's important to conduct another walkthrough at night to determine if the darkness increases any vulnerabilities. TheSleepJudge's data collection and analysis showed that, despite a 10% increase in crime during the day, violent crime is more prevalent at night. Parking lots at night are also common targets, and they pose liability issues if the lighting is poor.
Lighting also plays a significant role in surveillance and deterrence. Ensuring that your cameras have clear, well-lit, and unobstructed views at night is crucial for gathering evidence. Well-lit homes, businesses, or individuals are less likely to become targets for criminals.
Checking physical barriers that are already in place or considering adding new barriers is a solid next step. When evaluating the physical barriers, ask yourself, “Would it take more than 30 seconds to break into my most sensitive area?”
Unfortunately, humans are the number one risk when it comes to physical and cybersecurity. Developing and following strict procedures, protocols, and rules will reduce the effect human error has on your security plan. When coming up with your security protocols, ask yourself the following questions:
The second part of the protocol assessment should relate to monitoring and responses. To evaluate your response plans, consider the following questions:
Now that you’ve assessed your property’s security, you’ll want to document your findings and have discussions about plans, upgrades, and protocols.
Having a reliable security camera system is one of the best ways to secure your home or business. Cameras allow you to monitor activity in real time and review footage in the event of an incident. But if you don’t work with surveillance systems regularly, knowing where to place cameras and which types to use can feel overwhelming.
At CCTV Camera World, we’ve helped thousands of customers choose the right cameras the first time. The following tips will help you map your layout, identify critical zones, and select the right equipment to build an effective system.
Whenever you start planning to install or upgrade a security camera system, you will want to start by plotting where cameras should go and how they're aimed to maximize coverage. Making an overview is one of the best ways to decide how many cameras you need and where to point them. We recommend using Google Maps, but if you have blueprints or a property map from your local government, that may work better.

The following lists are useful references for placing cameras on your sitemap. These locations are some of the most critical areas to protect with cameras. Consider the perspective of an intruder; where would you enter?
There are many misconceptions when it comes to the field (or angle) of view that cameras can see. People often assume they can use multiple wide-angle cameras and consider it a successful solution. Unfortunately, due to how optics work, wide-angle fixed-lens cameras are excellent for general detail but are not always the best choice for detail at a distance.
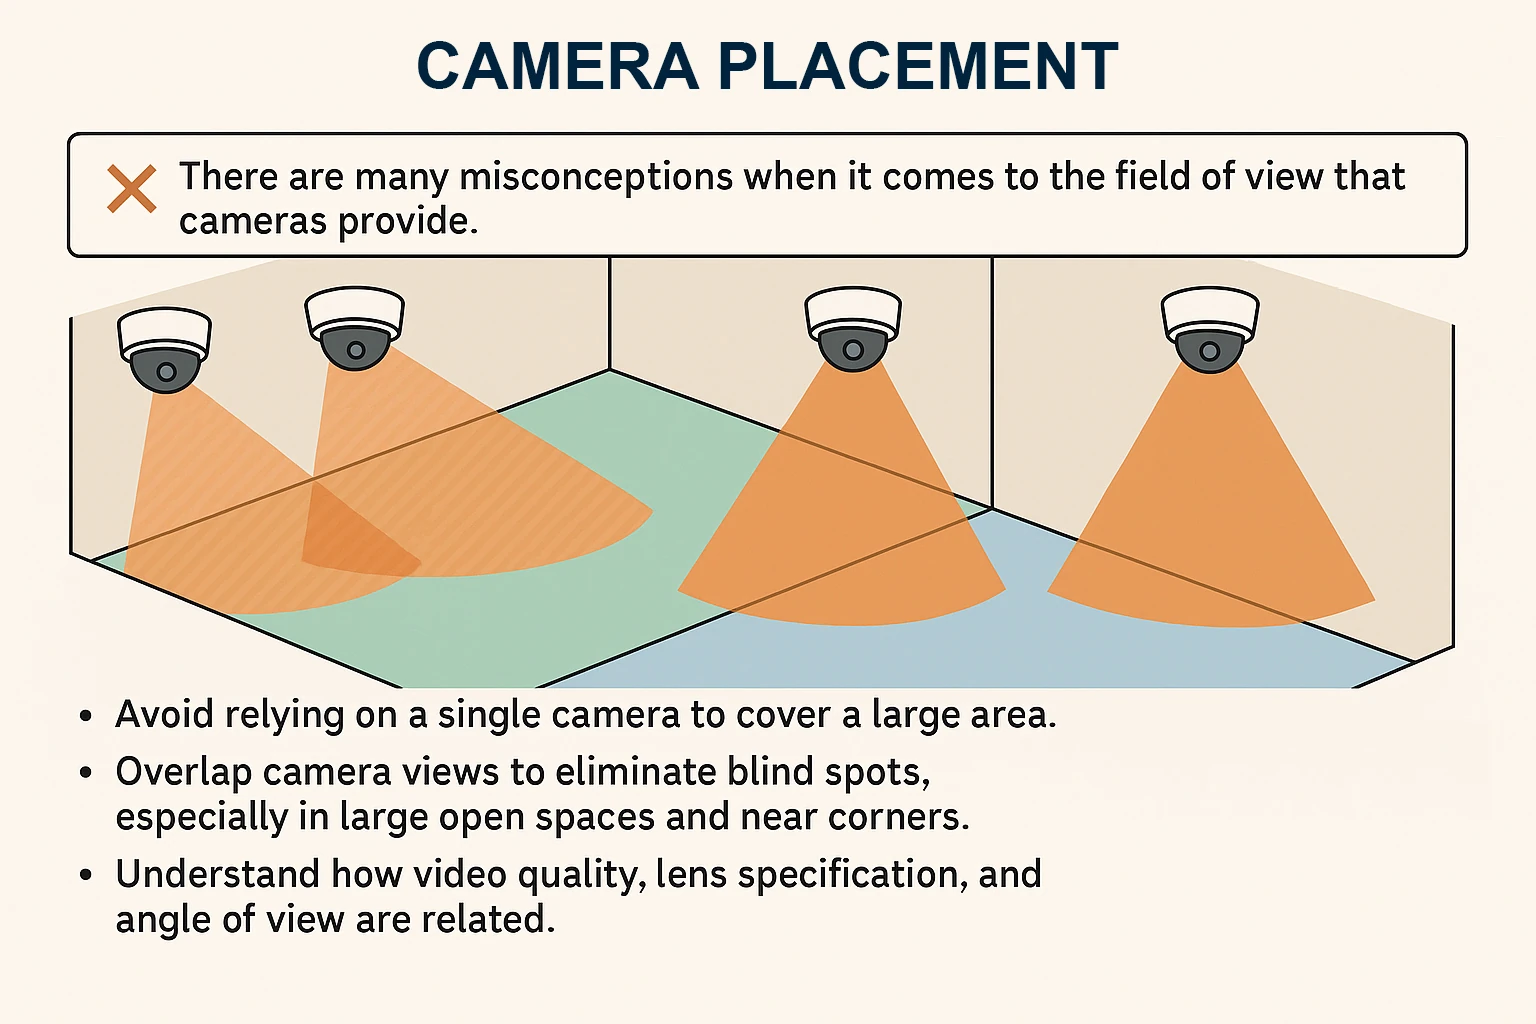
Another common assumption is that all cameras can capture plates, see faces at a reasonable distance, and have “color” night vision. While we wish this assumption were true, it’s simply not. While standard fixed-lens cameras with no extra features excel in general surveillance, they frequently lack the essential features for specific applications. Mixing camera types provides overall coverage and critical detail where needed.
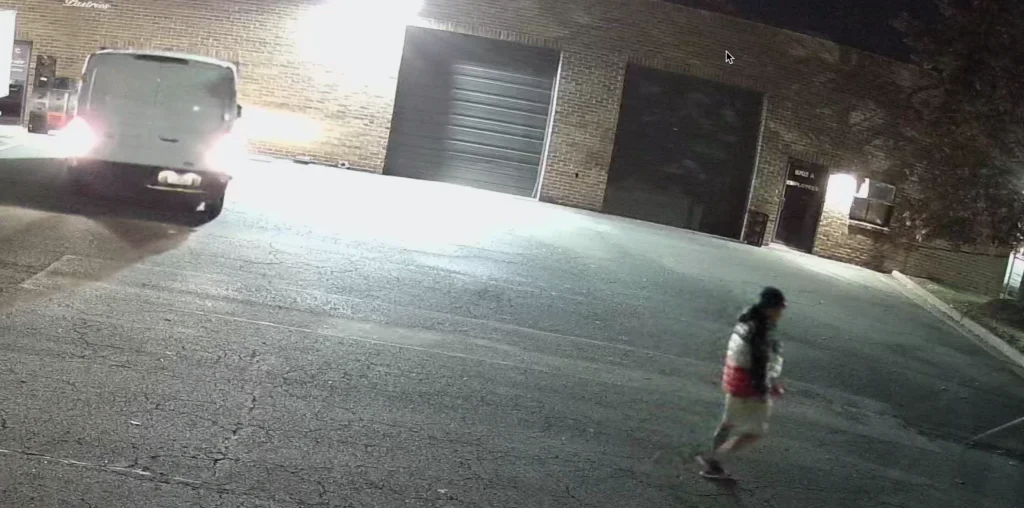
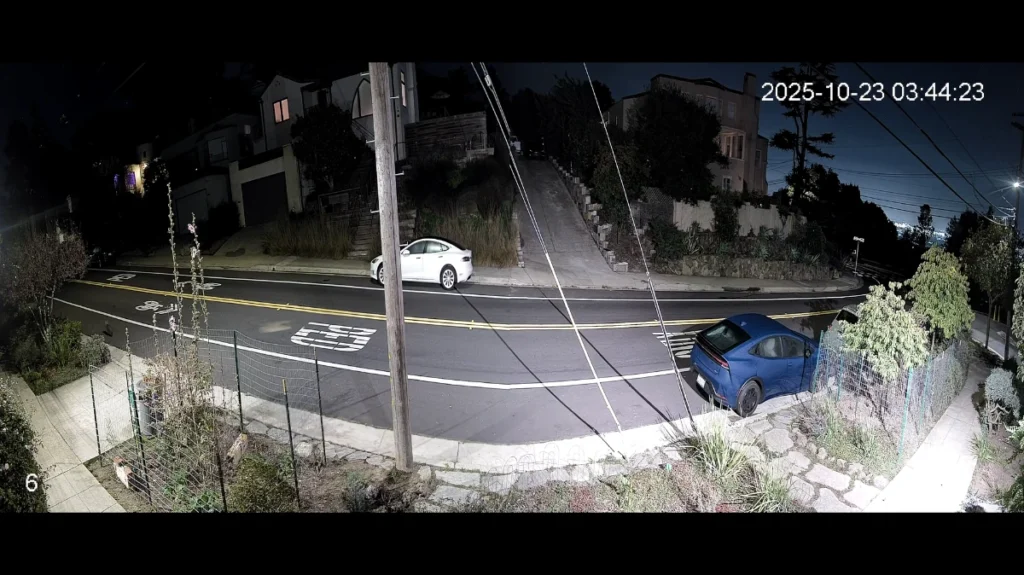
This screenshot is from one of our own 4K cameras. The scene is bright enough to see a person walking and a van pulling in, but notice what’s missing — there’s no usable face detail and the license plate is completely blown out. That isn’t a glitch or a bad camera. It’s just how general-purpose cameras behave at night, especially when headlights or distance get involved.
If you actually need plate numbers after dark or while a vehicle is moving, you have to use a dedicated license plate capture camera. Those cameras are built for the job and only work when they’re installed at the right angle and the right distance. Without that setup, even the best 4K camera
Even the best security camera can’t do its job if it’s blinded by sunlight and reflections or blocked by a tree branch. Poor lighting and unanticipated obstructions are some of the most common reasons footage ends up being unusable. Whether you're dealing with glare, shadows, or overgrown landscaping, be mindful of what your cameras see both during the day and at night. Proper placement isn't just about direction; it's also about height, angle, and location. Mounting too high can make the view useless, and mounting too low makes the camera an accessible target for vandalism or tampering. Getting this right ensures your cameras capture useful, detailed footage without leaving gaps. A PoE camera system is only useful if it records when something happens and you can access the footage. Planning out your recording schedules, storage setup, and alert preferences is critical for convenience and effectiveness. Every property is different, but most security problems fall into a few predictable patterns. Here are common scenarios that highlight how small vulnerabilities turn into real incidents: These situations aren’t rare, they’re the exact issues people call us about daily. Each example reinforces the same point: clear lines of sight, proper lighting, and cameras placed with intention prevent most issues before they escalate. Physical security is not about gadgets or fear; it is about prevention and preparation. Whether you manage a warehouse, run a small business, or just want your family to feel safe at home, building a layered defense keeps problems small and predictable. Walk your property, search for weak spots, and fix what you can see right away. A sturdy lock, bright lights, and a clear camera view will do more for safety than anything else you can buy. The goal is not perfection; instead, it is awareness. Every small change helps. Locking a gate, trimming a bush, or adjusting a camera might not seem like much, but together they make a big difference. When something goes wrong, having clear video and a plan means you can handle it without panic. We at CCTV Camera World think that physical security should be practical, affordable, and based on everyday needs. Our systems include reliable hardware, smart detection, and easy setup, so you don't have to worry about maintenance. You can focus on your business or keep your house safe. If you want to secure your property, check out our professional surveillance systems. You'll discover how easy it is to get professional-grade protection without paying monthly fees. Physical security refers to the measures used to protect people, property, and assets from physical threats like theft, vandalism, or unauthorized access. It combines barriers, surveillance systems, and security protocols to prevent and respond to incidents effectively. Learn more in our overview of physical security. The five pillars of physical security are Deterrence, Detection, Delay, Response, and Recovery. Together, they create a layered approach that helps prevent, identify, and respond to threats effectively. Learn more in our Five Pillars of Physical Security section. Deterrence discourages crime before it happens using visible cameras, lighting, and warning signage. Detection identifies threats in progress using motion sensors, alarms, and AI-powered Smart Detection cameras. Smart Detection cameras use AI algorithms to recognize people and vehicles, reducing false alerts from movement like leaves or shadows. This allows you to respond only to real threats, not environmental motion. Delay barriers include fences, reinforced doors, locks, and safes. Basically anything that slows down an intruder’s progress can be considered a barrier. These systems can also integrate with your security camera recorder to send alerts when breached. Response is how quickly you act after a threat is detected. It includes push notifications, live video access, sirens, and two-way audio to warn intruders or alert authorities. See our section on Response planning for setup ideas. Recovery focuses on reviewing footage, documenting incidents, and restoring normal operations after a breach. Maintaining reliable NVR/DVR backups ensures you can retrieve evidence or support insurance claims. Start by walking through your property and noting all access points, lighting conditions, and existing camera coverage. Identify weak spots like poorly lit areas or unmonitored entrances, then use our Security Walkthrough section to document improvements. Position cameras at 8-10 feet high, overlapping their fields of view to avoid blind spots. Avoid direct sunlight and reflections, and keep trees or signs from blocking your line of sight. Explore our Camera Placement section for diagrams and examples. Use a mix of cameras for comprehensive coverage: More details are in our Camera Type Comparison section. For homes, aim to keep footage for 7-14 days. For businesses, retain at least 30 days for incident review and compliance purposes. Use our NVR and DVR Storage Calculator to estimate required hard-drive capacity. Lighting impacts both deterrence and image clarity. Ensure entrances and parking areas are well-lit, avoid glare into the lens, and use cameras with built-in white-light LEDs where ambient light is low. Re-evaluate your physical security setup every 6-12 months or after any security incident. Update camera placement, lighting, and staff or family procedures as needed. Physical breaches can expose sensitive data, and cyberattacks can disable physical devices. Combining both defenses ensures complete protection of your property and digital assets. Install visible deterrence cameras, improve outdoor lighting, and create a response plan with real-time alerts to your smartphone. Even a few simple steps can reduce risk dramatically.
Consider upgrading to specialized models:
Don’t Forget About Lighting and Obstructions
Keep these tips in mind:
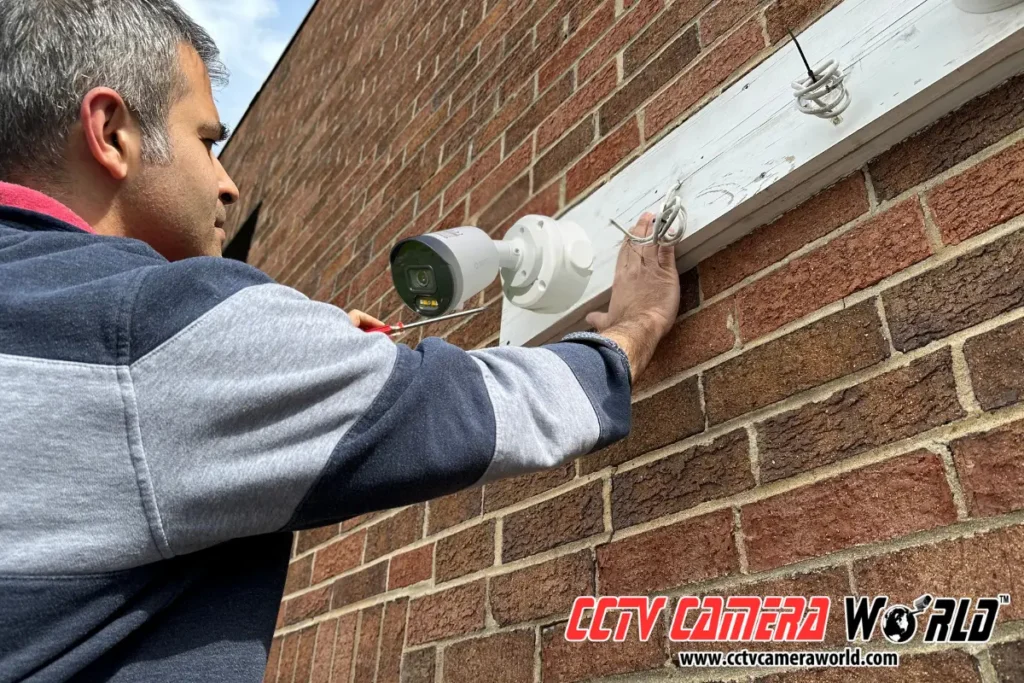
Mounting Tips for Best Performance
Mounting best practices:
Plan for Recording, Alerts & Review
Keep the following in mind:
Real-World Examples of Physical Security Challenges
Final thoughts on physical security
Frequently Asked Questions: Physical Security for Homes and Businesses
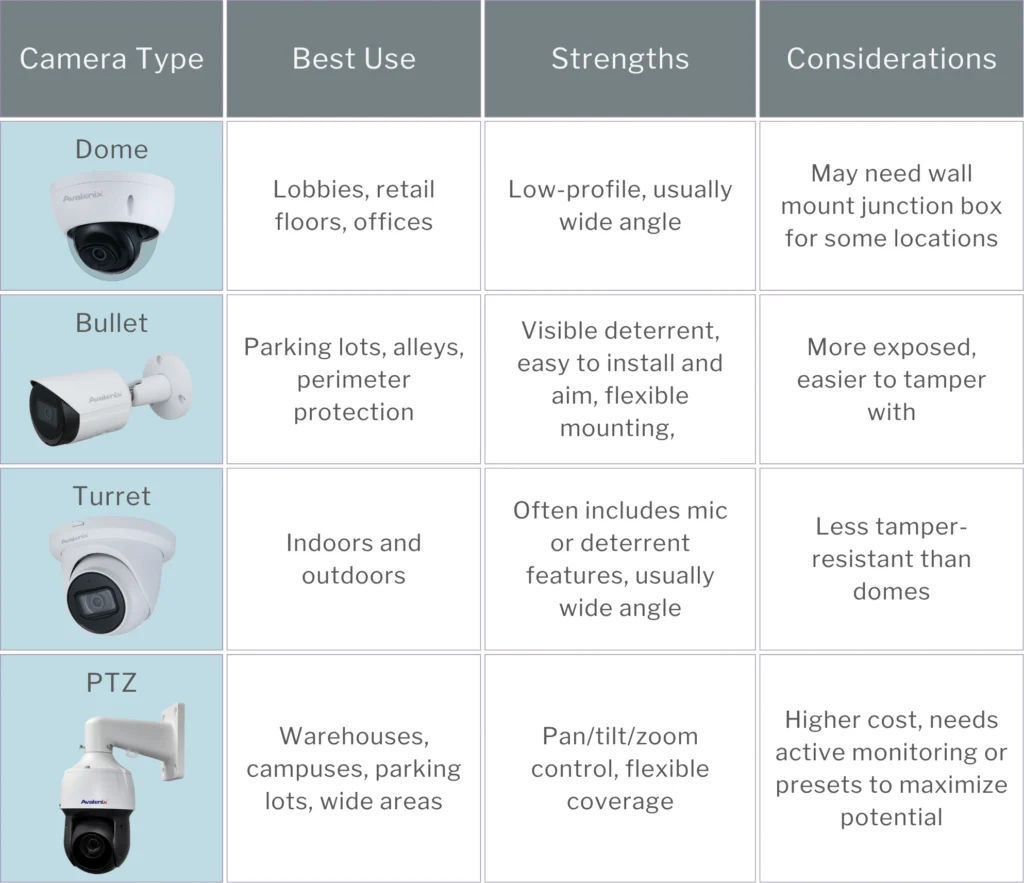
What is physical security? What are the five pillars of physical security? What’s the difference between deterrence and detection? How do smart security cameras improve detection? What are examples of delay barriers in physical security? What does "response" mean in a security plan? What is recovery in physical security? How can I assess my property’s physical security? How should I position security cameras for best coverage? What type of security cameras should I use?
How long should I store security footage? How does lighting affect camera performance? How often should I review or update my security plan? What are the most common physical security mistakes?
How do physical and cybersecurity overlap? What’s the easiest way to improve physical security right now?
Although we specialize in surveillance here at CCTV Camera World, it’s just one aspect of home or business security. Physical security plays a vital role in developing a comprehensive strategy to safeguard your family, guests, customers, and employees. In today’s world of rapidly advancing technology, physical threats aren’t just about break-ins or vandalism; they can […]
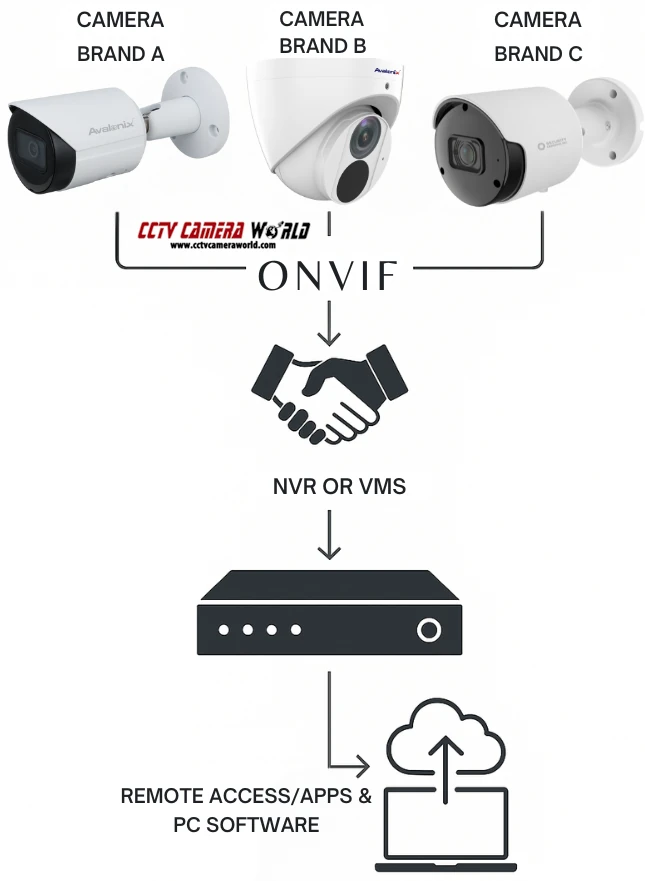
If you’re planning to install or own a surveillance system using IP security cameras, ONVIF is one of those terms you’ll probably come across. Short for the Open Network Video Interface Forum, which maintains the standard, ONVIF is a loosely followed industry protocol standard that allows cameras, recorders, and software from different camera and network video recorder brands to talk to one another.
While ONVIF isn’t relevant or required for every installation, it becomes useful if you want to mix brands, keep existing equipment, or use third-party video management software like Blue Iris or Synology Surveillance Station for recording. Understanding what ONVIF is and what it isn’t can help you avoid compatibility pitfalls and give you more flexibility when choosing cameras.
In this guide, we’ll break down what ONVIF does, what its profiles mean, how to verify if a camera has good implementation, and which ONVIF features are most useful. Whether you're a system integrator, business owner, or DIY home user, this article will help you make smarter decisions when planning or expanding your surveillance setup.
Start with these tested picks. They add quickly over ONVIF and cover the most common use cases.
| Camera | Type | Resolution | Ideal For | |
 |
Turret | 2MP | High-quality cameras at a Budget | Shop |
 |
Bullet | 4MP | General Exterior or Interior with Mic | Shop |
 |
Turret | 4MP | Interior/exterior turret for offices, retail, restaurants | Shop |
 |
Dome | 8MP (4K) | 4K Dome with wide angle lens | Shop |
 |
Bullet | 8MP (4K) | Easy to install 4K Bullet, Storefronts and lots; 164 ft IR | Shop |
 |
Motorized Zoom Bullet | 4MP | Warehouses, Manufacturing, Building Exteriors requiring an adjustable zoom lens | Shop |
 |
PTZ | 4MP (2K) | Perimeters; 25X zoom, auto track, 330ft night vision | Shop |


CCTV Camera World sells camera brands that all support at least ONVIF Profile S for live video streaming. Most models also support advanced profiles like G, T, or M for features such as automatic discovery, motion alerts, metadata streaming, and PTZ control.
ONVIF stands for Open Network Video Interface Forum, an industry group founded in 2008 by Axis Communications, Bosch, and Sony. Its goal was to create a standardized protocol that allows IP-based security devices, like cameras, recorders, and video management systems (VMS), to work together regardless of brand.
Before ONVIF, surveillance systems were mostly proprietary. Unless specifically designed as a collaboration, a camera from one manufacturer would not work with an NVR or software from another. This lack of compatibility often meant customers were usually locked into purchasing from a single vendor, even if customer support was lacking or nonexistent.
The ONVIF protocol was developed to help alleviate that problem. By providing a common communication protocol, ONVIF allows different brands of cameras and video systems to share live video streams at a minimum. It also facilitates the ability to send motion events, trigger recording, and enable PTZ (pan-tilt-zoom) control across devices from different manufacturers.
The standard is generally widely adopted, although it is not always implemented well. Some manufacturers only support a limited version of ONVIF or advertise compatibility without enabling key features. Others claim their devices are ONVIF compliant, but it either doesn’t work or requires additional steps that most users won’t understand. That’s why it’s important to understand what ONVIF actually covers, how its “profiles” work, and how to verify whether a camera is truly compatible for the functions you need.
At its core, ONVIF is a communication protocol that allows IP PoE security cameras from different manufacturers to discover each other and communicate over a local or wide-area network. It’s technically not an app or piece of software but a set of protocol specifications that manufacturers develop within their devices to add flexibility.
In a typical setup, you would connect an ONVIF-compatible IP camera to a third-party NVR or VMS. Thanks to ONVIF, the NVR or recording software may be able to automatically detect the camera on the network, pull the video feed, and transmit data for PTZ control, audio, event detection, time settings, recording schedules, and more. However, this interaction relies heavily on the profile, or features, that the camera and NVR support.
Here’s a basic overview of what ONVIF may be able to facilitate:
Note: It’s important to understand that ONVIF support does not guarantee all features will work perfectly across all combinations of devices. Compatibility depends on how well ONVIF support was implemented, which ONVIF profile the device supports, and whether the system it’s being added to can handle that profile correctly. We’ll cover what a profile means in the next section.
ONVIF uses so-called profiles to organize features into standardized groups. Each profile represents a specific set of functions that an IP camera or video device should support, such as video streaming, recording control, or analytics metadata transfer.
If two devices, like a camera and an NVR, support the same ONVIF profile, they will likely be able to work using those shared features. For example, if both support Profile S, the NVR should be able to receive a live video stream and control basic PTZ functions. Even if they share a common profile, some functions may be missing or fail altogether, which is contrary to the popular misconception that ONVIF guarantees support.
Here are the most relevant ONVIF profiles you’re likely to encounter:
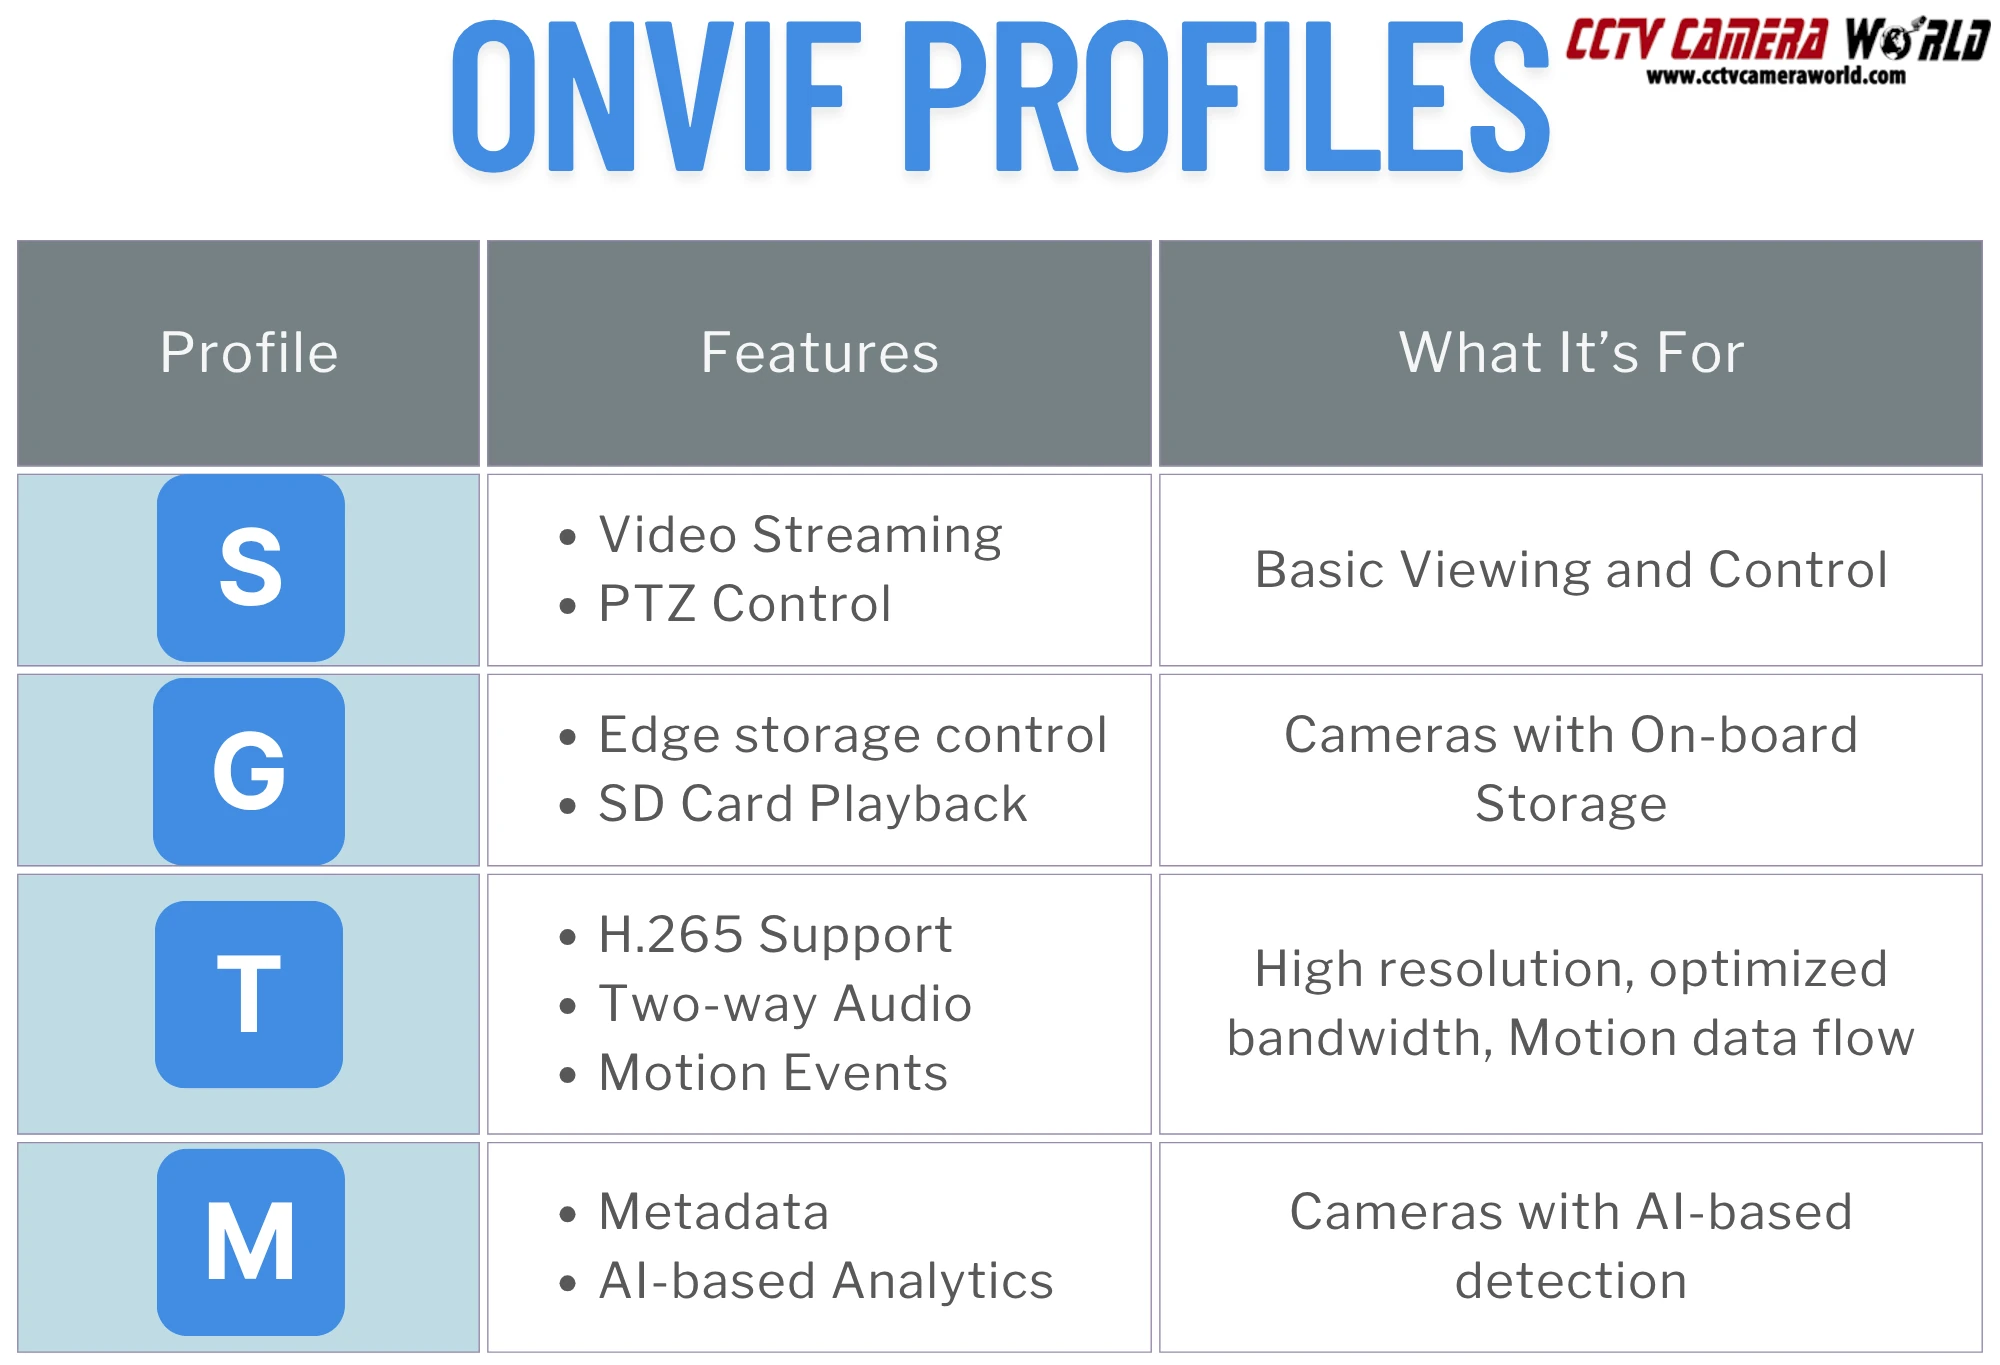
ONVIF profiles like A, C, and D apply to access control systems and other types of security hardware outside the scope of security camera systems. These include things like door strikes and locks, credential management at entry points, and event relays for alarm panels. Unless you're developing a comprehensive and integrated physical security strategy, you likely won’t need these.
While ONVIF support may not be relevant or necessary for every surveillance setup, it provides benefits for those seeking flexibility, upgrade paths, or the ability to combine equipment from various manufacturers. For businesses, installers, and even DIY users, ONVIF simplifies system design and allows for more control over what devices you use and how they’re integrated.
One of ONVIF's most significant benefits is its ability to integrate devices from various vendors without worrying about proprietary hardware. If your NVR supports ONVIF Profile S, like all of those available from CCTV Camera World, you can usually add a compatible camera from another brand even if the two manufacturers don’t officially support each other. For specifics on compatibility with our NVRs, please contact our support department for more information.
This is especially helpful when:
Many medium- and large-sized businesses use software-based video management systems (VMS) like Blue Iris, Synology Surveillance Station, or Milestone XProtect instead of, or along with, a traditional NVR. These platforms rely heavily on ONVIF to auto-discover cameras, stream video, and control PTZ or event-based recording. Having cameras with excellent ONVIF support gives you the option to use software with niche features, clean user interfaces, or unique analytics.
Using compliant equipment gives you more flexibility in the future due to the industry's general support for ONVIF. You’re not tied to one brand, vendor, or manufacturer, which means you can:
In many cases, ONVIF makes adding cameras easier by enabling automatic device discovery. Rather than manually inputting IP addresses, RTSP URLs, or network ports, your NVR or camera software can scan for compatible cameras and pull critical network information directly. This is especially useful on larger installs or for IT professionals managing dozens of devices. Typically, the only thing these discovery protocols can’t handle are login credentials, unless they’re unsecured defaults such as 123456 or admin.
For users working with AI-enabled cameras, newer ONVIF profiles like T and M can allow smart features like object detection or motion triggers to be passed from the camera to the NVR or software platform. This can enable more reliable notifications, efficient recording schedules, and filtered event playback.
The difference between ONVIF and RTSP often causes confusion when researching IP cameras. While they’re related, each serves a distinct purpose, and they are not interchangeable.
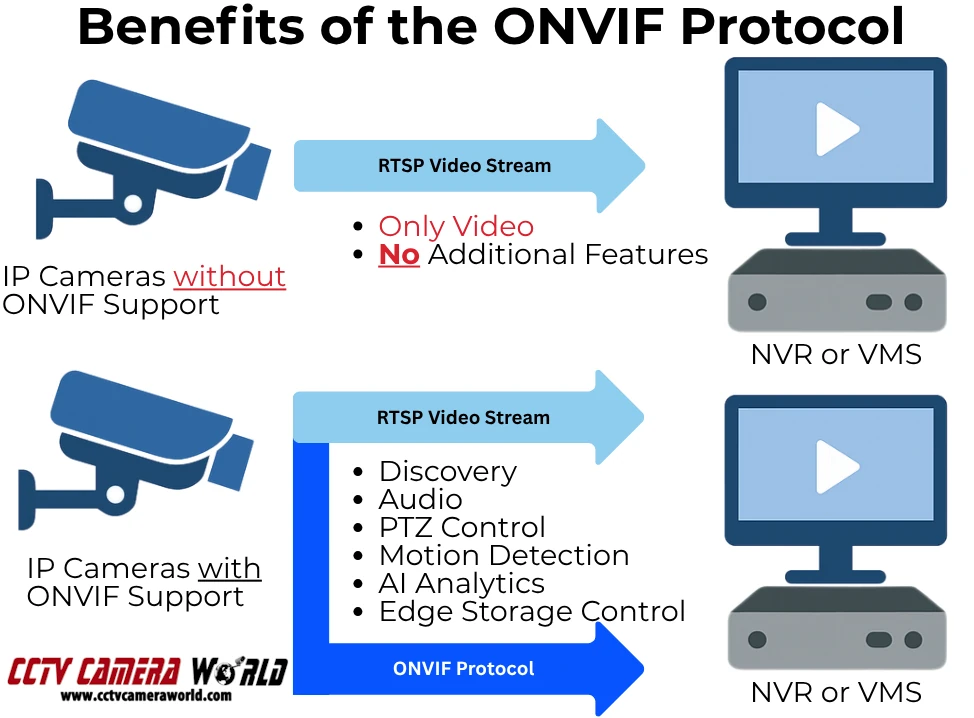
RTSP stands for Real-Time Streaming Protocol. It’s a low-level protocol used by most IP cameras to deliver audio and video to recorders and software. If you’ve ever added a camera to VLC, Blue Iris, or a basic NVR using a URL like rtsp://, you were using RTSP.
RTSP is solely about streaming video and audio, if supported, and nothing else. It doesn’t support features like PTZ control, motion alerts, camera discovery, or recording commands. It’s just a transport channel for media.
Most ONVIF-compatible cameras use RTSP for video, while ONVIF adds a higher-level control layer that includes the data specified by the relevant profile. Without ONVIF, the camera is manually added to your recorder or software using the RTSP URL, and you will not have access to advanced features.
ONVIF wraps RTSP (and other protocols) into a broader, more adaptable container. It allows your recorder or software to:
While RTSP handles the video, ONVIF manages the communication to ensure compatibility even when a system does not use equipment from the same manufacturer. Cameras that only support RTSP may work for video, but you’ll likely need to manually configure stream URLs, and you won’t have access to motion alerts or remote control features.
You may occasionally come across references to PSIA or brand-specific SDKs. PSIA (Physical Security Interoperability Alliance) was an early alternative to ONVIF but never gained the same traction. Today, ONVIF is by far the most widely adopted interoperability standard in the video surveillance industry.
Just because a product listing says “ONVIF-compatible” doesn’t mean the camera fully supports the features you expect. Some cameras only provide basic streaming, while others implement ONVIF so poorly that they are unusable with third-party software or NVRs. Additionally, some claim to support ONVIF when in reality they only offer a standard RTSP video stream.
If ONVIF holds significant importance for your setup, it's essential to confirm the genuine support of a camera instead of trusting marketing claims or vague spec sheets. Here’s how to verify compatibility before you buy or when troubleshooting.
Start with the product specs or datasheet. Look for a dedicated section that lists ONVIF support and, ideally, which profiles are included (e.g., Profile S, G, T, or M). If a listing only says “ONVIF supported” without any profile info, be cautious as it may be incomplete, outdated, or simply refer to basic RTSP streaming.
At CCTV Camera World, we note ONVIF compatibility in our spec tables, and most, if not all, of our models are ONVIF compatible. If you’re unsure whether a model supports a specific feature, contact our support team with the model number for confirmation.
ONVIF Device Manager (ODM) is a free tool for Windows that scans your local network and identifies ONVIF devices. It shows
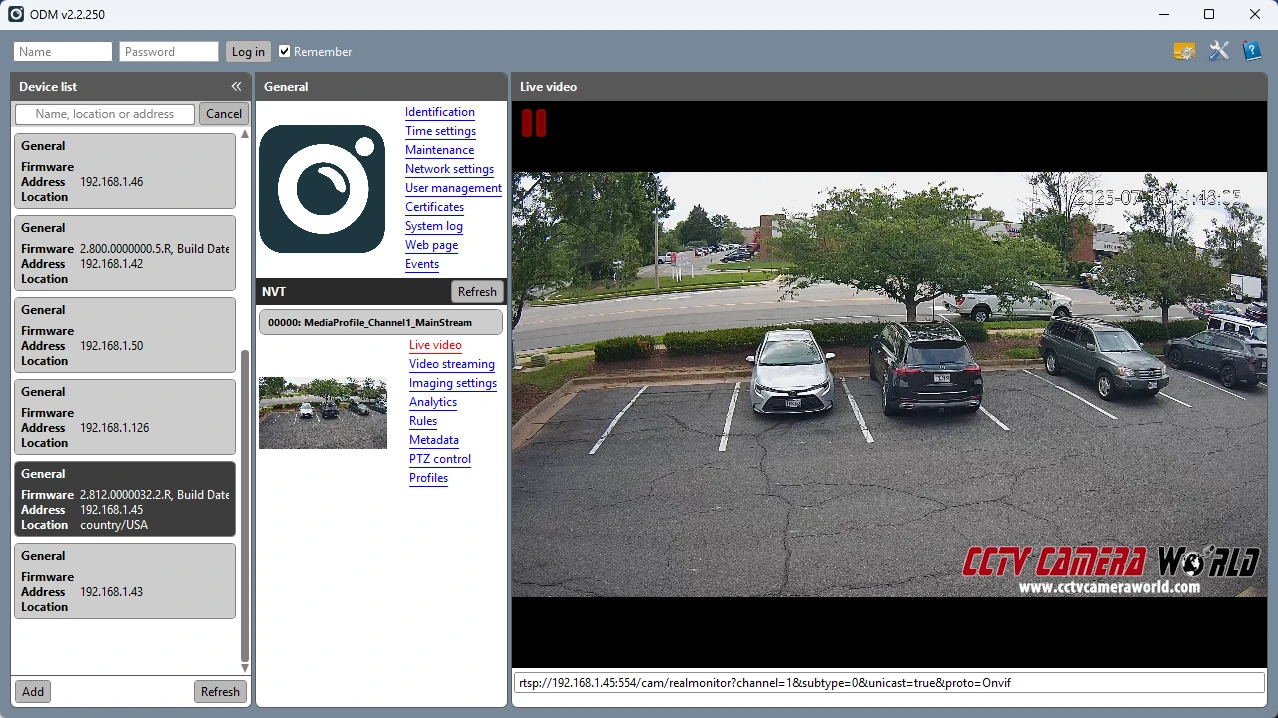
ODM is one of the best tools for confirming true ONVIF support. It’s also a fantastic way to confirm if your cameras are secure or not. For example, during our testing of some cameras with ODM, we discovered that their ONVIF protocol was unsecured, which allowed nearly full access to camera settings, similar to being in the web interface. In the wrong hands, this vulnerability means a hacker could use ODM to make significant changes to the camera’s settings or possibly even brick it by exploiting flaws in its ONVIF code.
If you already have the camera, the best way to verify ONVIF functionality is through hands-on testing with your software or recorder, as well as ODM mentioned above. Add it to your VMS software or an 64 channel NVR that supports ONVIF and whether
Testing on a standalone NVR, or VLC alongside ODM is the best way to spot compatibility gaps.
If you’re planning to build a PoE camera system or add cameras to an existing one, choosing ones that have adequate ONVIF support is necessary. Whether you're looking for basic video streaming or data to flow over, such as advanced AI features like object detection, it's important to match your camera's ONVIF profile to the capabilities of your NVR or VMS.
Below, we’ve outlined a few categories of ONVIF-compatible cameras that fit different needs, from general-purpose PoE models to advanced PTZ and AI-enabled units. All of the cameras in this section support at least ONVIF Profile S, and many support advanced profiles like G, T, or M.
These cameras are perfect for basic needs, although most of them also support some form of analytics such as tripwire, intrusion box, and smart motion detection. The cameras are compatible for live viewing, feature motion detection, and can work with most ONVIF-compatible devices.

Useful when you need directional control and optical zoom through your NVR or VMS.
High-resolution surveillance that work with most ONVIF NVRs and software

Even when a camera claims to support ONVIF, getting everything to work smoothly can still be a challenge. That’s because not all devices implement ONVIF well, and compatibility often depends on which profile is supported.
If you’re running into issues, here are some of the most common ONVIF-related problems we’ve seen, along with practical steps to resolve them.
ONVIF is a communication protocol that allows IP cameras and recording hardware or software from different brands to communicate with each other. It enables cross-compatibility for features like live video, PTZ control, motion alerts, and camera discovery, depending on which ONVIF profile is supported by the camera and recording platform.
If you’re planning to install or own a surveillance system using IP security cameras, ONVIF is one of those terms you’ll probably come across. Short for the Open Network Video Interface Forum, which maintains the standard, ONVIF is a loosely followed industry protocol standard that allows cameras, recorders, and software from different camera and network […]
Whether you’re a homeowner who wants to check cameras from a laptop or a business owner looking to give staff secure access, this step-by-step article will help you get the most out of your AvaEye system.
AvaEye cloud security cameras provide free cloud remote viewing with local recording, so there are no monthly storage fees. They use a secure P2P link, so you do not need DDNS or port forwarding.
Here is the difference in plain English:

No Monthly Fee Cloud Cameras
Explore a wide collection of professional cameras and surveillance systems that are cloud accessible without subscription costs.
Shop Cloud Security CamerasWhen most people think of remote access for a security camera system, they imagine downloading an app or tinkering with complicated router settings like port forwarding. AvaEye takes a different approach. With built-in cloud support, every AvaEye camera and recorder can be accessed directly from a web browser. This gives you added flexibility, security, and peace of mind whether you’re checking in from the office, from a laptop at home, or even from a borrowed computer while traveling.
Here are the key advantages we’ve confirmed while testing AvaEye’s browser-based cloud access:
Before logging into your AvaEye system remotely with a browser, verify that the following requirements are met. These ensure your cloud connection is reliable and secure.
NDAA Compliant PoE Cameras with Cloud Access
Explore a wide collection of PoE cameras and systems that are cloud accessible without monthly charges.
Browse
You can view IP cameras and NVRs from CCTV Camera World in a standard web browser with no monthly subscription. This guide shows how to enable the P2P cloud setting, add your device to the cloud server, and open the web interface in Firefox on Windows without needing any plugins. We even show how to […]
When you buy a surveillance camera system, one of the many things to think about is whether you want wireless or wired security cameras. Fortunately, there is a solution that asks, "Why not both?" CCTV Camera World sells recorders and cameras that can work together to create a hybrid security camera system that can accommodate both wired and wireless security cameras
A hybrid security system is the best of both worlds. It combines the ease of use of wireless cameras with the powerful features and high reliability of wired cameras. We sell professional products, so our WiFi security cameras require power adapters. We do not believe that battery or solar-powered home consumer grade equipment satisfies the high-quality standards required for a professional surveillance system. If you're interested in a pre-configured hybrid system, you can get a customized quote by contacting us using our contact form.

Wireless Security Camera Systems
Professional WiFi and Wired Surveillance Systems
Shop hybrid camera systems capable of connecting to both WiFi and Wired PoE cameras.
A hybrid wireless and wired camera system lets you use both wireless WiFi and wired IP cameras on the same recorder. Wireless cameras are convenient because they can be set up anywhere within the range of a WiFi network or WiFi NVR and only need a 12V DC power adaptor to power the cameras. Most of the time, wired PoE cameras have more features such as AI enabled Smart Detection, and have a longer lifespan.
A security camera system for a home, small office, or small business can be fully customized with a hybrid camera set-up.
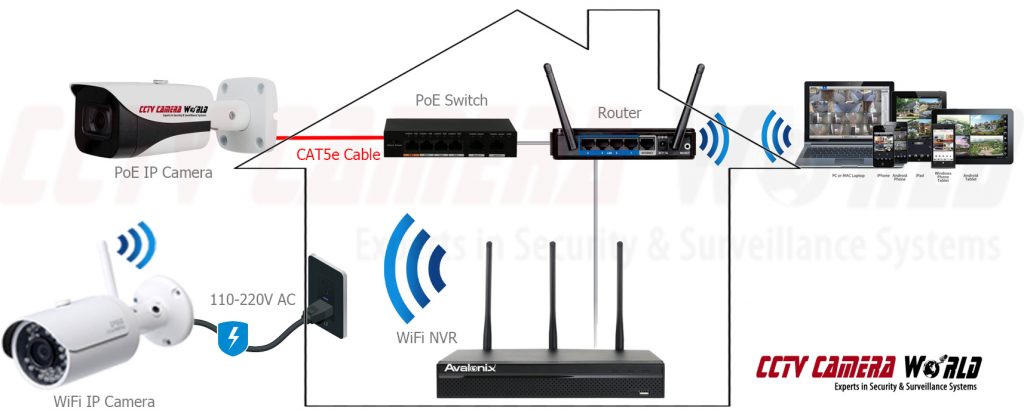
There are two different kinds of hybrid surveillance systems available, which we will refer to as type A and type B. A wireless NVR is used in type A. A wired NVR is used in type B. For either system, wireless cameras need 12V DC power, and wired cameras connect using CAT5e or CAT6 Ethernet cables.
A WiFi NVR serves as the system's heart and brain in the type A system. After turning on, wireless cameras connect by automatically pairing with the built-in WiFi network of the NVR. WiFi cameras must be within 250ft (unobstructed line of sight) of the NVR and have few obstructions in order to function properly. Wired cameras in the type A system are connected to a Power over Ethernet (PoE) switch using an Ethernet network cable. The PoE switch can be directly connected to the WiFi NVR or networked with a router.
We encourage using a router to set up a local network. The WiFi NVR connects to the wired cameras over the local network. It's worth noting that the router doesn't require an internet connection, and the system can function as a stand-alone surveillance system. An internet connection is only necessary if remote viewing is required.
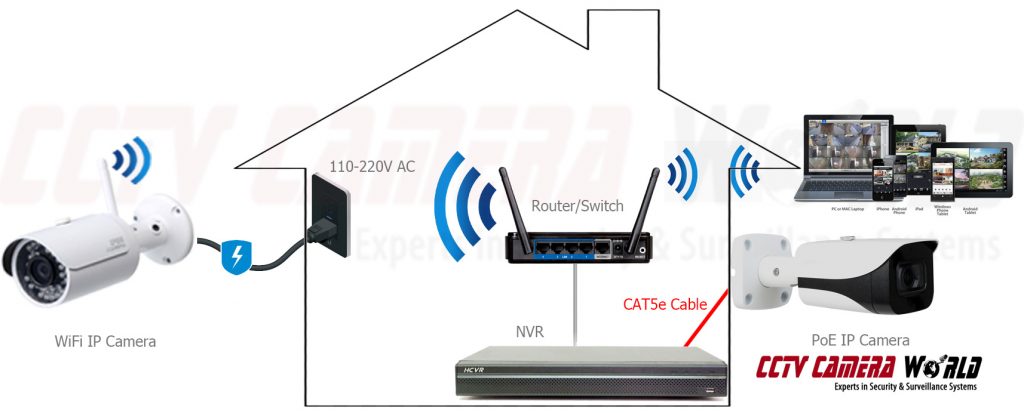
In a type B system, a wired PoE NVR is used along with a router that provides the WiFi network for the wireless cameras to connect to. With the built-in PoE switch on the NVR, the wired IP cameras can connect directly to the NVR over Ethernet cables. The NVR will automatically connect to any wired cameras that are connected to its PoE switch.
The wireless cameras are paired manually to the router's WiFi network. In order to pair the WiFi camera to the router’s wireless network, you must first turn it on and connect it via Ethernet to the router. After the wireless camera is paired with the router, the camera can be mounted anywhere within range of the WiFi network.
The Type B system can also be used with or without an internet connection. An internet connection is only necessary for the remote viewing app to work.
As mentioned above, at the heart of each system is a different type of NVR recorder, which ultimately dictates how each type is set up. In the sections that follow, we'll show you how to install each type, step-by-step, with the help of an instructional video.
Important: Before installing either system, we recommend bench testing the equipment to get a better understanding of how the system is installed and works together.


Note: If you purchase a pre-configured system with a router, we will do this for you.
Or the cameras can be manually added using the “Manual Add” button using the IP address you configured. The camera-adding process is shown in our "Adding IP Cameras" guide.
The decision to purchase a hybrid surveillance camera system is influenced by how you want it to perform, what features you want, and how you want to set it up. We suggest that you buy as many wired cameras as you can and only use wireless cameras where you can't run cables.
Wireless cameras are limited in the number of cameras that may be used (up to 8), do not have AI smart detection, and can only deliver video in 4MP 2K resolution. Wired cameras do not have throughput limitations associated with wireless technology, offer powerful smart security camera functions, and you can use ultra high definition cameras such as 12MP or 4K security cameras. Our professional 4K security cameras provide facial detail up to 80ft, which is beyond the 40ft limitation of 4MP or 2K wifi security cameras.
This is not to argue that wireless cameras should never be purchased. They are beneficial in situations where running cable is difficult but there is power already present. They're also useful in situations where you don't need Smart Detection or facial detail beyond 40ft.
When you buy a surveillance camera system, one of the many things to think about is whether you want wireless or wired security cameras. Fortunately, there is a solution that asks, “Why not both?” CCTV Camera World sells recorders and cameras that can work together to create a hybrid security camera system that can accommodate […]
When 4K video technology arrived on the market, it revolutionized the way people viewed videos, movies, and images. The security and surveillance industries continue to greatly benefit from the invention of affordable 4K PoE cameras, which offer both high-quality video and simple installation. Currently, professional 4K cameras record the highest quality video in mass production to date, aiding in criminal prosecution and helping homeowners and business owners protect their property. Look no further than security cameras from CCTV Camera World if you're looking for top-of-the-line PoE security cameras to give you peace of mind.

Professional systems with NVR and PoE cameras
Shop our plug-and-play IP camera systems with 4K clarity, PoE simplicity, and free remote viewing from anywhere.
Shop PoE SystemsYou might wonder why, no matter where you look on the web, people are talking about 4K. Perhaps you're worried about the cost, uncertain about how to view the high resolution, or uncertain about where to start your search for the right type of camera for your needs. By the end of this article, you'll know what makes a surveillance cam 4K, how to choose the best 8MP (4K) security camera for your system at the right price, and the answers to all your UltraHD CCTV camera questions.
Whether you're outfitting a full surveillance system or just need standalone 4K IP cameras, we have options to fit every setup and budget.

Professional network-based surveillance cameras
Shop professional-grade PoE security cameras with crystal-clear 4K video, color night vision, and easy PoE or WiFi setup—built for reliable home and business security.
Shop PoE camerasThe term "4K" refers to the number of pixels in an image or video, also known as resolution. Resolution is how big an image is in layman terms; the larger the image, the more detail you can see as you zoom in. The higher the resolution, the larger the size of each video frame in security cameras. When it comes to security, having high-resolution cameras is important to capture as much detail as possible. CCTV Camera World's professional 4K PoE cameras, equipped with powerful image sensors and signal processors, offer some of the clearest and most detailed video quality available in the security camera market.
Whether you're a novice buying a new security camera system for your home or business or you're upgrading your older system from years ago, we've got you covered with everything you need to know about 4K surveillance cameras!
Online 4K PoE camera shoppers may be curious about other resolutions and how they compare. Let’s dive into the differences between the most common resolutions you’ll find when shopping for surveillance cameras.
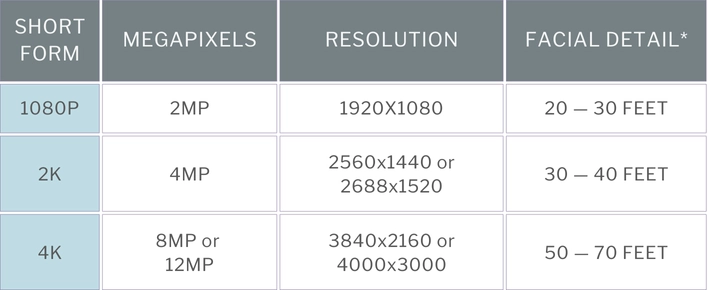
*Keep in mind that the facial detail is based on the professional high-resolution PoE cameras we sell, which are fixed-lens cameras with an 85-degree view and daytime capture. During the night, you can expect each resolution to see faces roughly 15 to 25 feet less than during the day.
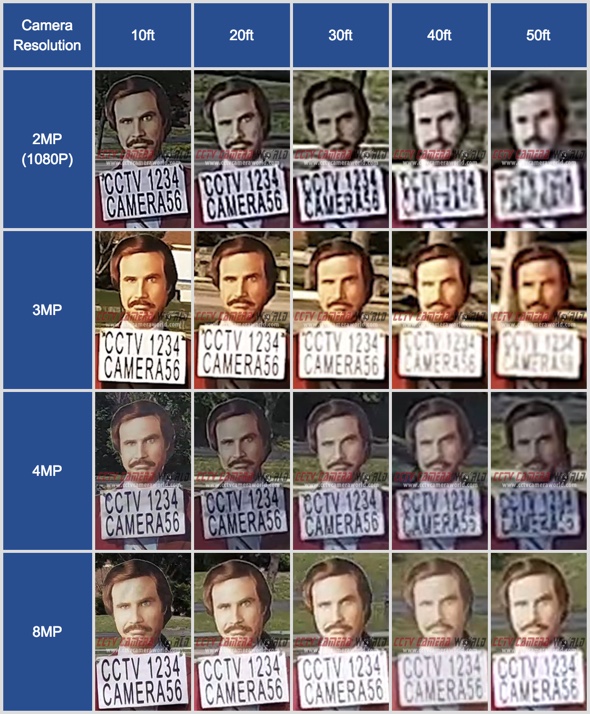
We could go on and on about video resolution, but it’s easier to understand the differences by showing examples. We made the following infographic showcasing real-life images of video captured directly from security cameras. You'll notice how 4K looks crystal clear at most distances and provides enough detail to recognize a face and read text at 50 feet!
While we're focusing on the benefits of 4K security cameras, they might not always fit your budget or be absolutely necessary. If you don't want to see faces from a distance or are just watching wildlife, a budget-friendly 2K security camera or even a 5MP 3K camera might do the trick.
That's the fantastic thing about buying a customizable PoE camera system from CCTV Camera World—you can mix and match camera resolutions to utilize 4K where it's important to capture as much detail as possible and save money by using lower resolutions in areas where you don't need the best detail.
By now, you understand the differences between 4K and lower-resolution cameras. You concluded that 4K cameras are the best option for your home or business, and you've also done some research to find the lowest price. You've found some "deals" on Amazon or at your local Best Buy, and you're thinking of walking out with a system that says it's 4K but only costs a couple hundred bucks. Don’t do it! As the saying goes, “You get what you pay for.”
Although a system or cameras may claim they are 4K and spit out a video size of 3840x2160 pixels, there are huge differences in picture quality because of a particularly important part of a camera: the image sensor! The electrical components in cameras, known as image sensors, transform the light we see into a digital image for viewing or recording.
Many of the low-quality cameras and systems available from big box stores and giant e-commerce retailers have lower resolution image sensors (typically 4 or 5 MP) and use "interpolation" technology to upscale the lower resolution and produce "4K" video in order to keep costs low. This process results in low-cost camera recordings that are not truly 4K in quality.
While the difference in quality may not be apparent to the naked eye when comparing videos side-by-side, the difference is extremely obvious when digitally zoomed in. With true and good-quality 4K image sensors, there isn't as much pixelation when you enlarge the video using digital zoom. On a cheap camera that uses upscaled 4K, you’ll immediately notice that the video is blocky and pixelated, and it may even have glitches as the upscaling technology tries to fill in the blanks.
Image sensors aren’t the only thing that low-cost systems compromise on. We dive deeper into the image sensor problem and other significant differences in quality in our aptly named “Why Not to Buy Cheap Security Cameras” article.
At CCTV Camera World, we take quality very seriously. We test our security cameras for their image and build quality before they even make it onto the website.
The image below compares a video from one of our 4K bullet cameras, located on the left, with a low-cost camera from a system available on Amazon and Big Box Stores. They are both 4K resolution cameras, but as you can see, finer detail is missing from the cheaper camera on the right. In real-world use, having a cheap 4K camera is not going to provide the video you'll need when something happens.
After confirming that 4K is the best security camera resolution, we can discuss in more detail why 4K video is so excellent for surveillance, as well as the other benefits that our UltraHD security cameras provide.
As we pointed out earlier, 4K PoE cameras come equipped with 8MP image sensors, allowing them to capture ultra-high-resolution video. Think about it like painting: it's a lot harder to add details on a small 4x6 postcard than on a big 30x40 canvas. Higher resolution means a bigger 'canvas' for catching all those details. With a 4K surveillance camera, you're getting a huge 'canvas' of 3840x2160 pixels, compared to 1920x1080 or 2560x1440.
4K video's high detail density results in noticeably better image clarity, especially when using the digital zoom feature present in our 4K security camera systems. Digital zoom allows you to choose a segment of the video and enlarge it using software.
When compared to lower resolutions, digital zoom is quite different. With lower resolutions, using digital zoom results in pixelated and blurry images. The reason is that stretching the image simply doesn't retain enough detail or have enough pixels to maintain image clarity. The beauty of 4K cameras is that they retain finer detail even when digitally zoomed in, making them a superior choice for surveillance needs.
It might seem obvious by now, but 4K security cams also really shine at night compared to lower-res ones (pun intended). In low light, every pixel counts. When night falls, 4K cameras really step up their game, capturing clear video. Lower-res cameras often produce grainy, noisy video at night that makes it more difficult to see the details that matter.
Besides high resolution, many 4K cameras come with advanced nightcapture technology. They use low-lux Starlight imaging sensors to work better in low light. These low-light sensors mean 4K cameras can still record in color mode with ambient lighting. Take advantage of the improved contrast and nighttime clarity to ensure you don't miss out on any vital details.
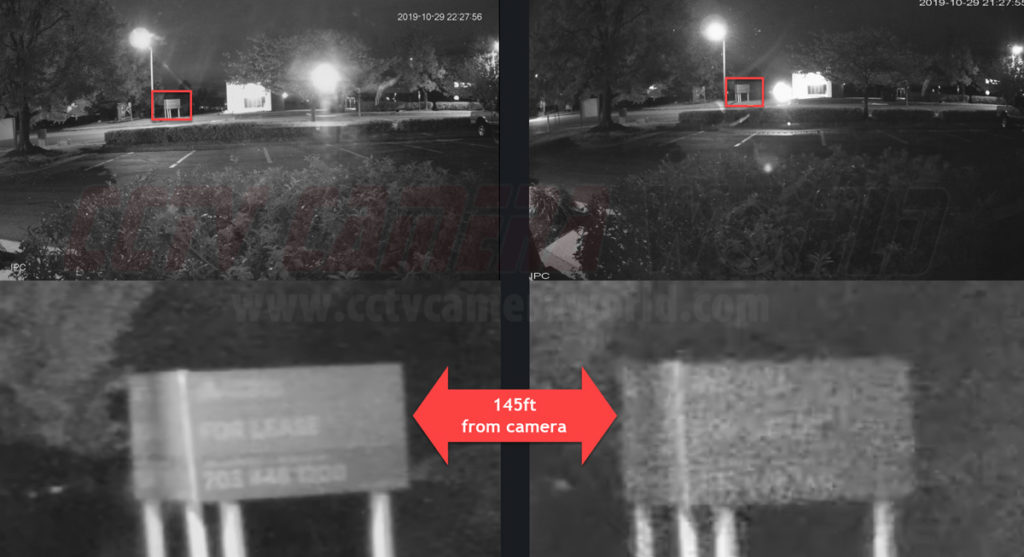
Capturing facial details accurately is key when you have security cameras. Sure, it's useful for seeing who's at the door, but it can also be crucial in legal situations. This is where 4K cameras really come into play, with enough detail to capture unique features and facial expressions from a greater distance than lower resolutions. The level of detail can make all the difference when trying to identify someone for prosecution.
Faces are key evidence to show someone was there during a crime, fight, or accident. If things go to court, 4K camera footage can be the clear evidence you need. Unlike lower-res cameras that give you pixelated or blurry images, 4K cameras produce sharp, detailed images that hold up in court.
Additionally, with their high-res video, 4K cameras are ideal for today’s advanced facial recognition technology. AI technology helps identify threats and control access to secure areas. If capturing facial details with clarity is a priority, 4K cameras are your best bet.
In addition to their high resolution, our 4K cameras feature AI detection that integrates seamlessly with our Network Video Recorders (NVRs). This isn't ordinary motion detection; it's a whole lot smarter and more accurate, resulting in fewer false alerts to your phone and less bogus recording compared to traditional video-based motion detection that can only look for changes in pixels.
Professional network-based surveillance cameras
Shop professional-grade IP cameras with crystal-clear 4K video, color night vision, and easy PoE or WiFi setup—built for reliable home and business security.
Shop IP CamerasSmart Motion Detection (SMD) is similar to traditional video-based motion detection but with a huge improvement. SMD only alerts you when it detects a human or vehicle, rather than triggering when any pixels change in the video. With SMD, you won't have as many false motion detection alerts and recordings caused by things like shadows, insects, or swaying branches as you would with old-school pixel-based motion detection.
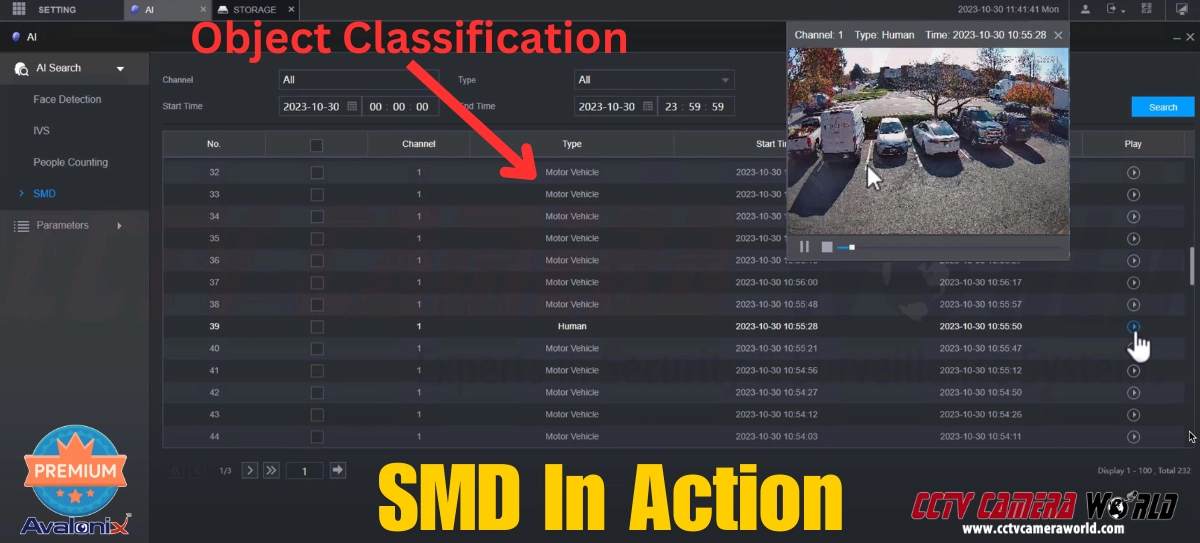
The most popular AI technologies our 4K cameras have include Intrusion Detection and Digital Tripwire features. These features provide the ability to draw digital boundaries on your camera's view, depending on the specific camera model. This type of AI is akin to having a virtual guard monitor your custom boundaries and trigger recording as soon as an object violates your rules.
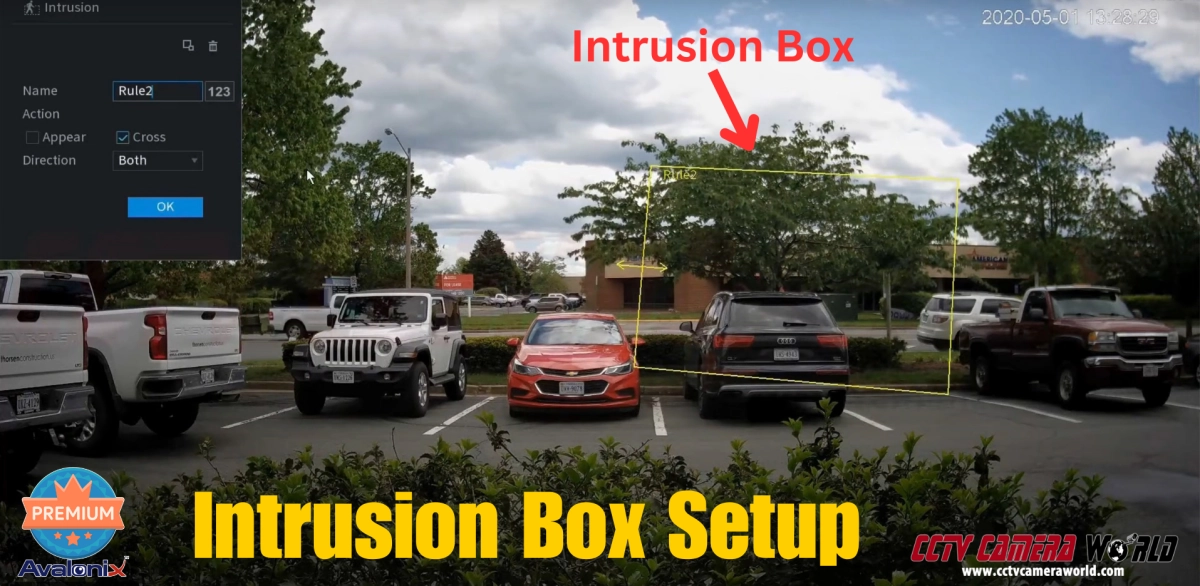
Some models also offer face detection as a feature. Cameras with this feature can detect when a face is present in the video. Face detection is particularly useful for verifying visitors and identifying employees or banned patrons.
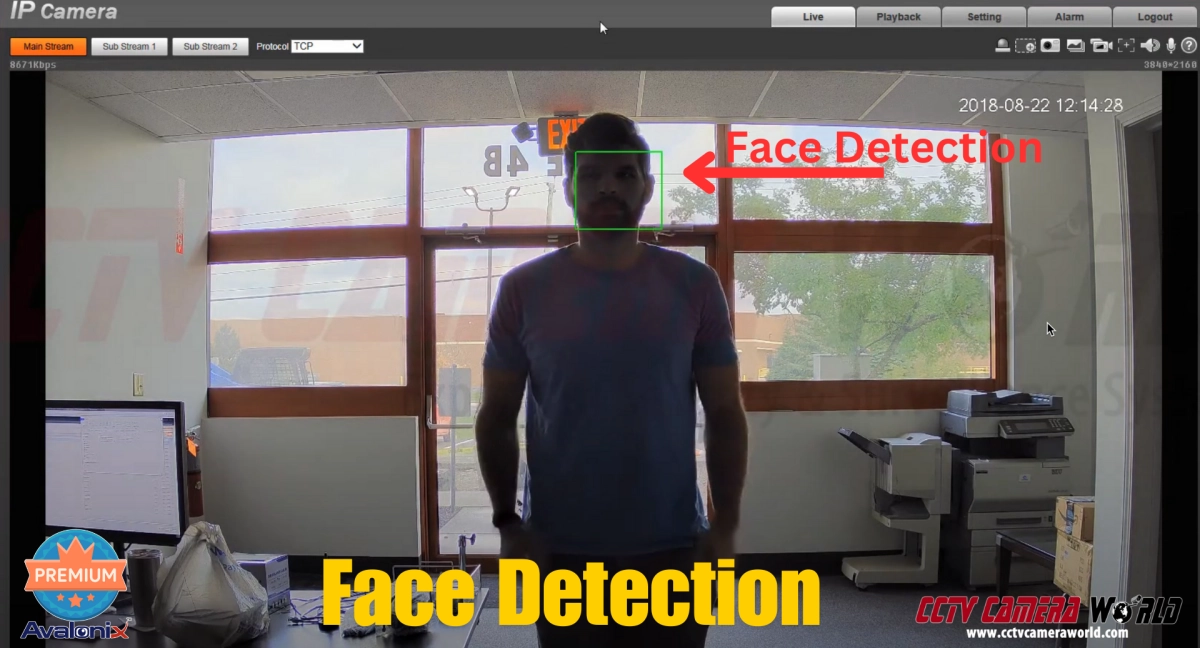
Some 4K models also come with several analytic features that are useful in commercial settings. These features include:
Choosing the ideal 4K camera for your system can be challenging due to the abundance of available options. Don’t worry; we’ll lay out some popular options to simplify your search and guide you on your journey. Each recommendation will include the key reasons why the camera is a beneficial choice, ensuring that you choose a 4K surveillance camera that's the perfect fit for your needs.
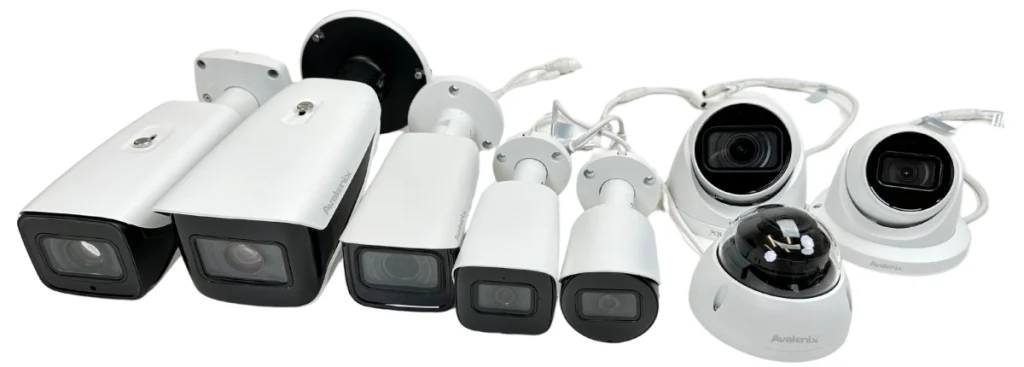
Maintaining a budget is one of the biggest concerns for most people when shopping for security cameras. Customers are looking for a high-quality system, but they don't want it to break the bank. Fortunately, we offer several options for professional-quality 4K network cameras at competitive prices.
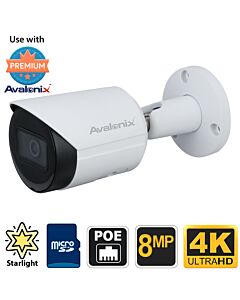
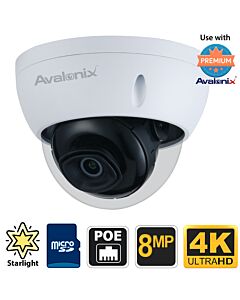
For areas where you require the absolute best video quality, consider our Ultimate series of 4K PoE cameras. These cameras stand a cut above the rest due to their top-notch image sensors, which offer more clarity and less noise than the budget options above. These Ultimate series cameras not only have the best image clarity but also feature Smart Motion Detection, visual tripwire, and intrusion detection, features found in most of our smart IP cameras.

If you need to monitor a distant area of your property, such as the end of your driveway, our motorized zoom 4K camera is an excellent choice. This isn’t an average camera; it's got a motorized zoom lens that lets you tweak the field of view. That means you can go from a wide-angle shot to a focused close-up while at home or away using the remote viewing phone app.
Looking for a comprehensive solution when it comes to security cameras? Let us introduce you to our 4K PTZ (Pan-Tilt-Zoom) camera. This camera serves as a versatile tool in the field of surveillance, like a Swiss army knife. The camera offers more than just a static view. With controllable PTZ motors, you can pan from side to side, tilt up and down, and zoom in and out, all while enjoying the crisp detail that 4K resolution delivers. Want to watch that cheeky squirrel steal bird seed from your feeder? Perhaps you would like to inspect the car that has been parked in front of your business for a little too long. With our 4K PTZ camera, you're in full control and can cover every inch of your property without getting out of bed or leaving your office chair.
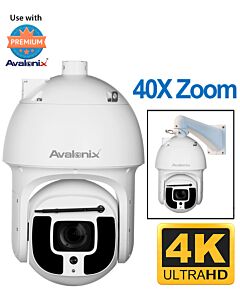
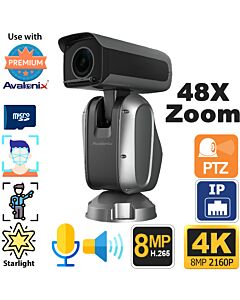
As the saying goes, “A picture is worth a thousand words.” We’re not here to simply talk about the power of 4K security cameras; we’ll also show you video taken from one. We recorded this video directly from our Ultimate Series 4K camera; it’s not just a stock video sample. You'll see how clearly it captures our cutout's face and the characters on the paper hanging around his neck. In this example, you can see what our 4K cameras provide. That's the kind of top-notch surveillance quality you can expect with our 4K cameras at your home or business. If the video looks blurry, it’s because YouTube is showing a lower resolution. Make sure you set the YouTube video quality to the highest possible using the gear icon at the bottom right of the video.
The answer really depends on your budget and the objectives you've set for your surveillance system. Indeed, 4K cameras are the pinnacle of new security camera systems. However, if you choose to purchase a system from CCTV Camera World, you'll have the flexibility to mix and match resolutions to design the ideal system that not only fits your budget but also meets your specific needs. In areas where you need more than 40 feet of facial detail, opt for 4K cameras. For areas where detailed surveillance isn't as necessary, 2MP or 4MP cameras should be more than enough.
Most of the 4K security cameras on our website have a weather-resistant rating for outdoor use. You can use them both indoors and almost anywhere outdoors. An overhang is typically necessary for IP65 or IP66 cameras to prevent water pooling and weather-resistant gasket wear. However, not all cameras are designed for outdoor use, so be sure to review their specifications. Every camera on our website includes a feature list and specification sheet that provide information about its weather resistance rating.
As outlined in the Security Camera Resolution Comparison section of this article, 4K IP or PoE cameras record video that is roughly four times the size of 1080p cameras. The specifics can vary with each camera, but generally a 4K camera can identify faces from 50 to 70 feet away, while 1080p cameras can only see faces from 20 to 30 feet away. The section also includes a table illustrating the difference in resolution: 4K video has a resolution of 3840 x 2160, while 1080p video offers a resolution of 1920 x 1080.
Installing 4K IP security cameras is not too difficult. They don't require any special wiring, though the process will vary depending on the type of camera you purchase. You can run standard CAT5e or CAT6 Ethernet cables up to 328 feet, and they are compatible with 4K IP cameras. Equipment is also available to extend beyond 328 feet. While bullet cameras are usually easier to install than dome cameras, neither type is exceptionally difficult to install.
It’s difficult to give specific recommendations for the amount of storage space needed to record and store 4K video. A number of factors influence how much storage you may need, including, but not limited to:
Our Security NVR and DVR Hard Drive Calculator is an excellent tool to estimate the size of the internal drive you'll need. Simply input the number of cameras, their resolution, and the number of days you want to record continuously. The calculator will then display the "Total HDD Required."
You can round this number up or down to the nearest terabyte (TB) to determine what drive to purchase. If you plan to record only when motion or AI detection triggers, your required hard drive should be approximately 30–50% of the calculated size. For example, if the calculator recommends a 2TB drive for continuous recording from 4 cameras for 7 days, but your intention is to record only during motion detection for up to 7 days, a 1TB internal drive should suffice.
When 4K video technology arrived on the market, it revolutionized the way people viewed videos, movies, and images. The security and surveillance industries continue to greatly benefit from the invention of affordable 4K PoE cameras, which offer both high-quality video and simple installation. Currently, professional 4K cameras record the highest quality video in mass production […]
If you’ve been shopping for a PTZ (Pan-Tilt-Zoom) camera, you’ve probably noticed that the market is crowded with options. From cheap imports on Amazon to professional-grade systems, the range in price and quality can be confusing. The question most buyers ask themselves is: what’s worth my money? That’s where Avalonix Premium Series PTZ cameras come in. In this guide and video, we’ll explore why investing in an Avalonix PTZ makes sense for anyone who values clear video, reliable performance, and long-term durability.
Explore our full PTZ category here:

Pan-Tilt-Zoom Security Cameras
Cameras with Unparalleled Control
PTZ cameras are the swiss army knife of security and provide unmatched flexibility in warehouses. Pair them with fixed lens cameras for a comprehensive system.
BrowseFeatured Cameras in this Video:
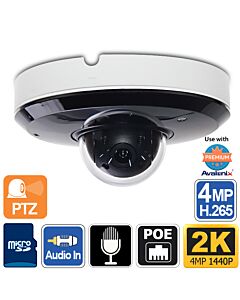
Words can describe, but video shows. Watch the unedited live demo below to see how our PTZ cameras perform in real-world conditions — daytime clarity, nighttime accuracy, optical zoom, and smart analytics that go beyond what cheaper cameras can do.

Most PTZ buyers are looking for three things: reliability, image quality, and versatility. Think of it like buying a car: you don’t want one that looks flashy on the lot but breaks down after six months. You want something that can handle daily use, whether you’re commuting to work or taking a road trip. In the same way, a PTZ camera needs to withstand weather, provide smooth zoom, and keep delivering crisp footage year after year.
Avalonix PTZ cameras are engineered with reliability in mind. Unlike budget cameras that often wear out when motors are overused, these cameras are designed for years of smooth pan, tilt, and zoom movement. Outdoor models are IP-rated for weather resistance, meaning they stand up to rain, dust, and freezing temperatures. In other words, they’re built for the real world, not just a spec sheet.
The video demo shows how Avalonix PTZs handle zoom. Optical zoom is like moving closer with a professional camera lens — detail stays crisp. Digital zoom is like enlarging a photo on your phone: useful, but limited by the original image quality. Avalonix models pair generous optical zoom ranges (up to 40x on some models) with digital zoom to give you flexibility both live and during playback. That means you can zoom in to read license plates or facial details without the pixelation that plagues low-end PTZs.
Motion blur is one of the biggest complaints we hear from customers who tried bargain PTZ cameras. Cars look smeared, faces become unrecognizable, and fast-moving objects vanish into streaks. Avalonix PTZ cameras, on the other hand, record at a full 30 frames per second, even at higher resolutions like 2K and 4K. The difference is like watching sports on a cheap TV versus a high-end one — one leaves you guessing, the other keeps up with every detail.
Daytime performance is impressive, but night video separates professionals from pretenders. Many cameras look sharp at noon but fail completely under streetlights. Avalonix PTZs use advanced sensors that minimize motion blur even when vehicles are moving at 40 mph at night. With the right ambient lighting, these cameras retain color detail far better than typical consumer models. It’s the difference between identifying a suspicious truck in your lot versus just knowing something drove by.
Motion blur is a physics and settings problem, not a mystery. Four variables drive it in security video: available illumination, the camera’s image sensor and processing, the frame rate you record at, and whether you are using an analog DVR system or a modern IP camera + NVR system.
Low light forces longer exposure times, which smear moving subjects. At night, if the scene is dim and you force a camera to stay in color, the shutter may hover around 1/15–1/30 second to keep the image bright. A vehicle going 40 mph travels ~58.7 ft/sec; at 1/30 sec exposure that’s almost 2 ft of motion during a single frame, which shows up as blur on plates and fine detail. Give the camera more light and it can expose faster, which reduces the smear.
Better sensors gather more light per frame and reduce noise more cleanly, which lets the camera hold shorter exposures without turning the image into mush. That is one of the core differences you see in our Avalonix PTZ line compared to budget gear. A stronger sensor pipeline means more detail at the same frame rate, especially in marginal lighting.
Higher frame rates give you more “slices” of the action and reduce the distance a subject moves between frames. Our IP cameras provide a high-FPS digital video stream to the NVR, and you can record at a true 30 fps for smoother, cleaner motion capture. By contrast, analog DVR systems often throttle at higher resolutions; 4K analog commonly tops out around ~7 fps and 5MP analog around ~12 fps, which increases perceived blur and makes fast subjects jumpier in playback.
Analog at 4K/5MP sacrifices frame rate to push pixels through legacy transport, so you trade motion clarity for resolution. An IP camera streams compressed digital video directly to the NVR at full frame rate, so you get both resolution and motion fidelity. In practice, 30 fps IP at night with some ambient light will outperform a higher-resolution analog stream running at a fractional frame rate.
If you force an IP camera to stay in color mode with low ambient light, you will still see blur on fast-moving objects. That is expected physics. The cure is simple: provide ambient white light so the camera can hold a faster shutter, or let the camera switch to black-and-white where it leverages IR for shorter exposures and crisper edges. In our video on this page, cars exceeding ~35 mph showed some blur because the exterior lighting around the building kept the camera in color mode; the camera prioritized color retention over a very fast shutter.
If your requirement is color identification of fast-moving vehicles at night, pair the optics with lighting. A proven option is our Active Deterrence 4K PTZ with a built-in white-light LED. The added illumination helps hold faster shutter times, reduces motion blur, and preserves vehicle color up to roughly 40 mph in many real-world scenes.

4K PTZ Camera with Active Deterrence
Survey your property in color and 25X Optical Zoom
Browse 4K PTZAnother reason Avalonix PTZs stand out is their built-in analytics. They don’t just record everything; they make sense of it. With features like intrusion zones, human and vehicle detection, and optional auto-tracking on certain models, you can cut down on false alarms and focus on what really matters. Think of it as hiring a security guard who never blinks — the camera filters out irrelevant motion, like a swaying tree, and alerts you only when a person or car enters the frame.
Where do these cameras shine? A few examples:
Cheap PTZs might tempt you with low prices, but when you need clear footage of a license plate, a face, or an incident at night, you’ll wish you invested in a camera that delivers. Avalonix Premium Series PTZs are built to do exactly that. They offer the optics, frame rates, and intelligence that make surveillance actionable rather than just decorative. Whether you’re protecting property or streaming a scenic view, Avalonix PTZs deliver long-term value, not frustration.
If you’ve been shopping for a PTZ (Pan-Tilt-Zoom) camera, you’ve probably noticed that the market is crowded with options. From cheap imports on Amazon to professional-grade systems, the range in price and quality can be confusing. The question most buyers ask themselves is: what’s worth my money? That’s where Avalonix Premium Series PTZ cameras come […]
You’ve decided to purchase a security camera. Your store has experienced stock theft, or someone has attempted to break into your mailbox. Regardless of the reason, you’re looking for one thing, which is safety. Even so, purchasing a security system involves understanding highly technical terms that are difficult to interpret without any prior knowledge of the security camera industry. Terms like RG59U, HD-over-coax, IP cameras, and frames per second (fps) are confusing. Acronyms such as IP, PTZ, and HDCVI seem foreign. Suddenly, your safety becomes an overwhelming and time-consuming process filled with jargon. Let's break it down. This guide will equip you with the fundamental knowledge required to determine the best security camera to purchase.
You’ve decided to purchase a security camera. Your store has experienced stock theft, or someone has attempted to break into your mailbox. Regardless of the reason, you’re looking for one thing, which is safety. Even so, purchasing a security system involves understanding highly technical terms that are difficult to interpret without any prior knowledge of […]
Pan-Tilt-Zoom security cameras are powerful tools for surveillance and internet live streaming. Unlike standard fixed-lens surveillance cameras, PTZ cameras offer precision control and a wider range of features for unmatched flexibility. One of those advanced features is auto tracking, available on some of our PTZ models. In this guide, we’ll cover everything you need to know about auto-tracking PTZ cameras, including how they work and some tips for optimizing them to get the best performance.
Are you searching for the best PTZ camera with auto tracking? Browse our selection below or contact our team for a recommendation!
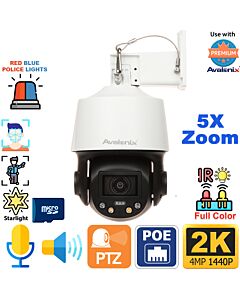
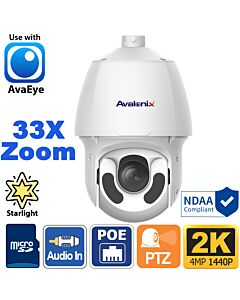
A PTZ camera uses electrical motors and servos that move the camera module inside to pan, tilt, and zoom. It can move and zoom using manual controls, timed presets, or auto tracking. Due to their flexibility, there are a wide variety of customization choices for security and live streaming or media projects. PTZs are available in various sizes, ranging from 4X zoom to 48X zoom or more. Browse our full selection of PTZ cameras here.
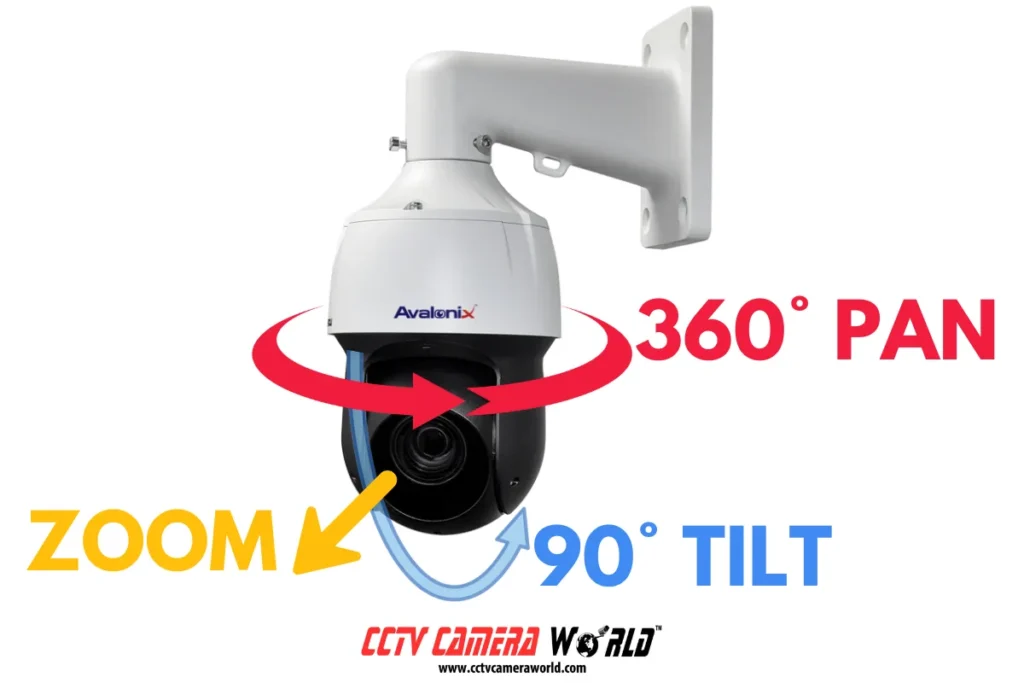
A PTZ uses a behind-the-scenes coordinate grid to manage the motors and servos that regulate the P (pan) and T (tilt) positions. The Z (zoom) is a motorized lens that electronically rotates in and out to dynamically magnify or minimize the view. Users can control through the security DVR software, PC software, mobile apps, or a standalone PTZ controller. Our Pan Tilt Zoom cameras are network-based or IP cameras with a web server, so they also allow control from a web browser when connected to a computer network.
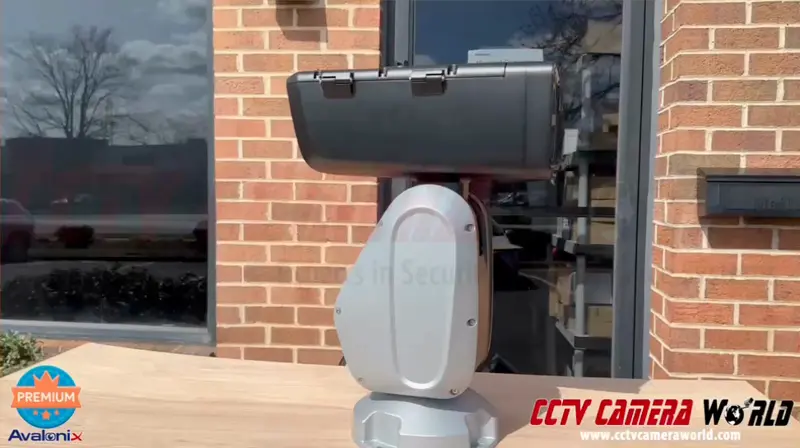
Auto Tracking, sometimes marketed as smart tracking, is a state-of-the-art monitoring feature available on some network-based cameras that can target a human or vehicle using smart AI detection. When a target is spotted by a detection rule, the auto-tracking feature kicks in and tells the camera to follow the subject until it is no longer visible. Smart Motion Detection, which is found in our fixed-lens cameras and motorized zoom cameras, should not be confused with auto-tracking.
Auto-tracking is useful for tracking automobiles in low-traffic areas, particularly driveways, parking lots, and gated entries. We suggest using it to track humans in low-traffic areas, such as sidewalks, gates, storage areas, and alleyways.
In the video below, you can see one of our Avalonix autotracking PTZs in action!

No, not all PTZs can track targets. In general, most PoE cameras do not have tracking unless it’s specifically listed in the feature set. All analog security cameras do not have automatic tracking. If you're looking for a camera with auto-tracking and are unsure of which one is best for you, please read the product description and feature list or contact our pre-sales tech department for help.
In the list above, we display all the different models available with auto-tracking.
CCTV Camera World's auto-tracking cameras are easy to configure using a web browser. Most cameras require Microsoft Edge with IE mode to access security cameras and take advantage of the full feature set provided in the web interface. The camera must have a preset view with a Smart Event Detection rule such as Intrusion Box or Tripwire set to detect the target of interest crossing an entry point from which the target will be tracked.
Below is a video that walks you through the steps of logging into the camera, creating a rule, and enabling auto-tracking, with an example of tracking in action at the end.

Auto-tracking is easy to set up, as outlined below or by watching the video above that demonstrates a rule that’s set up at a warehouse entrance.
For more details on Smart Detection rules, refer to our Smart Event Detection blog category. In the demo video, we used an intrusion detection rule for tracking vehicles and people.
Setting up autotracking is easy with an Avalonix Premium Series NVR and compatible PTZ camera. By defining a simple tripwire or intrusion detection rule, the PTZ can automatically track human or vehicle movement across the scene. Just create a PTZ preset, enable IVS in the NVR’s AI settings, and draw your rule using a mouse and HDMI monitor connected to the NVR. You can also adjust tracking duration and detection filters (like direction or target type). Once set, your camera will intelligently follow humans or vehicles, depending on your filter setting, after they move through the detection zone, offering hands-free, dynamic surveillance.
Watch the video tutorial below for a guided tutorial.

While Auto Tracking is an amazing technology, it still has a long way to go before it works as well as it does in crime scene investigation TV shows and action flicks. To monitor locations where an auto-tracking security camera may be unable to detect or follow a subject, we recommend combining it with one or more general-use security cameras with a fixed lens.
Only human bodies and cars are detected and tracked by the auto-tracking algorithm. While it would be interesting, don't expect a camera with auto tracking to detect your pets or wildlife and track them around your yard.
Here are some tips for improving auto tracking:
It will take some trial and error to find the ideal placement and viewpoint for your PTZ camera and its detection rules.
Pan-Tilt-Zoom security cameras are powerful tools for surveillance and internet live streaming. Unlike standard fixed-lens surveillance cameras, PTZ cameras offer precision control and a wider range of features for unmatched flexibility. One of those advanced features is auto tracking, available on some of our PTZ models. In this guide, we’ll cover everything you need to […]
Modern security systems aren’t just about recording video; they’re about making sure the right people have access when they need it. AvaEye makes this simple with a built-in cloud platform that lets you create user accounts, connect your recorders, and securely share access with employees, family members, or trusted partners.
In this guide, we’ll cover the three core steps every AvaEye user should know for sharing access:
We’ve tested this process on the latest AvaEye firmware and mobile app. Each step takes only a few minutes and removes the risks of handing out admin logins or wrestling with complicated network settings. Whether you’re running a business with multiple staff or setting up a home system for your family, AvaEye’s sharing features give you a balance of security and flexibility.

Before you can connect an NVR or share access with others, every person who needs access must have their own AvaEye account.
We know some people hesitate to create new logins or share their email addresses. AvaEye’s registration process is secure, and your email is only used for account management. A Star4Live account is required for:
The app may ask permission to access your local network. Since sharing works through a secure cloud code, this choice is optional, and you can allow or decline based on your preference.
Once you receive the code:
You’ll now be logged into your new account. To confirm, open the app’s main menu (☰ → Me) and look for your username and email address.
Note: Some third-party email providers with strict spam filters occasionally block confirmation codes. If you don’t see the code arrive, try again with a mainstream provider like Gmail or Outlook for smoother results.

Once your NVR is added to the cloud, you can give other people access without exposing your admin credentials. This is especially useful for business owners who want employees to monitor cameras, or for families that want multiple people to log in under their own accounts.
Pro Tip: If you log in and don’t immediately see your NVR or cameras, switch to the four-camera grid view under Images. This refreshes the channel list and often pulls in the feeds.

Once your NVR is added to the cloud, you can allow other people access without exposing your admin credentials. This is especially useful for business owners who want employees to monitor cameras or for families that want multiple people to log in separately.
This opens the sharing panel, where you can choose to share either the entire recorder or just specific cameras.
Note: If you’ve shared with that person before, you can tap the + icon to select them from your recent list and save time.
You control exactly what the other user can do:
Example: Share a single camera with live viewing only on an ongoing basis, or share all cameras with both live and playback access until a specific date.
Once shared, the device appears almost instantly in the other person’s app:
Note: In our hands-on tests, permission changes synced across devices within seconds. This makes it simple to revoke access quickly if an employee leaves or grant temporary access for a specific project without worrying about long-term security.
Modern security systems aren’t just about recording video; they’re about making sure the right people have access when they need it. AvaEye makes this simple with a built-in cloud platform that lets you create user accounts, connect your recorders, and securely share access with employees, family members, or trusted partners. In this guide, we’ll […]
If you need reliable evidence after trespassing or theft, a good
license plate capture camera is one of the smartest upgrades you can make to a security system. License plate video gives law enforcement a concrete lead, helps with insurance claims, and lets you track repeat offenders coming in and out of your property. The challenge is choosing the right tool. There is a real difference between a purpose-built ANPR/LPR plate camera, a long-range 4K bullet used for general surveillance, and a standard zoom camera that’s great for scene coverage but inconsistent for plates in motion.
In the video below, we show a side-by-side comparison of three cameras we carry and explain what each can and cannot do for capturing readable license plates in real-world conditions. You will see how vehicle speed, mounting angle, distance, and lighting affect results. We also demonstrate how an NVR surfaces plate snapshots and events to speed up investigations, and why placement and lane control matter more than megapixels when plate evidence is the goal.


Professional License Plate Cameras
Get a reliable plate reader camera for day or night capture.
Combine professional license plate reader cameras with a professional NVR to get ANPR data.
We set up three cameras watching the same ingress and egress area and reviewed the footage on an NVR capable of ANPR data and on a PC using the camera monitoring software.

License Plate Camera with ANPR – Capture Plates Day & Night
4MP Resolution with Active Deterrence
This 4MP ANPR license plate camera is purpose-built to capture plates day or night, even from vehicles moving up to 75mph, with smart IR and shutter controls that eliminate nighttime glare. Its motorized 8–32mm zoom lens allows precise long-range plate capture up to 100ft, while built-in AI can recognize vehicle types, colors, and logos for added detail. Designed for reliability, it offers PoE connectivity, two-way audio, strobe alerts, and a rugged IP67/IK10 weather- and vandal-resistant housing for outdoor installations.

4K Long Range Zoom Camera for License Plate Capture During The Day
4K Resolution PoE Camera with 7-32mm Zoom
This 4K long range PoE IP camera delivers crisp Ultra HD video with a 7–35mm motorized zoom lens that can capture plates up to 70ft. While powerful for general surveillance, it is only suitable for capturing license plates during the day on slow-moving or parked vehicles when you have a direct, head-on angle of view. Designed for versatility, it features PoE installation, advanced video analytics, and durable IP67 weatherproof construction for outdoor use.
We replayed footage directly from the NVR. For the LPR camera, we also used the camera’s web interface to review plate hits and download still images to verify results. Note that a microSD card is required for the ANPR function to work. The camera writes ANPR data to the microSD and then syncs it with the NVR.
If you want consistent plate captures, the setup matters as much as the camera.
No LPR system is perfect in every scene. Think in terms of probability and placement. When mounted correctly and aimed at a slow point with controlled angles, the dedicated LPR camera can deliver reliable plate snapshots with roughly 80 to 90 percent accuracy. Weather, reflective plates, aftermarket frames, and driver behavior all influence results. Always confirm important reads with the associated clip.
Will a 4K camera read plates at night?
Sometimes, with good lighting and a slow vehicle. If you need consistent night performance against headlights and glare, use a dedicated LPR camera.
Can I point one LPR camera at a busy multi-lane road?
You can, but you will get the best results focusing on one lane where vehicles slow or stop. If you must cover multiple lanes, plan on one LPR camera per lane.
Do I need an NVR?
On some camera models, you can review hits from the camera’s web interface and microSD. For fast investigations and long retention, an NVR is strongly recommended.
Can I capture plates and faces with the same camera?
Not reliably. The exposure settings for plates and faces conflict. Use one dedicated LPR camera for plates and a separate overview camera for people and scene context.
If you need help picking the right lens, angle, and mounting height for your driveway, gate, or parking lot, we can help you design it so the camera does what you expect.
If you need reliable evidence after trespassing or theft, a good license plate capture camera is one of the smartest upgrades you can make to a security system. License plate video gives law enforcement a concrete lead, helps with insurance claims, and lets you track repeat offenders coming in and out of your property. The […]
You may be thinking of using a security camera for purposes other than security and safety. On a daily basis, we receive inquiries about how to use our cameras for observation-related uses, such as watching after animals in a zoo or animal sanctuary, live streaming a sporting event, or a time-lapse capture of a construction project. Whether you want to capture video or snapshots, our cameras can handle almost any task. This guide will assist you in starting your standalone camera project with one of our Premium Series IP cameras.
You may be thinking of using a security camera for purposes other than security and safety. On a daily basis, we receive inquiries about how to use our cameras for observation-related uses, such as watching after animals in a zoo or animal sanctuary, live streaming a sporting event, or a time-lapse capture of a construction […]
A very important feature that is not found with older or cheap IP camera systems is offline alerts. These offline alerts are extremely important for recognizing when a break-in is happening. Vandals and thieves will notice security cameras and try to destroy, damage, or disconnect the cameras. When that happens you will want to be notified and this is required by law for some businesses. Our Security Video Recorders support this crucial security feature.
(more…)
A very important feature that is not found with older or cheap IP camera systems is offline alerts. These offline alerts are extremely important for recognizing when a break-in is happening. Vandals and thieves will notice security cameras and try to destroy, damage, or disconnect the cameras. When that happens you will want to be […]
We demonstrate in this guide how simple it is to set up email alerts on your PoE NVR system. We use Gmail as our preferred email account because it is free and quick to send emails.
This guide shows how to set up email alerts on PoE NVR systems. The steps are similar on many brands and models, and the screenshots come from our AvaEye platform so you can follow along exactly.
Using compatible AvaEye PoE IP security cameras and NVRs ensures accurate event analysis and recording. All AvaEye cameras include video-based motion detection, and most support Smart Motion Detection (Ultra Motion Detection, UMD).
We recommend the free AvaEye app for fast push notifications, and email alerts as a backup. Because email requires a compatible provider and an outbound network path for SMTP, this tutorial uses Gmail with an app password. You can follow the same flow on other PoE NVRs.
Setting up email alerts is not a straightforward process for many, as a compatible email account and unhindered ability to host an email server on your internet connection are required.

There’s a few things that you’ll need to have set up before you’re able to get email alerts working with your AvaEye NVR and PoE cameras.
To access the NVR's web interface, you must connect your computer to the same local computer network as the NVR.
While you can set up email alerts using the HDMI or VGA monitor interface, we found that setting them up on a computer is easier.
To access your NVR's web interface using your preferred browser, type the NVR's local IP address into the address bar and hit Enter on your keyboard. Log in to the admin user account using the credentials printed on a label at the top of the NVR.
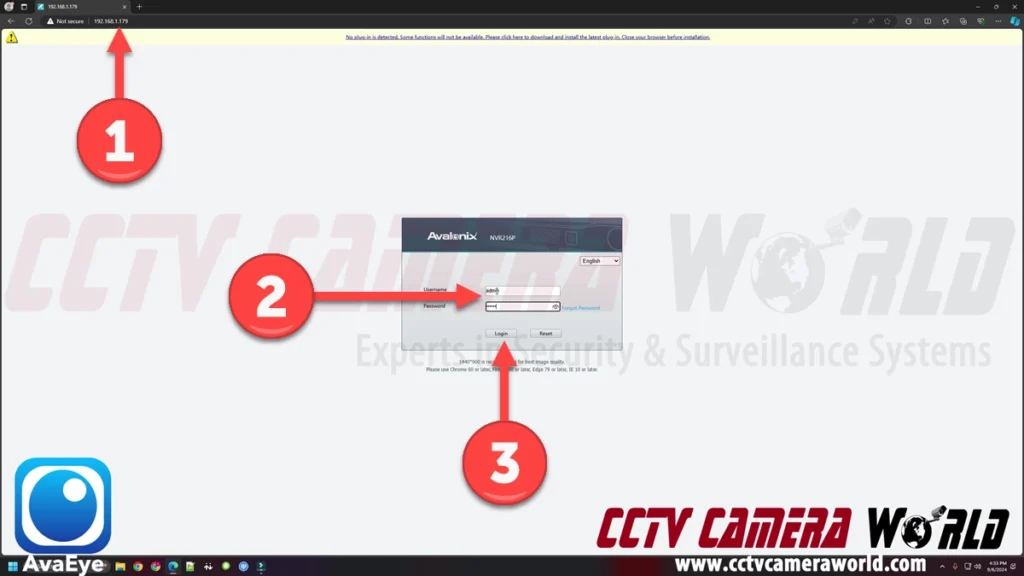
If you don’t know what the local IP address for your NVR is, navigate to the network settings page using the TV or computer monitor interface. You can find the IP address in the Network settings, Basic tab, and TCP/IP page after logging into the admin user and going to the main menu.
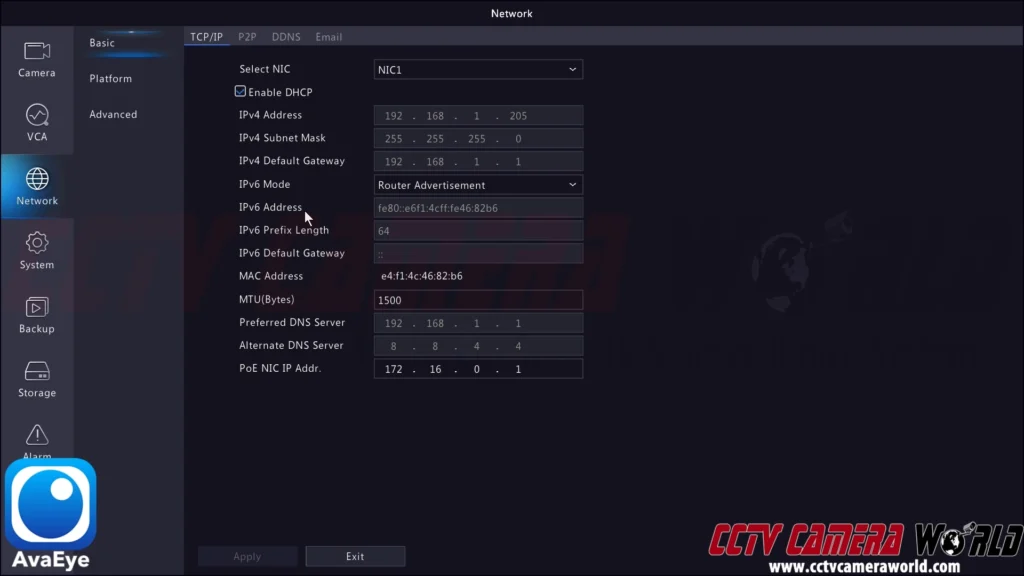
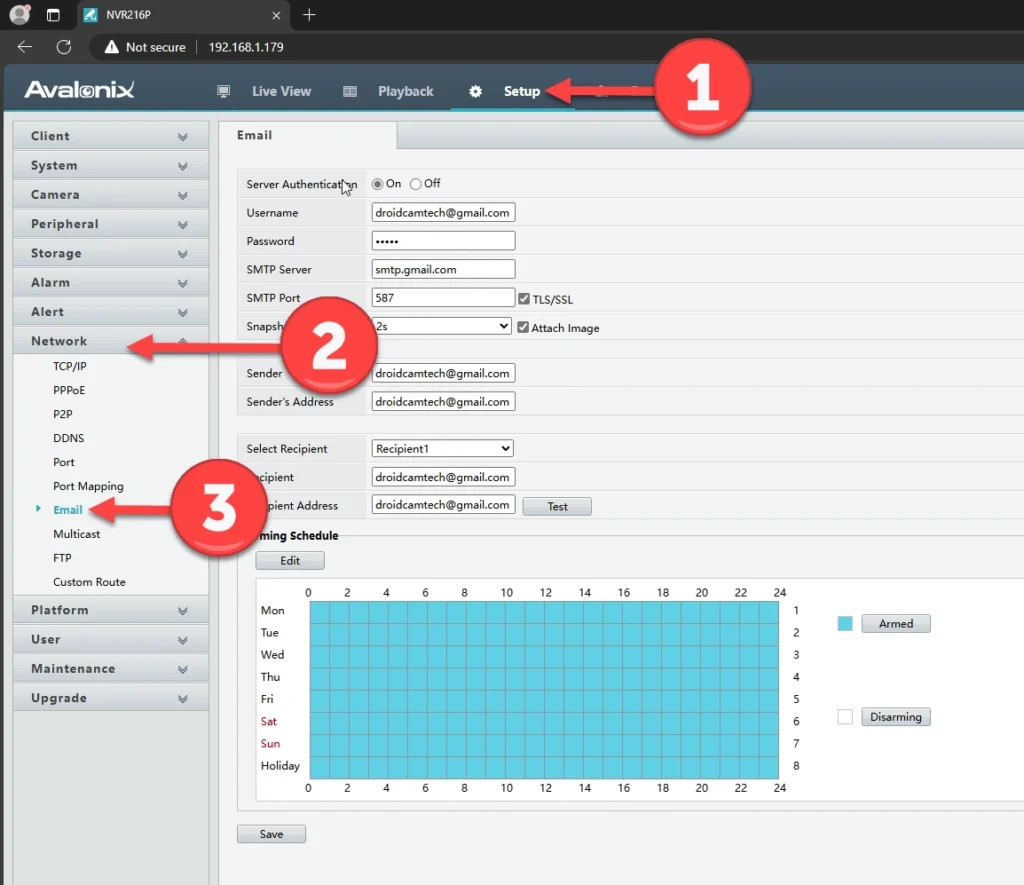
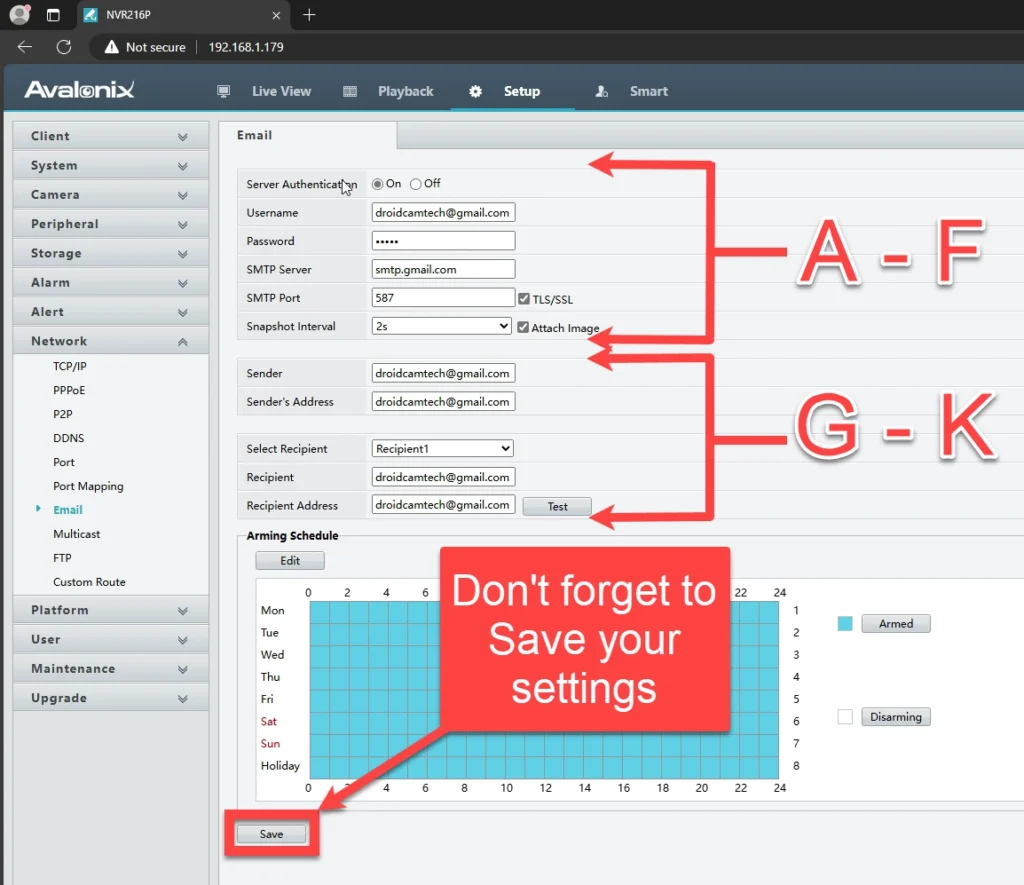
As discussed in the before you get started section, double check that the AvaEye system has the correct date and time, and the snapshot recording schedule is set to Event based recording. In this section, we’ll explain how to enable motion detection and enable the email alert trigger for motion detection. It’s worth noting that you can use any type of Event Detection that the AvaEye cameras and NVR support.
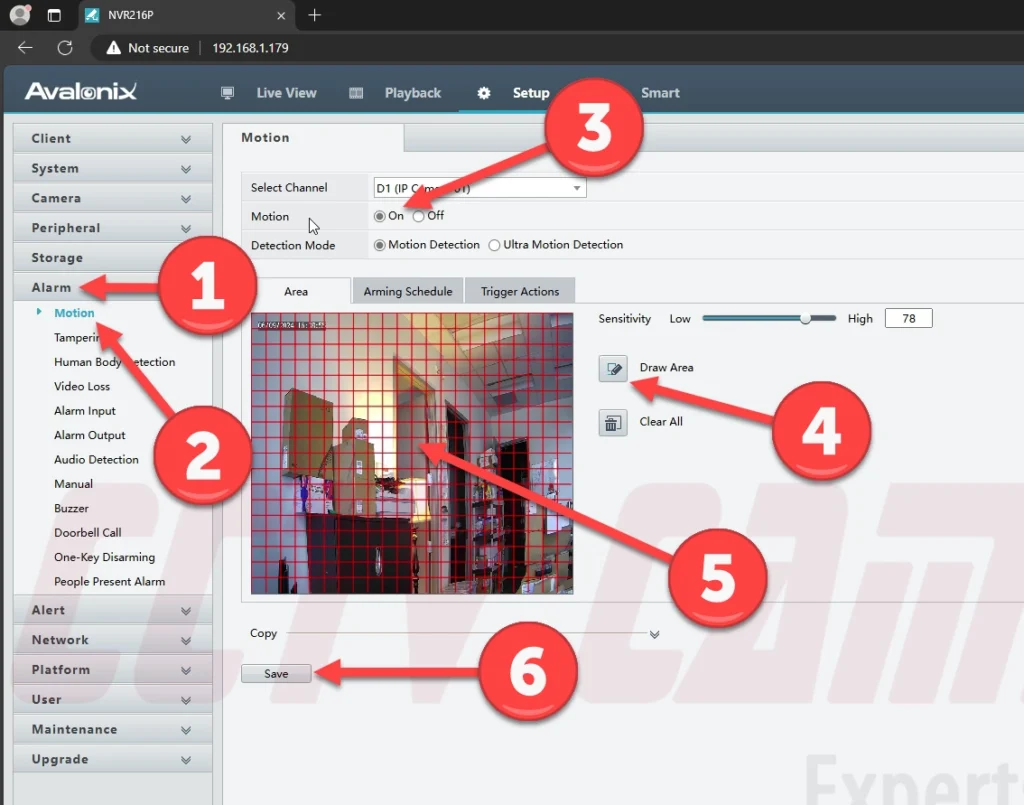
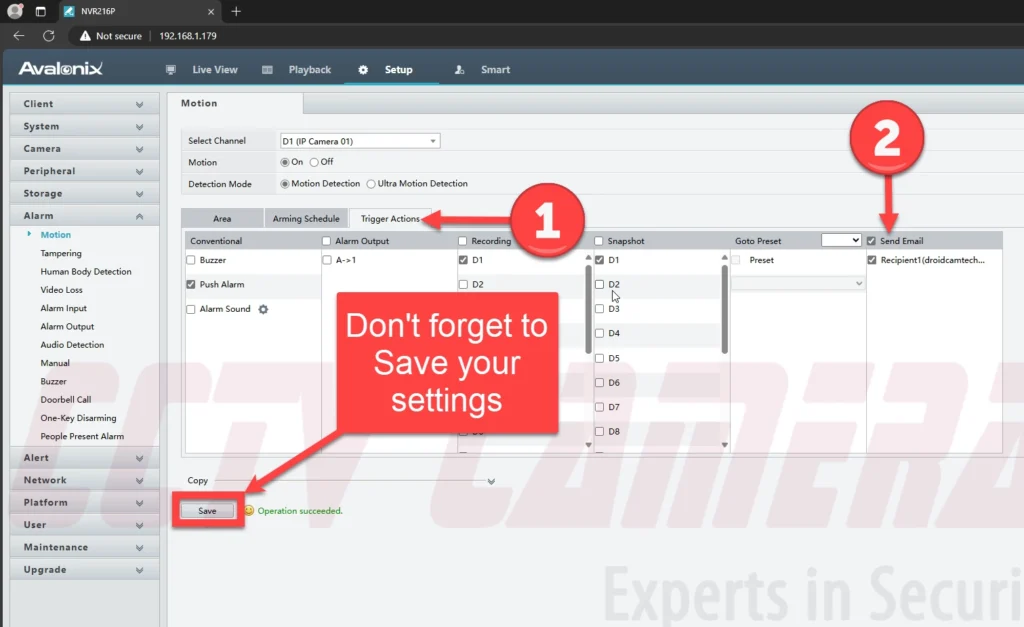

If you follow this guide, you should have successfully set up email alerts with a few snapshots in your inbox. If you’re having trouble, don’t hesitate to send an email support request. Also, check out the AvaEye app, which can receive push notifications using event detection to quickly pull your cameras up on your phone.
Microsoft consumer mailboxes (Outlook.com, Hotmail, MSN) no longer support app passwords or basic SMTP sign-in from third-party devices like NVRs. If you use one of these addresses, email alerts will fail even with the correct settings. For reliable results, use Gmail with an app password, your ISP’s SMTP relay, or a dedicated SMTP service.
We demonstrate in this guide how simple it is to set up email alerts on your PoE NVR system. We use Gmail as our preferred email account because it is free and quick to send emails. This guide shows how to set up email alerts on PoE NVR systems. The steps are similar on many […]
Online account and information security has become the utmost priority of businesses in the wake of rampant hacking that led to leaks of sensitive data. Over the years, Google and other websites have added several security features to Google and Gmail accounts to increase security. Not only is it for security purposes to reduce leaks and the subsequent fallout of having a leak occur, it’s also to prevent customers from being taken advantage of or scammed as well as reduce email spam. In this article, we’ll cover what additional security Google has implemented for customers, how to set them up, and how they relate to security camera systems.
One of the steps that Google and many other sites have taken is implementing a technology called Two-Factor Authentication, or “2FA” for short. Two-factor authentication is aptly named as it adds another step, or factor, in order for a computer or device to access an account. 2FA works by requiring more than just a username and password to login to the account. For example, with Gmail, you’re typically required to provide a phone number to create an account, which was originally introduced to reduce spam. Now the phone number requirement has an additional benefit for two-factor authentication as it allows Google to send a text message for verification. Or if you have an Android smartphone with your account added, you can receive a direct notification for logging in.
Two-Factor Authentication is required to set up App Passwords in your Gmail account. We recommend following Google’s guide to enabling 2FA for your account.
https://support.google.com/accounts/answer/185839
In our video tutorial, we briefly show where to setup 2FA in your Google account. Without 2FA set up, you cannot follow the section below on creating an App Password.

Within the last few years, Google has also clamped down on third-party applications and software that use Google-hosted email accounts and servers. These third-party applications range from simple security camera systems sending automatic alerts with snapshots to complex spam and scam networks. In the past, you would be required to use your actual account password to allow third-party apps and software to access your Gmail account. Because of the potential for online account theft, abuse, and spam, Google developed a system called App Passwords. App passwords work by creating a 16-digit passcode that is unique and separate from the actual account credentials. These passcodes provide a secure way to access your Gmail account without using your real password.
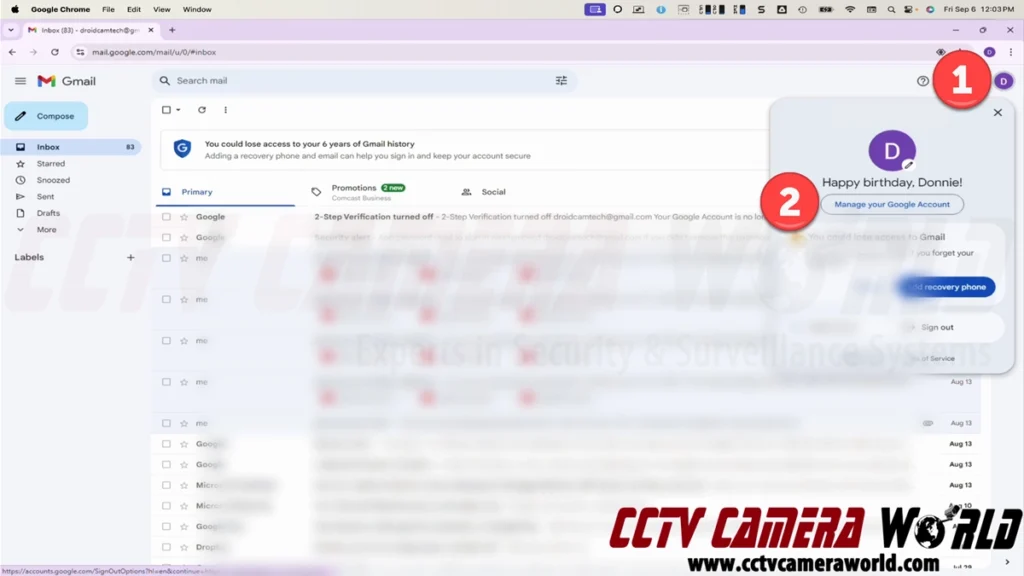
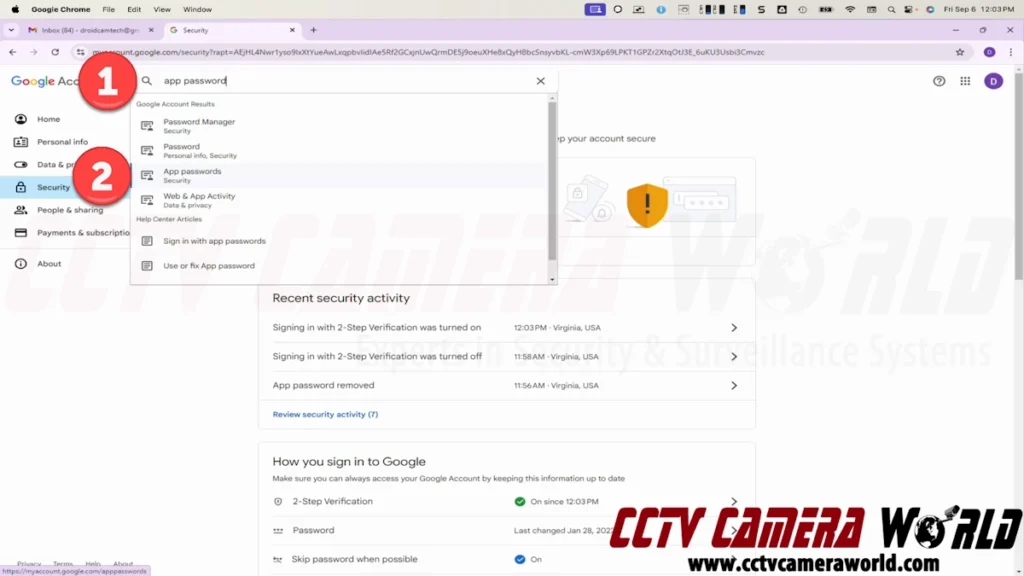
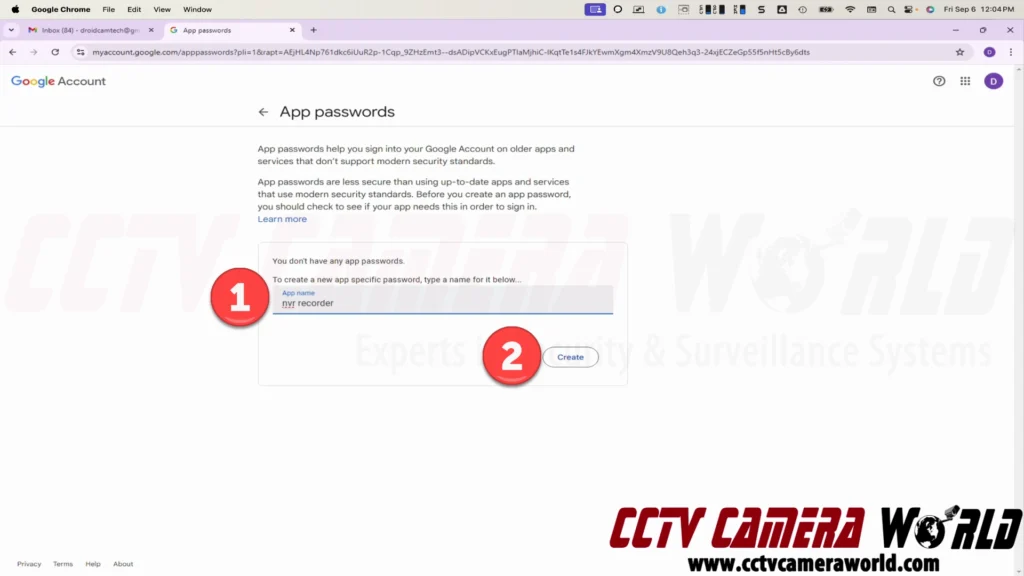
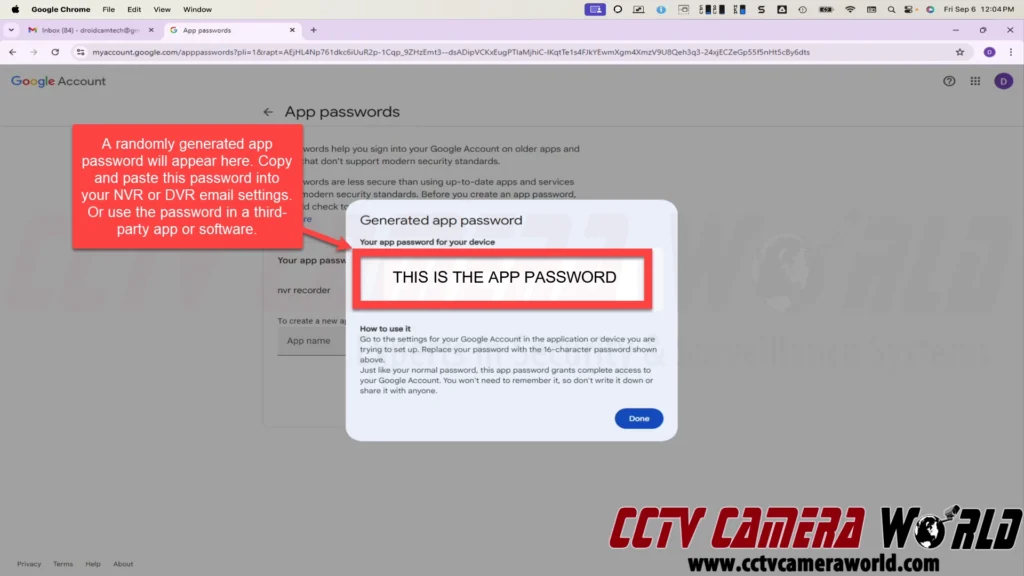
If you’ve followed the steps above and your Gmail App Password still isn’t working on your NVR or PoE camera system, don’t worry—this is a common roadblock. If you're sure you have correctly created an App Password and entered the settings correctly in your camera system setup, and email sending is still not working, you'll want to make sure your ISP is not the issue. You need to verify that your network and ISP actually allow connections on Gmail’s required SMTP port (587). This quick Windows test can help you confirm whether the problem is with your network connection rather than the App Password itself.
Follow these steps to check if your network allows connections to Gmail’s mail server on port 587. This test will confirm whether the problem is with your App Password or with your ISP/network blocking the connection.
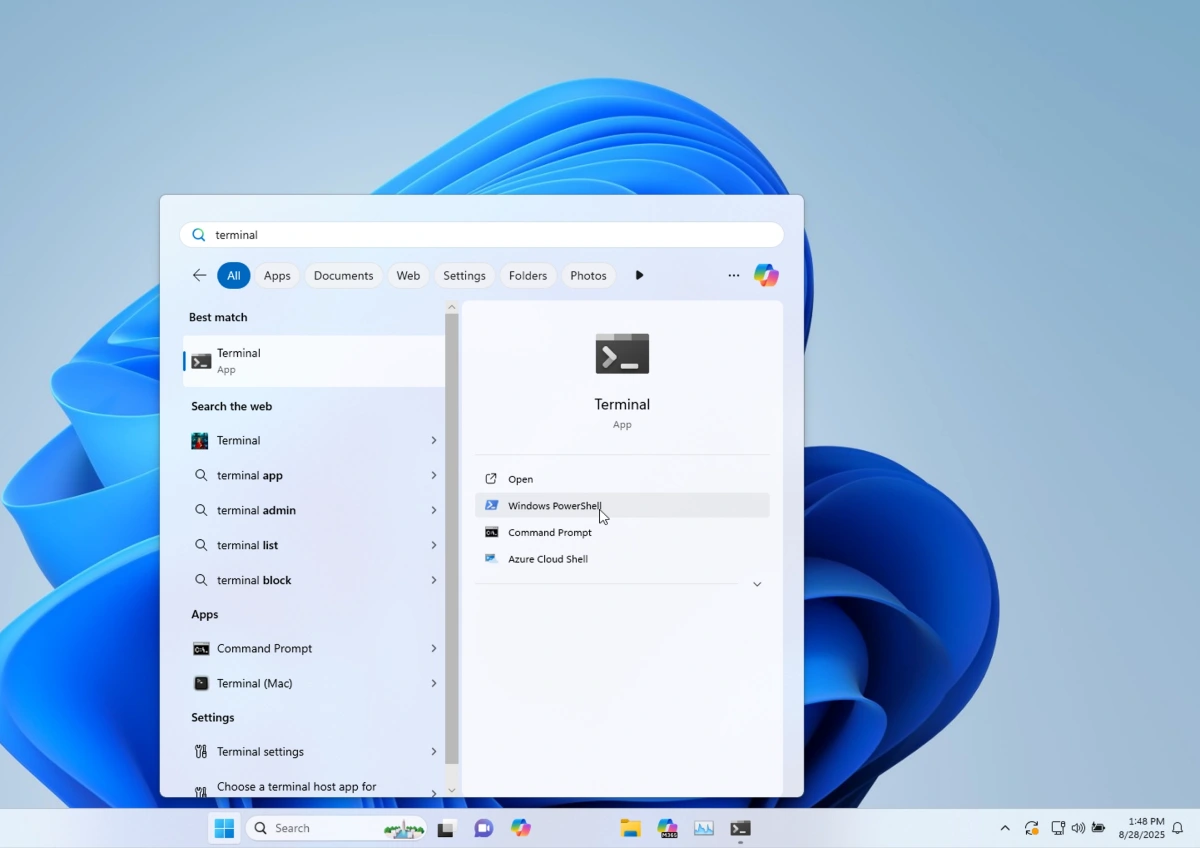
Test-NetConnection smtp.gmail.com -Port 587TcpTestSucceeded : True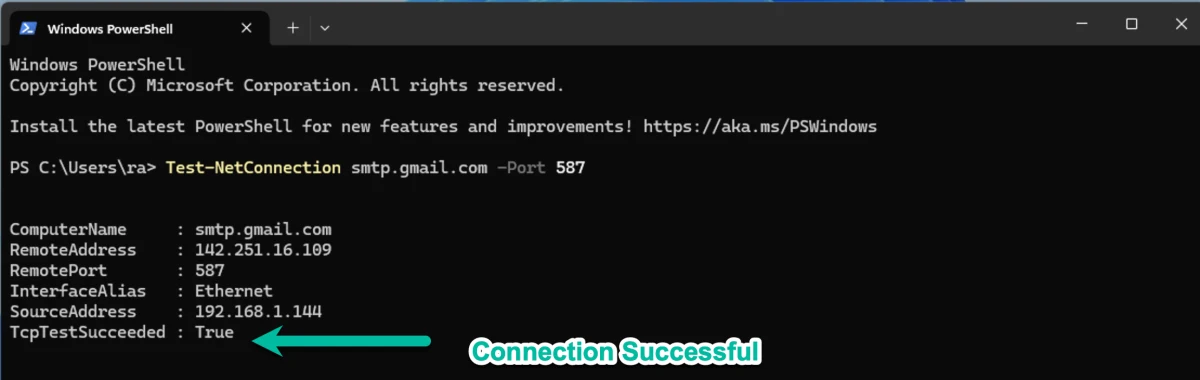
Online account and information security has become the utmost priority of businesses in the wake of rampant hacking that led to leaks of sensitive data. Over the years, Google and other websites have added several security features to Google and Gmail accounts to increase security. Not only is it for security purposes to reduce leaks […]
CCTV Camera World provides all of their security camera systems with standard features that include video-based motion detection and email alert notifications. Although setting up video recording based on motion detection is straightforward, configuring email alerts and integrating email accounts may be daunting for users who are unfamiliar with our system interface. In the following guide, we illustrate how to set up email notifications on your Surveillance DVR using the web service menu. While the menu may not be identical depending on the year and model of your recorder, this guide should still be easy enough to follow.
The video below provides thorough instructions on how to set up email alerts using a free Outlook account. At the time of writing of this post, we found restrictions on Gmail accounts that prevent them from being used to send email alerts from devices such as IP cameras or security camera recorders.

These instructions assume that:
If you are unable to watch the video due to corporate firewall restrictions, we have a brief summary of where to enter your email account credentials on the recorder by using the web interface.
Now that you've watched the video above, you may be wondering why bother with setting up email alerts from your security camera system. Especially when our systems also offer the option to receive push notifications for motion events, why bother with email alerts?
Login to your DVR or NVR using Internet Explorer so you can access the Web Service of the DVR. Then click Setup.

Navigate to the Email Settings page by clicking NETWORK -> EMAIL, and you should see the page similar to the one below.
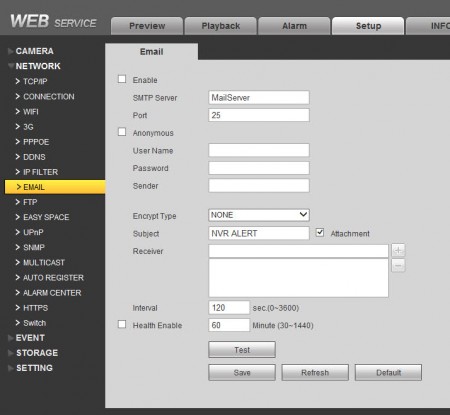
On this page, enter your email account information that will be used to send email notifications. Here is what our email settings page looks like after all the settings are applied and tested:
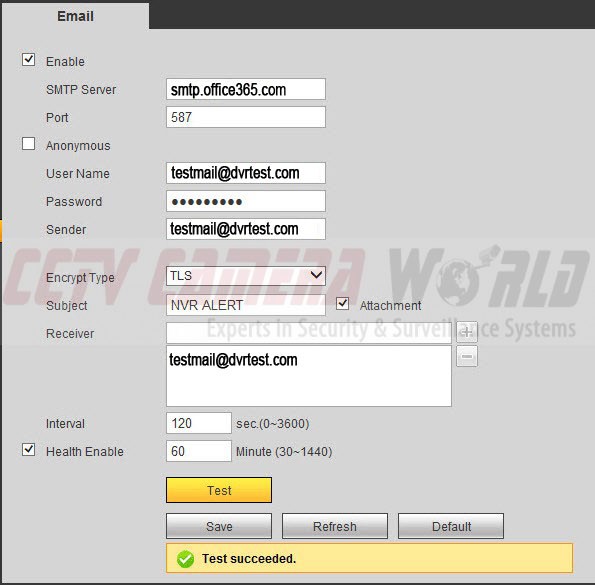
Here is a quick explanation of the configuration settings entered above. First, so you don't forget, check the Enable box.
SMTP Server: smtp.office365.com - this is the outbound email server as noted by Office.com
Port: 587 - be sure to use this port for encrypting outbound email
User Name: [enter your Office365 email address in full]
Password: [enter your Office365 email account's password]
Sender: [enter your Office365 email address in full] - same as User Name
Encrypt Type: TLS
Subject: NVR ALERT or any other subject line you'd like
Attachment: *Be sure to check Attachment if you want to send a picture snapshot as well with the text alert
Receiver: Enter the email address you would like to send the email alert to. In our case it is the same as the sender.
Interval: 120 sec - this is the default time in seconds that you want to wait between alerts
Health Enable: Check this setting if you would like update health alerts sent to you at the specific time intervals (in minutes) about the health and operation of your recorder
Remember to click on the SAVE button, and then click on the Test button to check whether the settings you used are working. If all works well, you should get a Test Succeeded message on the page.
Navigate to EVENT -> VIDEO DETECT and make sure that the following check boxes are checked:
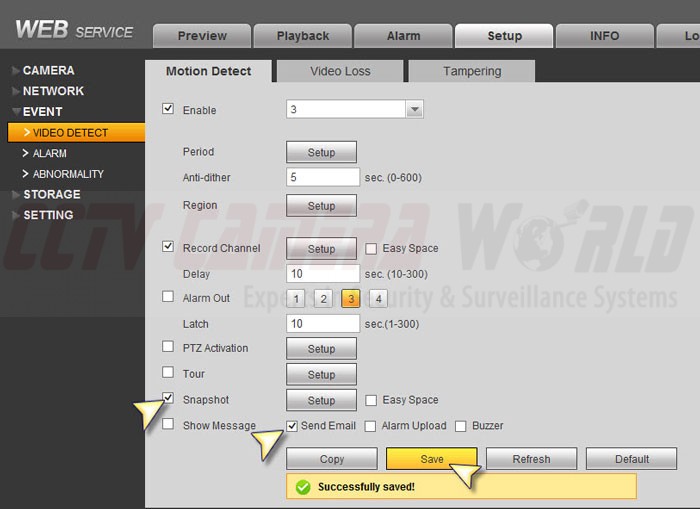
Notice the settings on this page are per Channel or Camera. You need to enable these settings for each channel you would like to enable motion detection and email notifications for. In our case we enabled them for Channel 3.
Up to this point you have configured email notifications to be sent, however a snapshot will not be included with each notification until you enable Motion Detection Recording for Snapshots.
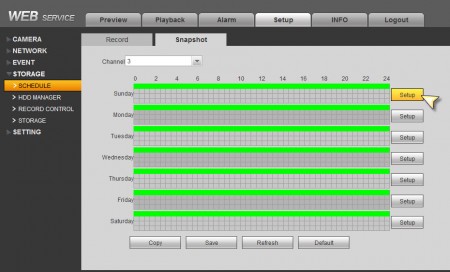
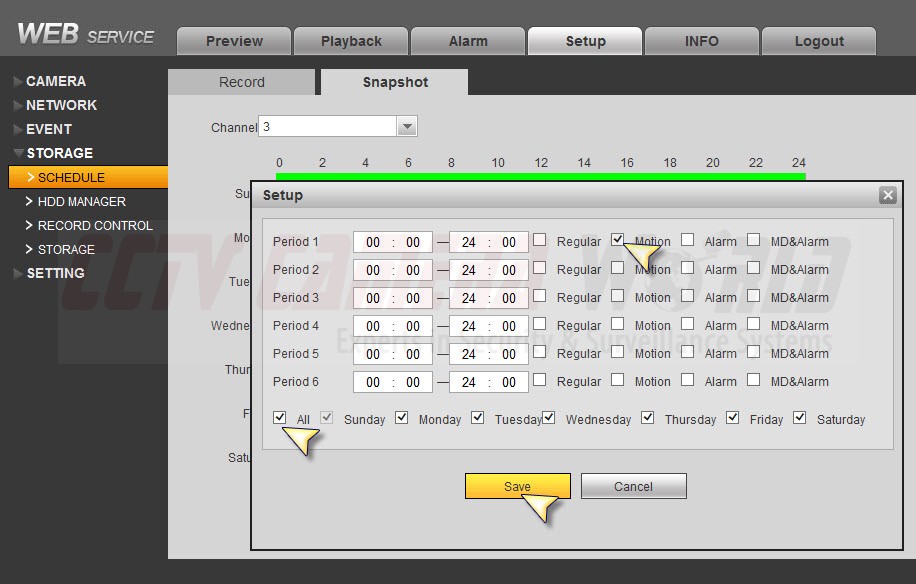
1) Uncheck Regular to disable snapshots from being recorded all the time.
2) Check Motion to enable motion activated snapshot recording.
3) Check All to enable this method for all days of the week
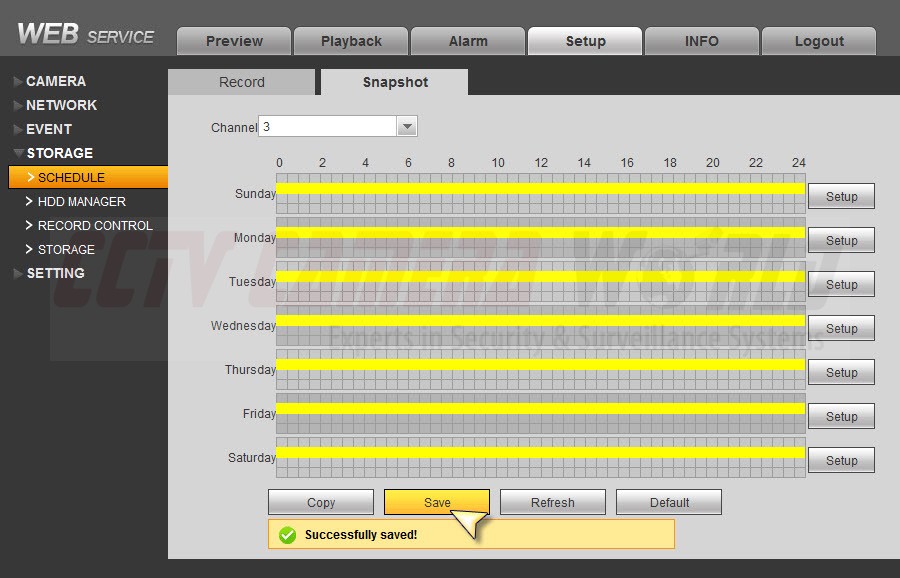
Press SAVE to make sure your settings are saved and applied. In our example above, we show how to enable motion detection, email notification on motion with snapshot for Channel 3. Steps 4-5 needs to be repeated for each Channel you would like email notifications for.
Here is a snapshot from our GMAIL account showing what the email notifications sent from the DVR look like.

It is important to note that the process is identical for configuring email notifications on motion when using our PoE security cameras. If you have any questions how to configure these settings on your DVR or NVR, feel free to contact us using our contact form.
CCTV Camera World provides all of their security camera systems with standard features that include video-based motion detection and email alert notifications. Although setting up video recording based on motion detection is straightforward, configuring email alerts and integrating email accounts may be daunting for users who are unfamiliar with our system interface. In the following […]
Motion and intelligent detection are helpful features in most security camera systems, but they aren’t always the most reliable way to detect events. Changes in lighting, random objects, and animals can still cause unwanted recordings even with the most advanced algorithms out there. That’s where alarm inputs come in.
Alarm inputs allow you to connect physical devices like motion sensors, door contacts, or buttons directly to your NVR. We’ve even had customers use light switches to manually start and stop recording for various purposes. When these devices are activated, they send a signal to the recorder to start recording, alert you, or even activate other actions, like moving a PTZ camera.
This article explains how to connect and configure alarm inputs on a professional NVR. We'll discuss sensor types, wiring, and how to set up your system to record when the sensor or trigger is tripped. Alarm-based recording, regardless of your location, provides you with greater control and superior accuracy compared to software detection alone.
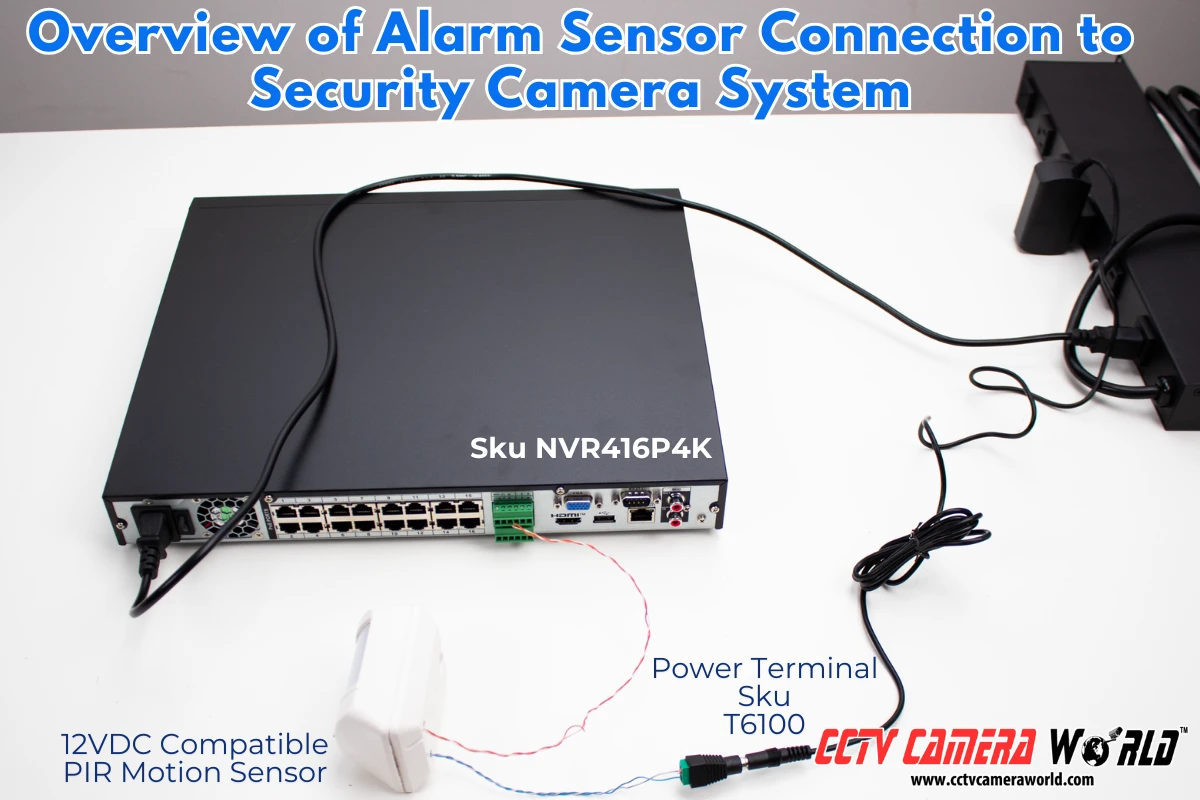
Alarm inputs are connectors found on most professional NVR systems. They allow you to wire external devices with circuitry, like motion sensors, magnetic door contacts, or switches, directly into your recorder. When they are triggered, it sends a low-voltage electrical signal into the alarm input, which tells the NVR to record, send an email, or push an alert to the remote viewing app.
Alarm input connections typically require two wires: one for the signal and another for grounding. The circuit can be either “normally open” (NO) or “normally closed” (NC), depending on the sensor, as explained in the next section. The NVR software continuously monitors these ports and reacts to any changes in the circuit state. When a connected sensor is triggered (for example, a door opens or a button is pressed), the recorder can be configured to:
Many modern NVRs offer at least 4 alarm inputs, while larger models may support 8, 16, or more.
Unlike software-based motion detection, alarm inputs are highly accurate. They respond to physical events, making them ideal for reliability in high-traffic environments, automating tasks, or triggering recordings during specific steps in manufacturing and shipping processes.
By connecting the right type of physical alarm device to your recorder, you can build a more intelligent surveillance system that only records when it matters. We created the table below to outline common alarm input devices, their functions, and typical uses.
| Device Type | What It Does | Where to Use It | Why It’s Good |
| PIR Motion Sensor | Detects body heat and movement using passive infrared | Outdoor walkways, driveways, wide hallways, parking lots | Only triggers when heat is detected, usually from a human or vehicle. |
| IR Beam Tripwire | Sends an alert when the infrared beam is interrupted | Loading docks, warehouse and office entrances, garage doors | Physical tripwire that outperforms digital tripwire detection |
| Magnetic Door/Window Contact | Triggers when two magnets are separated (e.g., door opens) | Storefront entries, backdoors, secure gates or cabinets | Does not rely on an algorithm to detect an object entering the door |
| Tilt or Vibration Sensor | Detects shaking or physical movement | File cabinets, server racks, roll-up doors, heavy machinery | Can detect entry to secured storage, which cameras cannot do |
| Glass Break/Shock Sensor | Responds to the sound or vibration of breaking glass | Storefronts, glass doors, large office windows | Guarantees recording is triggered in the event of a break-in |
| Panic Button | Manually triggers alarm or recording when pressed | Retail counters, offices, desks, security stations | Guarantees recording if authorities are alerted to the button |
| Manual Switch or Light Switch | User-controlled start/stop for recording | Workstations, packaging areas, manufacturing lines | Flexibility to record business processes or in specific situations |
All these sensors use a simple two-wire dry contact circuit, making them easy to integrate with most NVRs. With the right setup, you can reduce false alerts, log real activity, and trigger recordings only when they matter most.
Wiring an alarm input device to your NVR is a straightforward process, even if you’re not an electrician. Follow these simple steps to get your alarm device hooked up.
Look at the back of your NVR for a row of labeled connectors called an alarm block. These may be built-in push-tab terminals or a removable block with screw-down connections. You’ll usually see a green block with numbers like 1, 2, 3, etc., for the alarm inputs, and a terminal marked G or GND for ground.
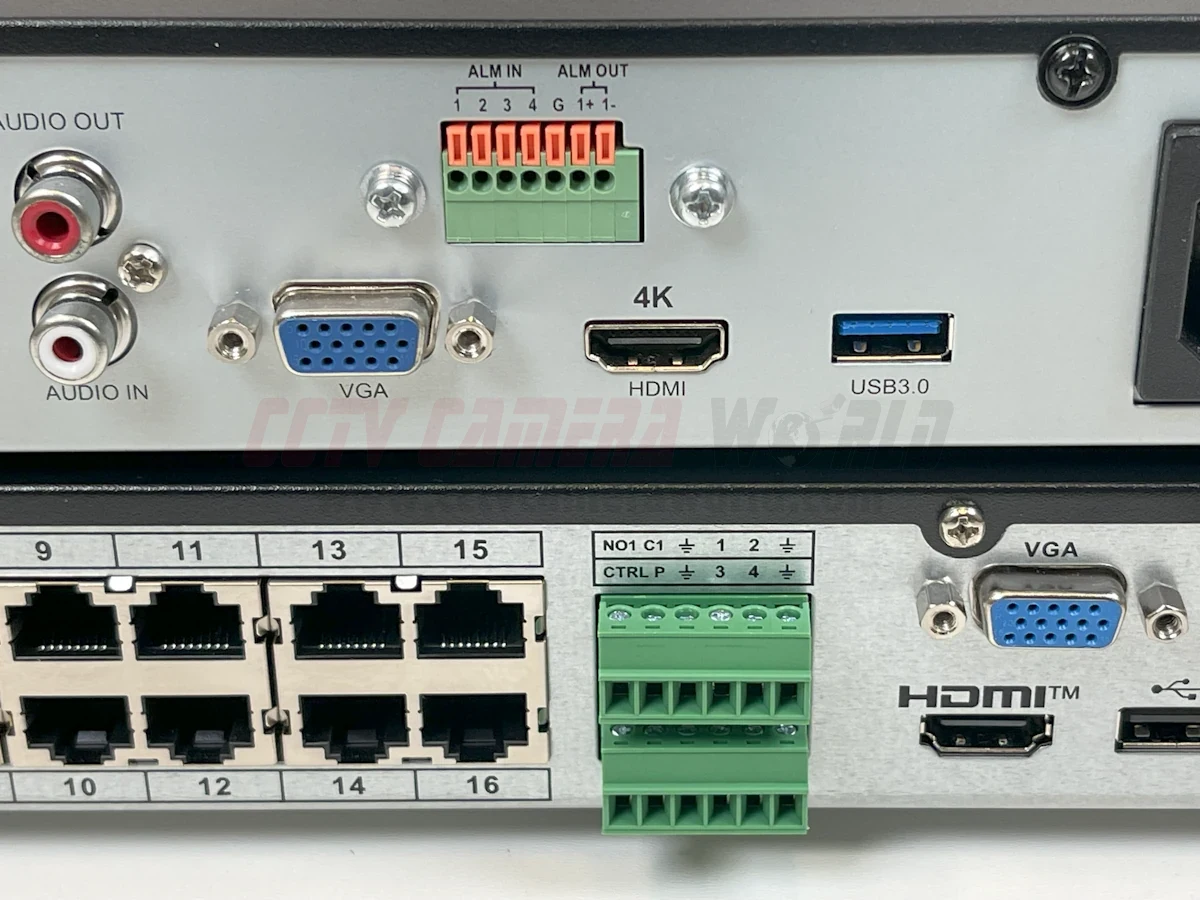
If you’re unsure which is which, look for a label printed near the ports or reach out to our support department with your order number and a photo of your alarm block.
Most alarm sensor devices use two wires: one wire goes to the numbered input you want to use (e.g., Input 1), and the other wire goes to the closest ground (GND) terminal. For simple contact-based sensors, polarity usually doesn’t matter, as they work by opening or closing a circuit. However, to avoid damaging the NVR, and if your sensor does have polarity markings (e.g., "+" and "-"), follow the instructions that came with it. It’s common to use the solid or red wire as positive and the striped or black wire as ground, but always double-check your sensor’s requirements and stay consistent when adding more devices.
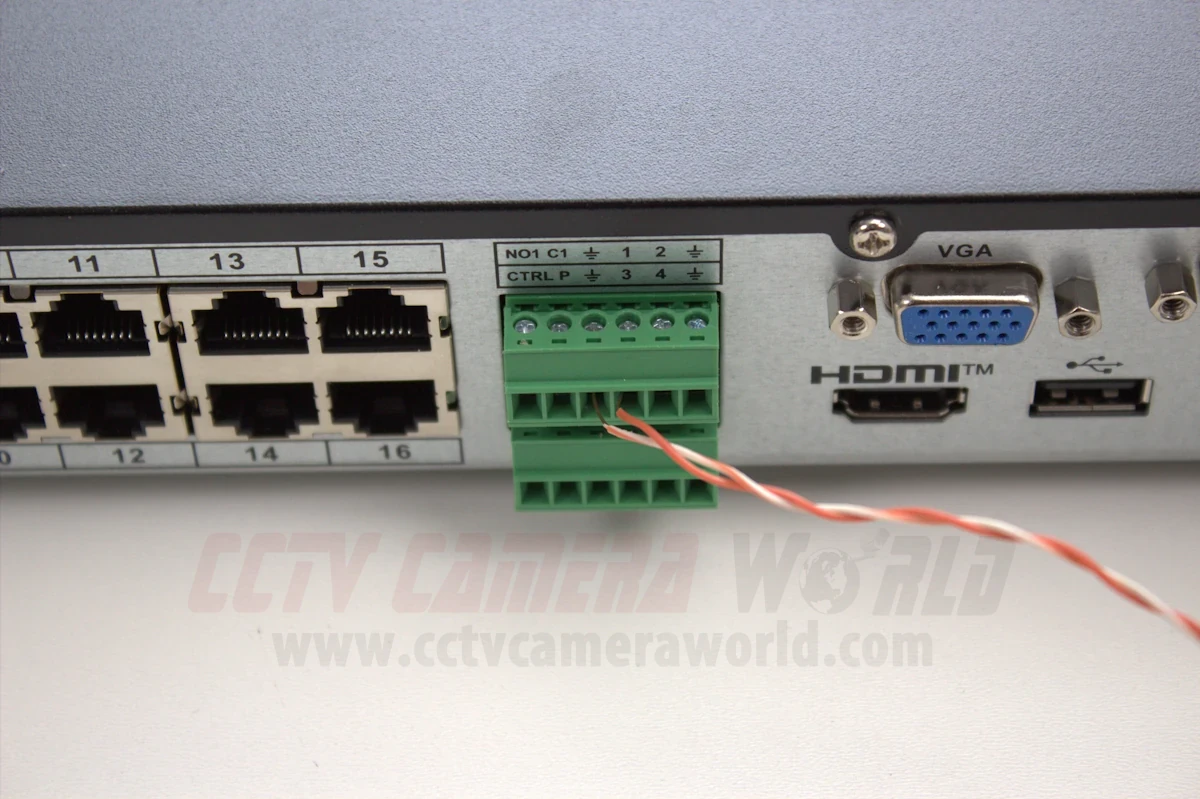
Tip: If you're using twisted pair cables like CAT5e, remove and use one pair for the positive and ground, leaving the other pairs unused or available for other purposes.
For push-tab connectors, press the tab down, insert the wire, and release to lock it in.
For screw-down terminals, loosen the screw, insert the bare wire, then tighten it securely. After the wire is secured, give it a light tug to make sure it won’t slip out.
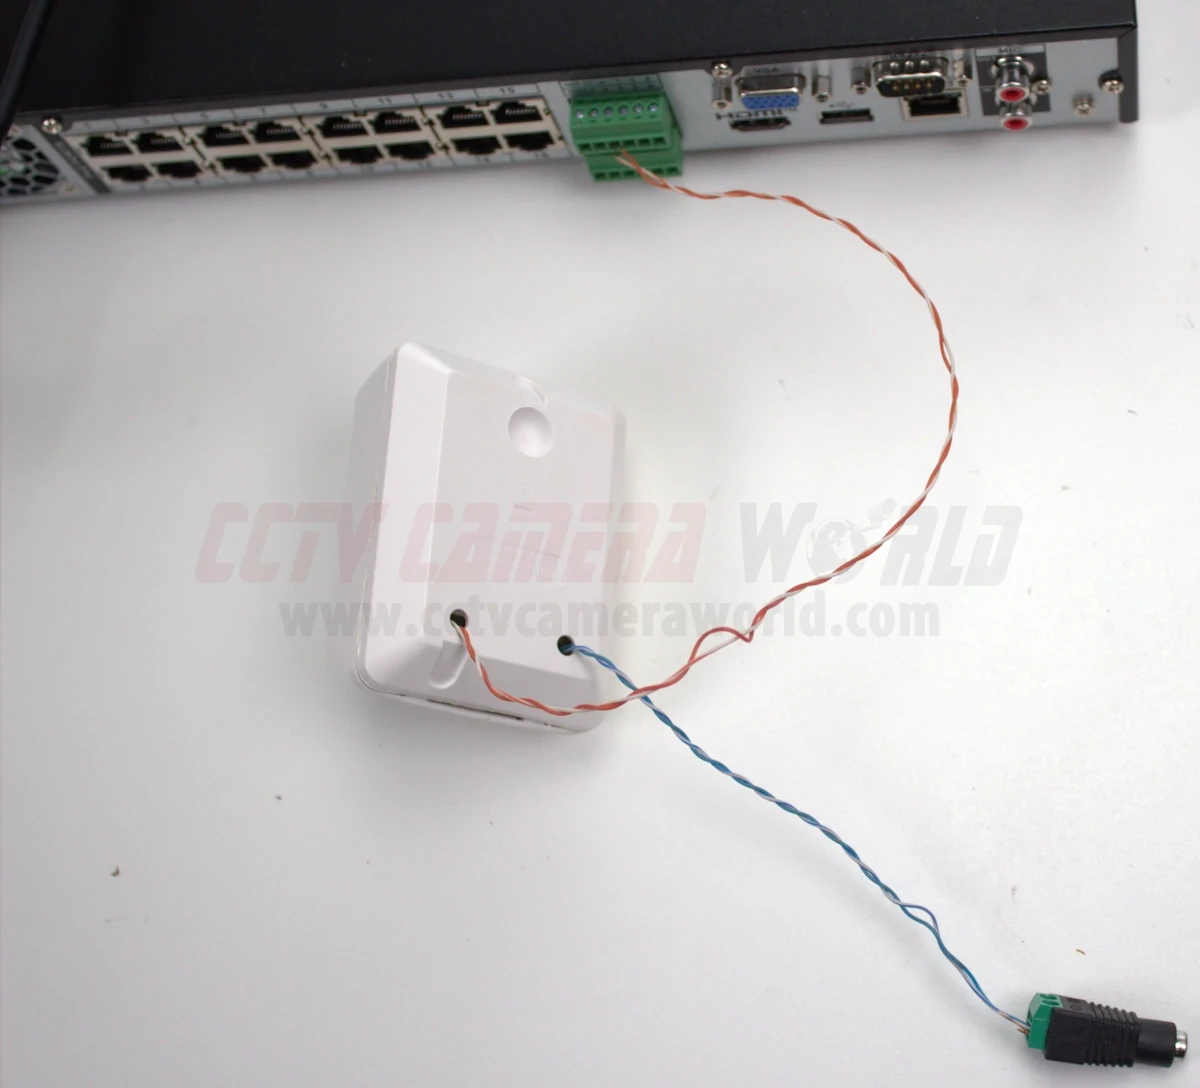
Tip: Avoid running alarm wires next to power lines or fluorescent lighting, as they can cause interference, false triggers, or damage the NVR.
Some sensors, like PIRs or beam detectors, need power to operate. These devices typically run on 12V DC and have two additional wires for power, separate from the alarm input circuit. Use a regulated 12V DC wall adapter, or connect the power wires to a central 12VDC power box when using multiple sensors.

Important: The NVR’s alarm input terminals do not supply power. They only detect the change in the sensor’s circuit. Some NVRs have power relays, but to avoid damaging your recorder, we strongly recommend powering sensors and sirens separately.
Once the sensor is wired and powered, you're ready to move on to configuring your NVR to recognize and respond to the alarm input.
After wiring the sensor to the NVR, the next step is to enable alarm input settings. This usually involves ticking a checkbox for the alarm input channel, assigning trigger actions, and adjusting the recording schedule.
Start by logging in to your NVR. Open the main menu and look for the section labeled "Alarm," "Event," or "Alarm Settings"; the exact name and menu location may vary depending on your NVR model. Once inside, select the Alarm Input or Alarm-In Port submenu.
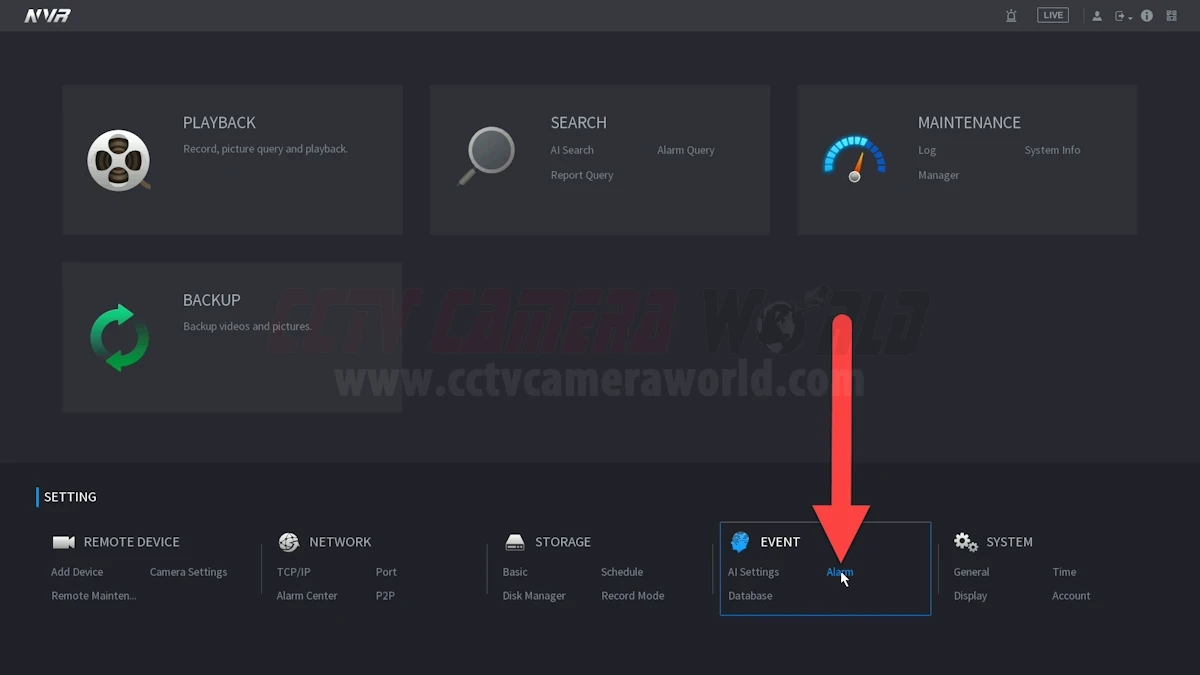
Use the drop-down menu to find the numbered alarm input that matches your wiring. Enable or check the box to activate it.
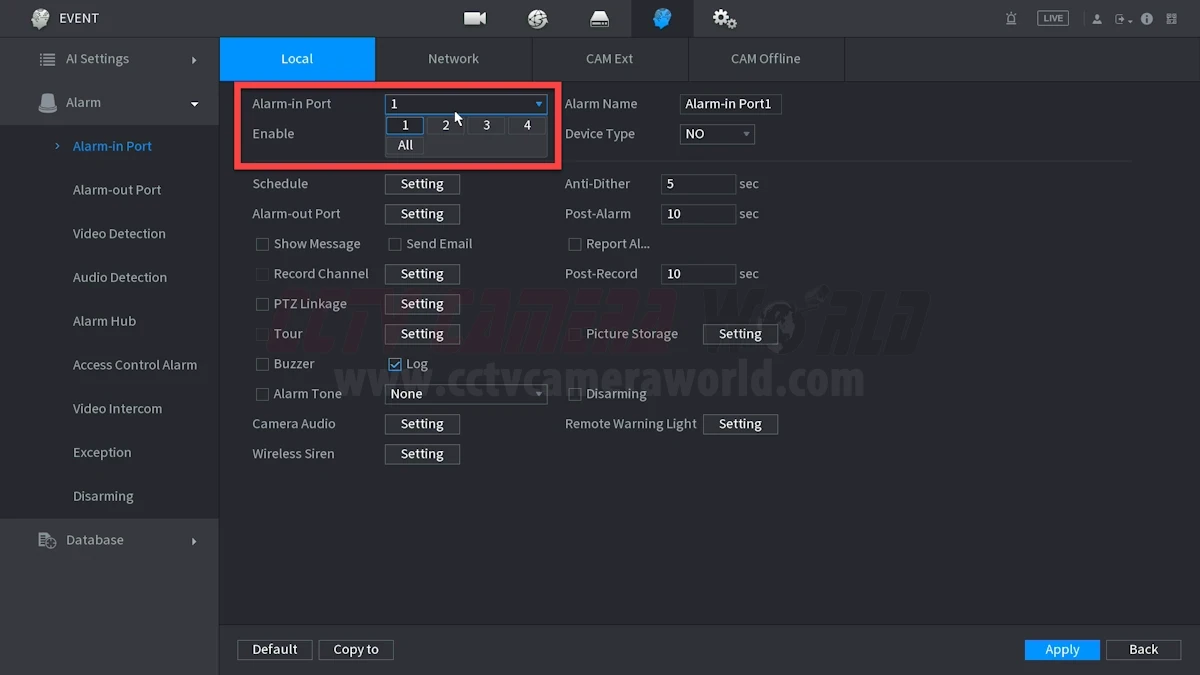
Most NVRs let you choose whether the sensor is Normally Open (NO) or Normally Closed (NC). Although this terminology can be confusing, it should be interpreted literally:
Set this option according to your sensor’s behavior. For example, if it's a door that should remain closed and you want recordings or alerts when it opens, set it to Normally Closed.
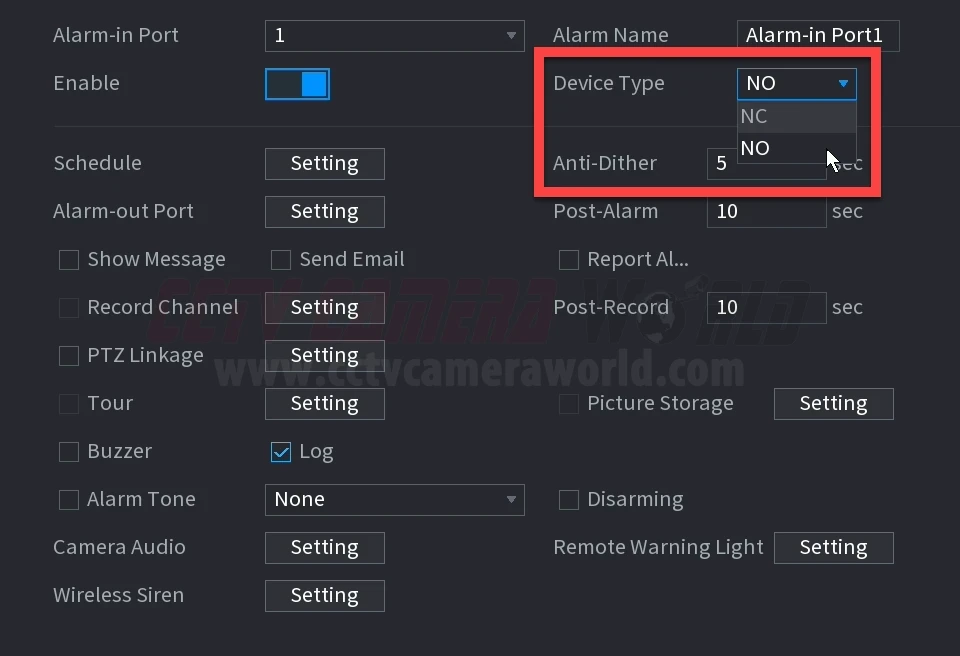
Then, select the action(s) you want the NVR to take when this input is triggered. Start with the Record Channel, Show Message, and Buzzer options for testing. After you confirm it’s working, continue to add extra actions as needed. These include:
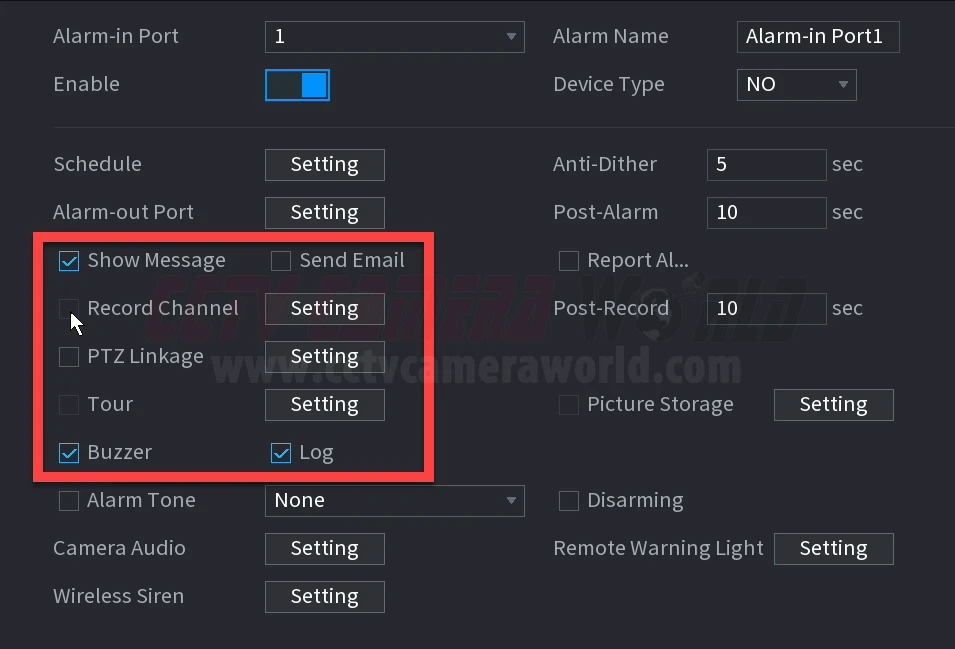
Your NVR may include timing options like Anti-Dither, Post-Alarm, and Post-Record. These control how long the NVR waits or stays active before and after a trigger:
Start with default short values (5–10 seconds) and adjust through trial and error based on your environment and needs.

Go to the Storage or Record section in your NVR’s settings and locate the Schedule tab. Change the recording mode for the desired channels from General or Motion to Alarm. If you're already using 24/7 recording, alarm triggers can still act as useful markers in playback.
You can choose to:
Once saved, your NVR is now armed and ready to respond to physical triggers through its alarm inputs.
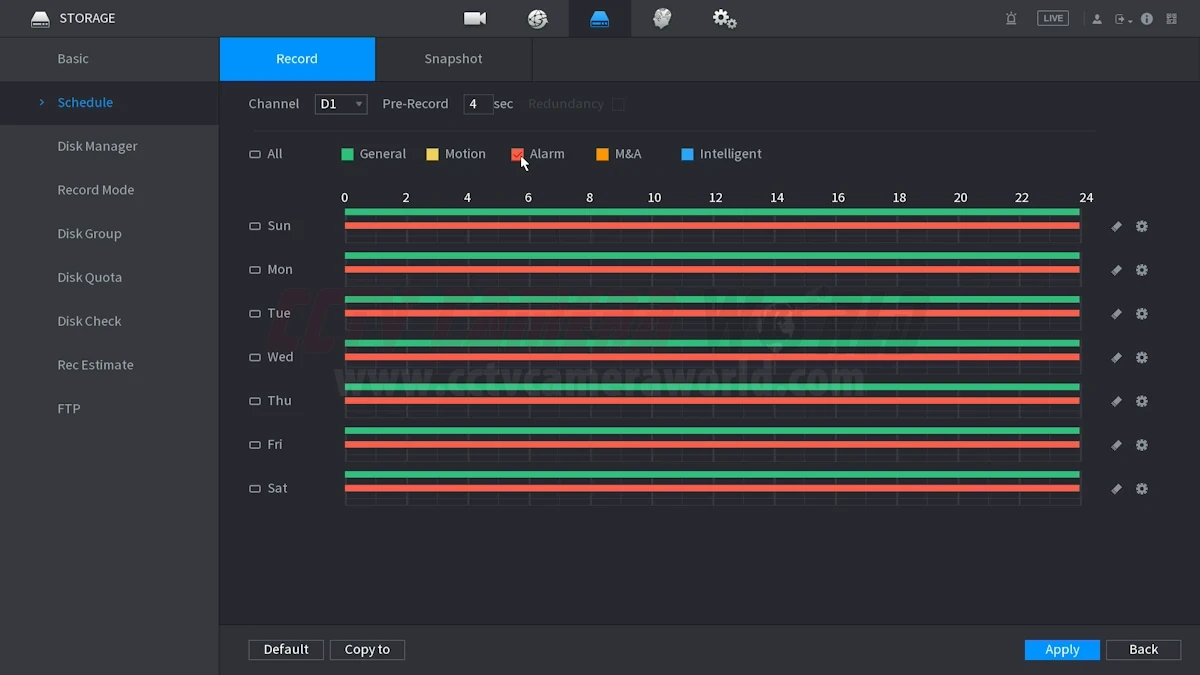
After configuring your alarm input settings, it’s important to test everything before assuming it works. These steps will ensure that your sensor is wired correctly, the NVR is responding as expected, and your recording and selected actions are working.
Turn on the buzzer/beeper or “Show Message” options to assist with trial and error. These features are great for confirming that the NVR is receiving input when the sensor is activated, especially if you're not ready to test recording or notifications yet.
Open or close the door, press the button, or trip the sensor. Watch the screen for a popup message or listen for the beep. These simple triggers provide immediate feedback and help verify wiring and settings before moving on to more advanced actions like email alerts or PTZ linkage.
Most NVRs include an Alarm Info or Event Log menu. These typically show a timestamped list of recent alarm input events, including start and end times, and often include a button to quickly review recordings. Use the logs to confirm that the trigger is being detected and logged correctly.
If no log entries are there after triggering the sensor, double-check your wiring, sensor polarity, and whether the alarm input is enabled in the settings.
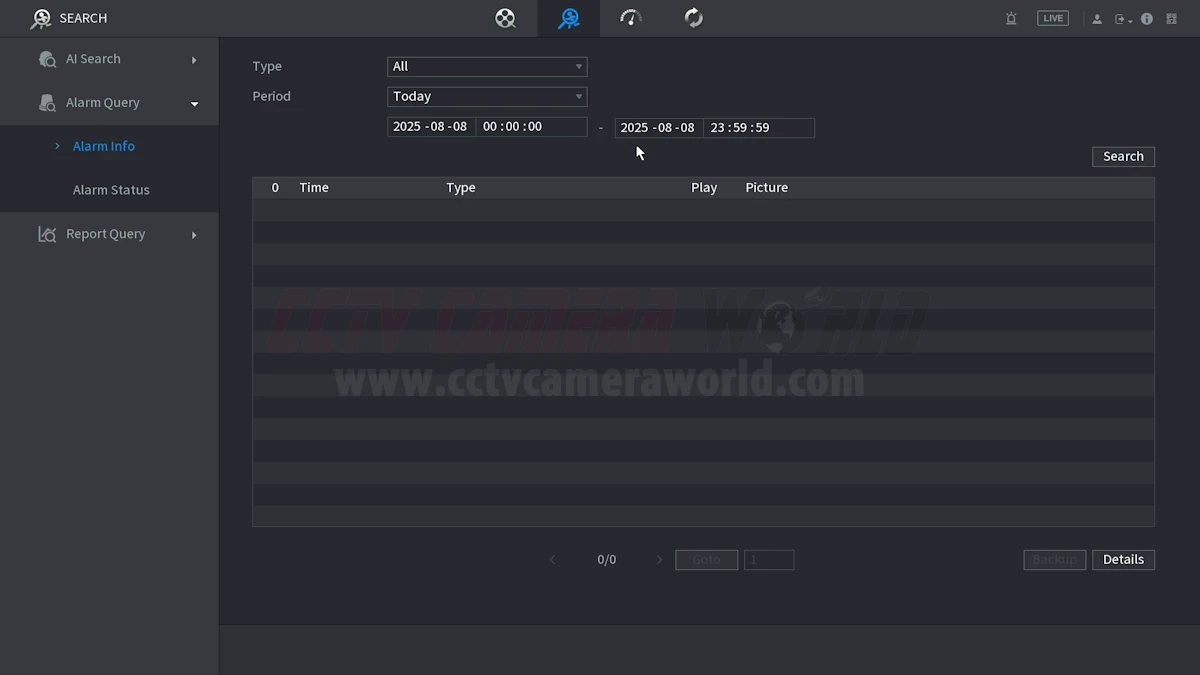
Go to the Playback screen, select the camera that should have recorded, and check the timeline. Most systems use color coding to show recording types. The Avalonix Premium Series, for example, displays alarm-triggered recordings in red. Play the footage back around when you activated the sensor and confirm that recording starts at or just before the trigger. If no footage was recorded, review your recording schedule settings. The channel may still be set to General or Motion-only instead of Alarm.
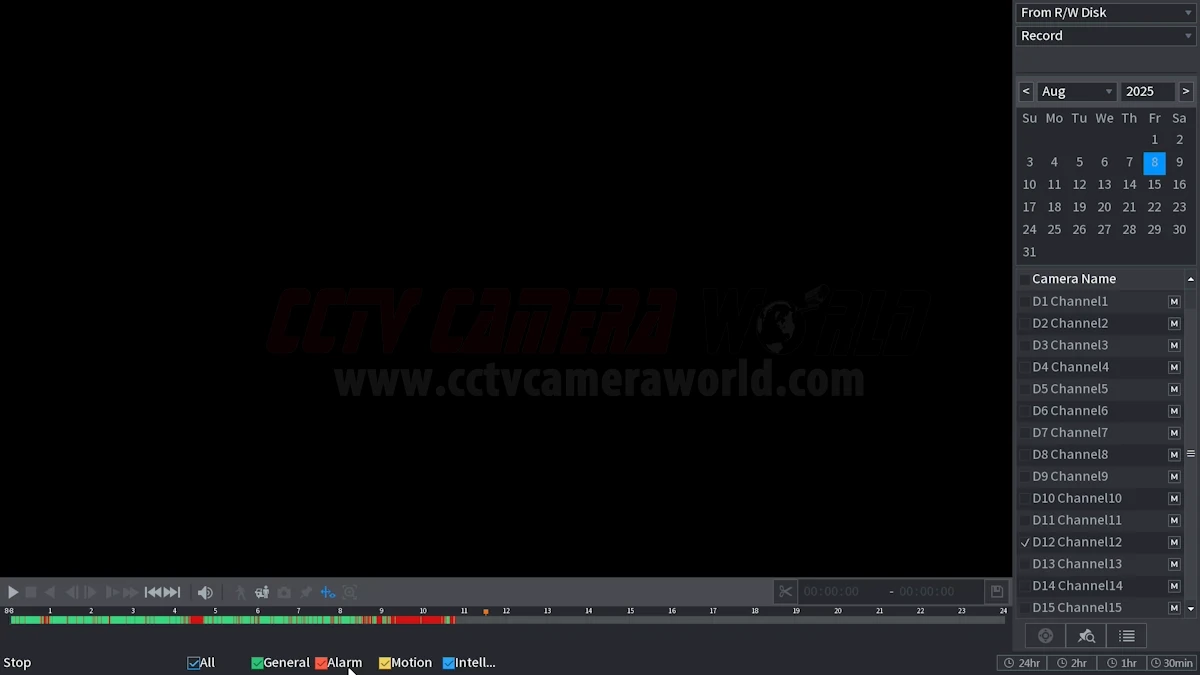
If you've enabled email or snapshot storage, now’s the time to also test those features. Trigger the alarm and check your inbox or mobile app for an alert if you’ve set up push notifications. Make sure snapshots are being saved based on your NVR’s snapshot settings. If alerts aren’t working, double-check that your email SMTP settings work or push notification permissions on your phone; these are managed separately from the alarm input settings.
Once you’ve confirmed that the NVR is receiving, logging, and reacting to alarm inputs properly, your system is ready, and alarm-activated recording will give you one more layer of peace of mind.
Motion and intelligent detection are helpful features in most security camera systems, but they aren’t always the most reliable way to detect events. Changes in lighting, random objects, and animals can still cause unwanted recordings even with the most advanced algorithms out there. That’s where alarm inputs come in. Alarm inputs allow you to connect […]
With the rapid decline of traditional media like TV, radio, and newspapers, people now get the majority of their entertainment, news, and cultural engagement from the internet. Livestreaming video on the internet to audiences has become a massive industry thanks to major players such as Google's YouTube Live, Amazon's Twitch, and Meta's Facebook Live. This online space is filled with content creators who stream themselves playing video games, hosting TV-style events, traveling the world, and engaging in other various activities.
A popular type of livestreaming involves the real-time broadcasting of city streets, wildlife, and properties such as homes, schoolyards, sports fields, or construction sites. This type of streaming typically requires a dedicated computer to take the video from a camera and re-stream it to the internet. Having to dedicate a computer for livestreaming means that the computer needs to remain on, which involves investment in the PC hardware and higher electricity bills, especially if the computer is not energy-efficient.
Fortunately, here at CCTV Camera World, we have a selection of live feed security cameras that have built-in streaming. In other words, the cameras themselves can stream directly to a service such as YouTube Live without requiring a dedicated computer to be on constantly. The cameras encode and transmit video using RTMP (Real-Time Messaging Protocol) technology, which allows our cameras with this feature to stream to most websites with ease. In this guide, we show how to connect an Avalonix LiveCam to the internet and start the stream. While this guide focuses on YouTube Live, it can be adapted to work for most streaming platforms by modifying the RTMP stream URL based on the website’s URL requirements.
Below are the requirements, along with some helpful information, to ensure that you have everything you need to broadcast your livestreaming outdoor camera to the world.
Of course, the first thing you'll need to follow this guide is a camera from our selection of Live Stream Cameras by Avalonix Premium Series. Feel free to click on one of the options below to learn more, or check out our Live Streaming Cameras store page. For help with picking the best outdoor live stream camera for YouTube, you can give us a call or reach out by email!
Although a dedicated computer is not needed to stream, one is required to set it up and to maintain it should it go down. While this process can be done from a Mac computer, we recommend using Windows to take advantage of the free central monitoring software. This software will allow you to check and manage the YouTube streaming camera and the live stream from anywhere there is an internet connection.
PoE, or Power over Ethernet, technology is used in our network security cameras to provide power and data over a single Ethernet or computer network cable. A PoE injector or PoE switch is used to power and connect the camera to a router or modem. If you would like to learn more about PoE, check out our PoE Technology - What is PoE? article. Usually, customers choose to add a PoE injector when purchasing our Live Stream Cameras.
Although we do sell a wifi camera with live streaming, it requires a 12V DC power supply but can be paired with your WiFi network to connect to the internet. However, WiFi cameras do not have the reliability and stability that are the inherent advantages of using wired IP cameras for live streaming.
As you can imagine, you need to use Ethernet cabling to utilize PoE technology for power and connectivity. Any standard CAT5e or CAT6 cable will work for this purpose. However, it's worth noting that if you intend to run your cable outdoors, it should be outdoor-rated and preferably run in a conduit. A cable length of 25, 50, 100, or 150 feet can be purchased along with the camera. Keep in mind that you need to purchase and run two (2) cables: one from your modem or router to the injector, and another from the PoE power source to the camera.
Other than physical goods, the most important thing that you need is a fast and stable internet connection to stream an IP camera to YouTube. With a fast internet connection, you may even be able to achieve 24/7 live streaming with an outdoor camera. Fiber is recommended for reliable 4K streaming and if you would like to try 24/7 streaming.
These days, the Internet Service Provider (ISP) provides a dynamic IP address along with most internet connections. Depending on the ISP, the IP address on your internet connection may change several times a week or once every few months. Every time the IP address on your internet connection changes, it will disrupt the YouTube stream and require manual reactivation of the stream from the camera. We suggest obtaining a static IP address for optimal stream stability.
In addition to stability, you need an upload speed that is adequate to continuously send large amounts of video data. Despite significant improvements in internet speeds over the past decade, streaming video services such as Netflix and Hulu have driven efforts on improving download speeds. This push has made it so that internet companies provide up to 10 times faster download speeds than upload speeds.
To reliably upload 2K or 4K live video to the internet, you need at least 5 Mbps, and optimally 10 or more Mbps. Contact your service provider or run a quick speed test at speedtest.net to determine your upload speed. Keep in mind that the constant upload bandwidth used for streaming may have an impact on other devices on your local network, and vice versa.
Also, your existing router or modem can play a large role in how successful your stream is. Most internet service companies provide their customers with low-end network equipment to save money. Your router or modem affects the speed and upkeep of your local computer network. If you have one that requires weekly or monthly reboots, that process will ultimately disrupt your stream, requiring you to reactivate it.
Alternatively, you may have an antiquated router that doesn't have the processing power or speed to transmit the stream. We recommend purchasing a new modem or router and returning the old equipment to your service provider. You might also save a few bucks on the equipment rental fees these companies sometimes sneak into service agreements.
Since this guide is about streaming to YouTube Live, you'll need an active YouTube account with live streaming access. If you haven't done so already or if you want to create a new account for a brand or business, you should do so as soon as possible.
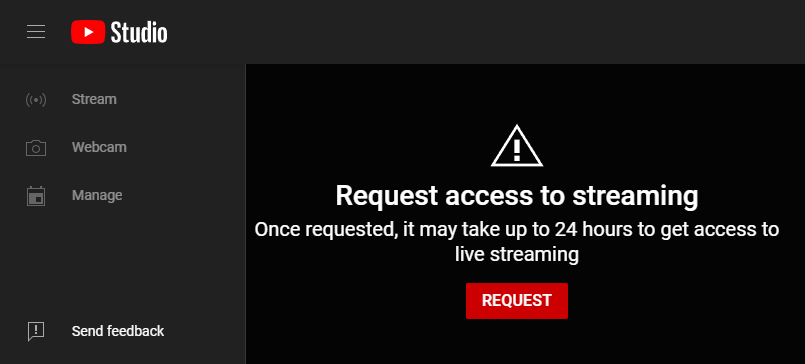
YouTube requires up to a 24-hour wait before allowing someone to stream on their platform. To request access, you must link a phone number to your account for verification purposes. This verification process helps YouTube mitigate the streaming of copyrighted, illegal, restricted, or adult content on their platform.
Last but not least, you need to ensure that your local computer network allows the camera to access the internet. When you purchase a camera for Live Streaming from CCTV Camera World, our team will reach out to acquire information about your local network and pre-configure the camera for it.
However, if you have any network firewalls, domain security policies, double NAT, or other restrictions on your network, these barriers can prevent the camera from accessing the internet. Make sure you check with your IT department before purchasing a camera, or have them "whitelist" the camera.
For the most part, maintenance is fairly hands-off if your internet service and network equipment are reliable. For example, we have customers who have been using our Live Stream Cameras to stream for several years, and their camera has not gone down except in extreme cases such as power outages. However, other customers with internet disconnections, slow upload speeds, or rebooting routers will experience their stream going down from time to time.
When the YouTube Live stream does go down for any reason, it requires you to manually restart the stream from the camera. Normally, this would mean you need to be on-site to access the camera using a web browser to toggle the streaming setting off and on. This is where our recommendation of using a Windows PC comes into play; you can use our PC Camera Management Software to access your camera remotely and restart the stream from anywhere you have an internet connection.
Now that you're prepared, you're ready to launch your stream into the world! If you're a novice with technology, the setup might seem a bit challenging. But don't worry! We're here to guide you with the following step-by-step instructions:

The first step is exciting: setting up your YouTube stream! In this phase, you'll create your stream title, provide a description, upload a thumbnail, and adjust other settings such as live chat, comments, and recording. Remember to be prepared for this step by requesting live stream access from YouTube in advance, as obtaining streaming access can take up to 24 hours.
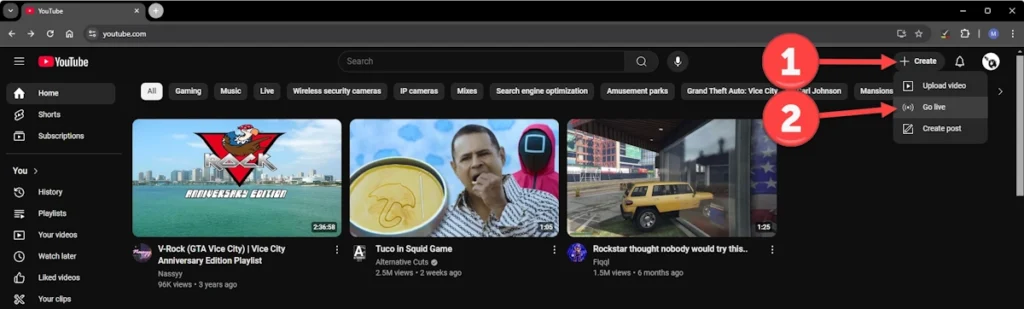
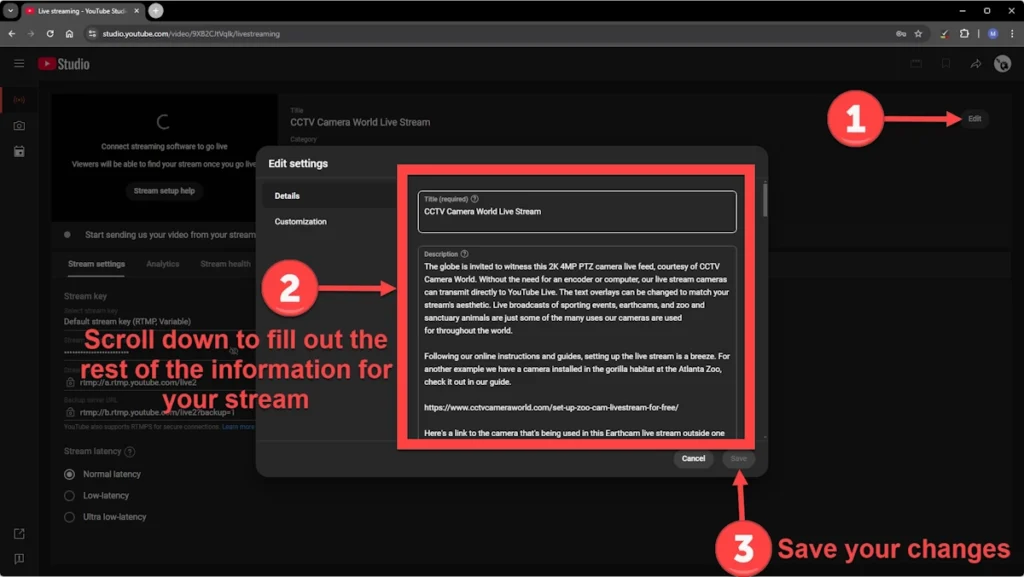
Now is where things can get a little tricky, as it’s important to pay close attention. Mistakes in your stream key will prevent the camera from accessing YouTube’s servers and uploading your stream.
OR
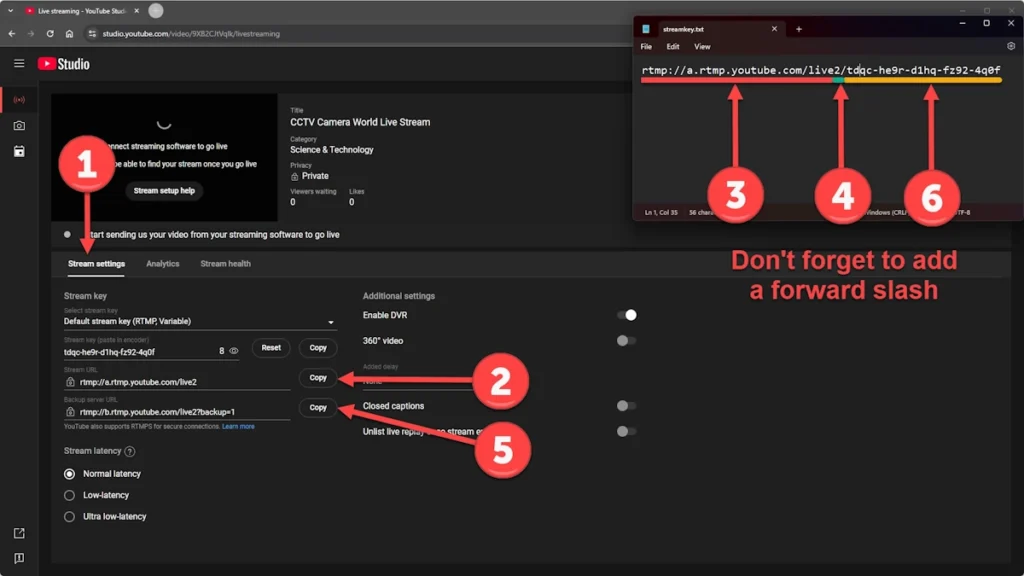
In your text editor, your Stream Key URL should resemble the following example:
rtmp://a.rtmp.youtube.com/live2/xxxx-xxxx-xxxx-xxxx

After verifying your account and creating a stream, connect the camera to your PoE injector or switch physically, and then link your PoE device to your router or modem. This process will power the camera and provide it with an internet connection.
The next step is accessing the camera's web interface, allowing you to become familiar with the camera and its settings. You have two options for this: you can access the camera directly using its local IP address within your network or, as previously mentioned in this article, use the PC software's "Link to Web" feature.
If the IP address was not pre-configured by us, you'd need to download and familiarize yourself with our camera configuration software. This software will help you locate your camera within your network. An added benefit is the software's ability to grant direct access to the camera's web interface with a single click, which is also explained within the guide.

Almost there! Now, transfer the Stream Key URL you've created into the camera's streaming RTMP settings page.

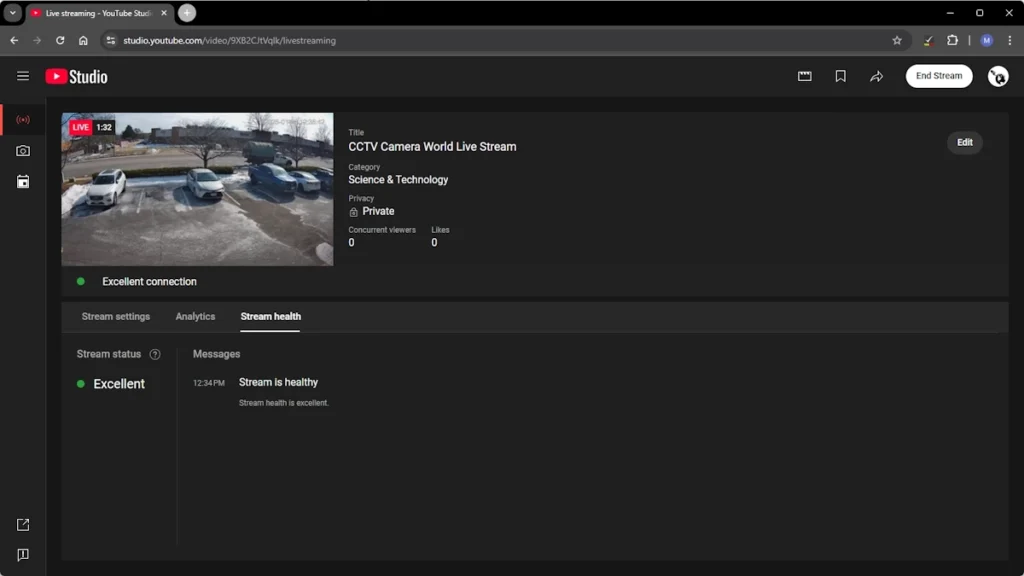
YouTube’s Schedule a Stream feature can also help if your internet connection is unstable or your upload speed is too low for reliable streaming. Instead of creating a brand-new stream each time your camera disconnects, scheduling a stream lets you reuse the same stream link, even if the feed is down for an extended period. This way, your audience doesn’t need to hunt for a new link, and you avoid the hassle of logging into YouTube Studio every time to restart the stream.
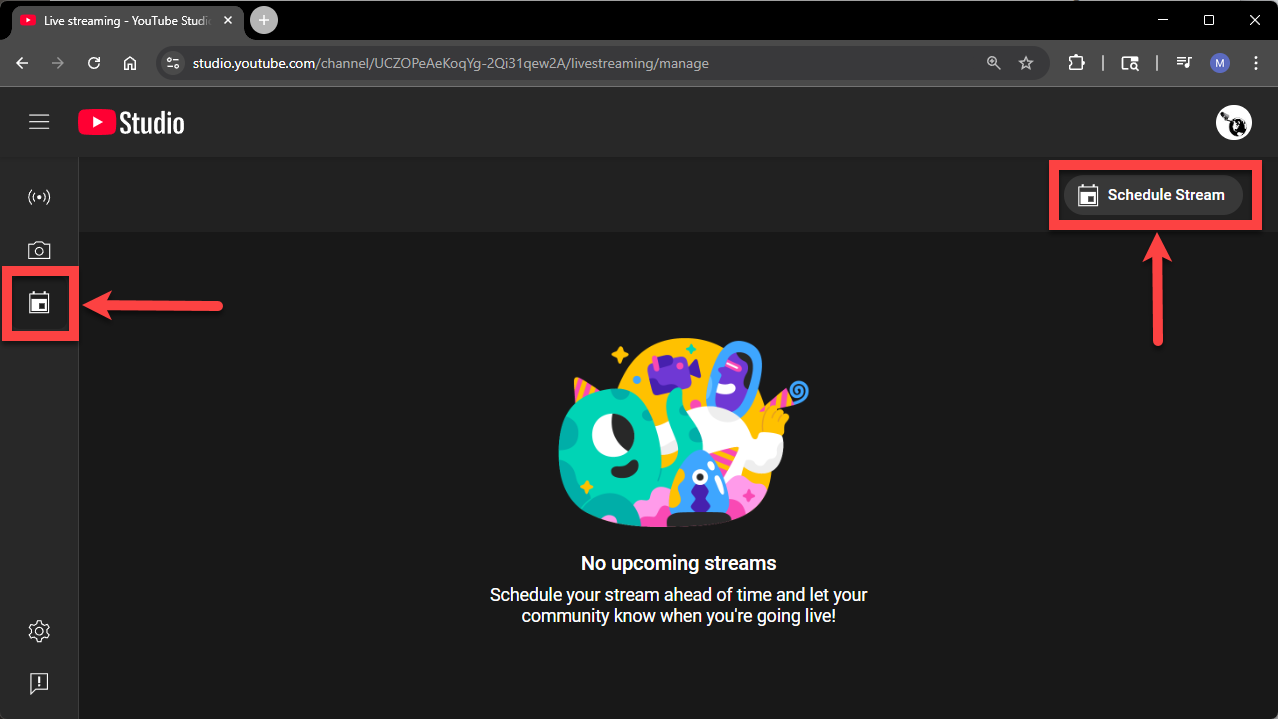
You will want to make sure that you do not enable the 'Auto Stop' feature, as that is what causes the stream to stop if the connection is unstable or the camera goes offline temporarily.
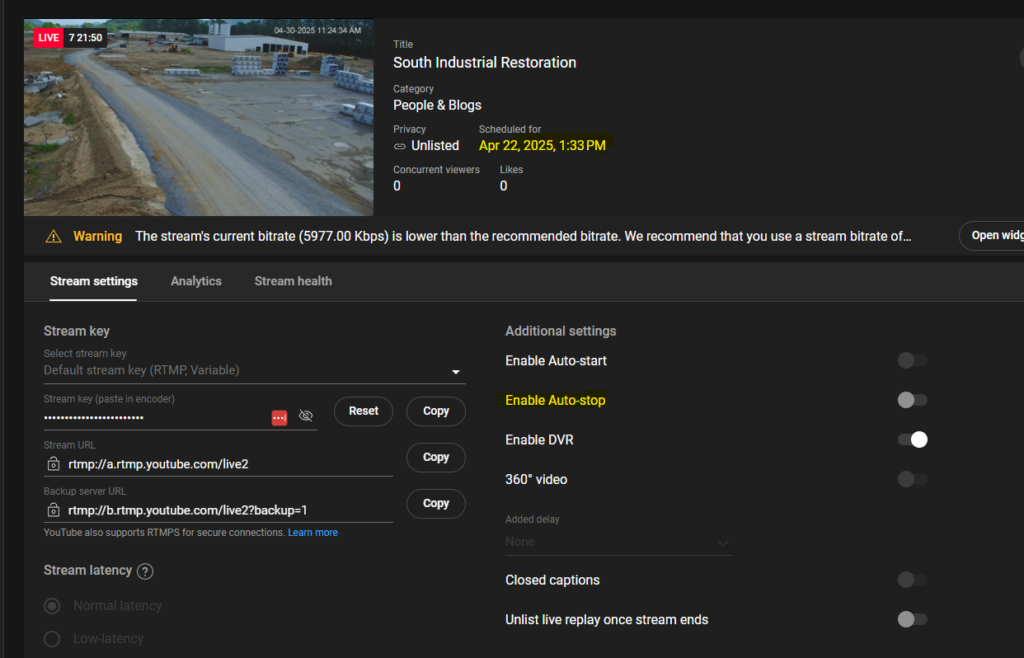
Instead of only sharing a YouTube Live link, you can embed your live stream directly on your website for easier access. This makes it simple for friends, family, or site visitors to tune in without navigating away from your page. Follow our embedding guide here to learn how to add the live video player to your site.
Occasionally, things might not go as planned. In such situations, you might need to do some additional troubleshooting to get your camera online and streaming.
If you're short on time or feeling overwhelmed, we offer a paid networking support service. With this, one of our technicians can remotely access your PC and guide you over the phone, helping get your stream up and running in no time.
The Central Monitor Software used for setup in Step 4 Option B also allows you to remotely manage and maintain your camera and stream. The “Link to Web” feature offers global remote access to your camera as long as you have an internet connection and your camera's location has power and internet connectivity.

Our live streaming cameras utilize the P2P (Peer-to-Peer) internet protocol. However, corporate, educational, strict small business, or home firewalls occasionally restrict or completely block P2P connections.
Occasionally, an ISP may block P2P server connectivity, or your network setup may block it due to a Double NAT situation. A Double NAT happens when there is another internal network ahead of the current one. For example, there may be an additional router in front of the current network connection. This is common if you're using a mesh network.
To successfully connect your camera to YouTube or another streaming platform over the internet, P2P access must be allowed.

Other than external restrictions, certain misconfigurations might prevent your camera from displaying an “Online” P2P status. If you are uncertain about how to achieve an online status, continue onto the next troubleshooting step or consider purchasing a networking support session.
For an “Online” status, your camera requires an active internet connection, a compatible local IP address, and a functioning DNS (Domain Name Server). As noted above, the P2P protocol must also be unrestricted on your network.
Ensure that the camera’s local IP address, subnet, and gateway are correctly configured. We recommend using reliable DNS servers like Google’s (8.8.8.8 and 8.8.4.4) or Cloudflare's (1.1.1.1 and 1.0.0.1). However, remember that some networks might require specific DNS servers for devices to reach the internet. Check with your IT department for any potential restrictions.
One of the most common issues stems from mistakes in the stream key (aka RTMP) URL. People who are unfamiliar with reading and writing URLs can make errors such as adding redundant punctuation, repeating words, or incorrectly pasting the stream key. Compare your RTMP URL to the examples provided below to ensure accuracy.
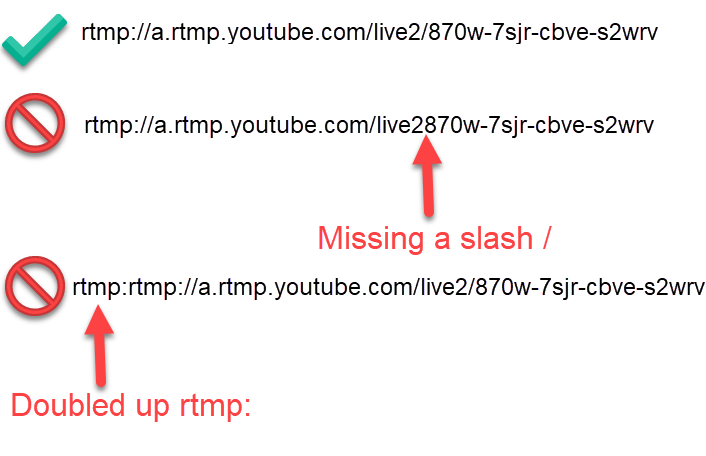
Livestream platforms typically have specific requirements. For example, most require H.264 video encoding. Ensure your camera is set to H.264 encode mode within the “Camera” and “Encode” web interface settings.
Also, do not change the encoding type or enable Smart Codec unless we recommend you do through support. If you adjust encoding settings and see warnings or errors in your YouTube Studio stream page, revert to the default settings and make sure H.264 is selected.
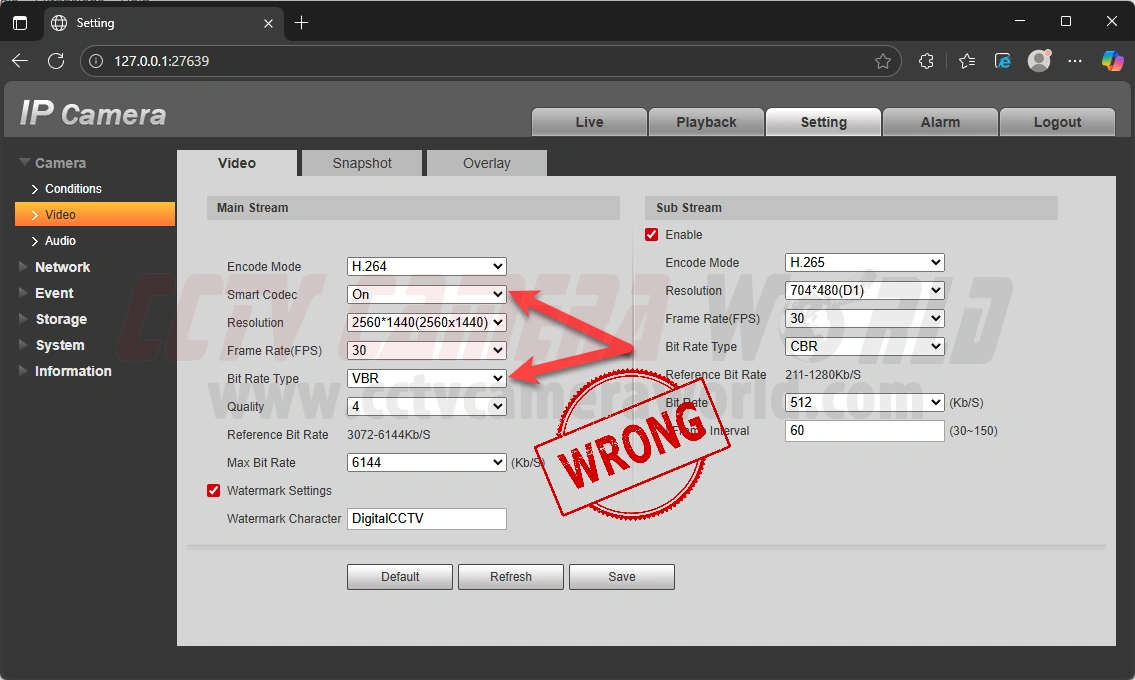
If your stream faces issues like lag or dropped frames, first make sure you have sufficient upload internet bandwidth to support the required stream bitrate. These issues often arise due to slow internet upload speeds or unreliable service. Consider adjusting settings like resolution, framerate, and bitrate. Decreasing the resolution, framerate, and bitrate are all ways to optimize your streaming experience. Finding an optimal balance between the three will require some trial and error. Note that lowering encoding settings will affect how your stream looks.
You can refer to YouTube’s encoding guidelines or the table we created below that shows some common optimal encoding settings:
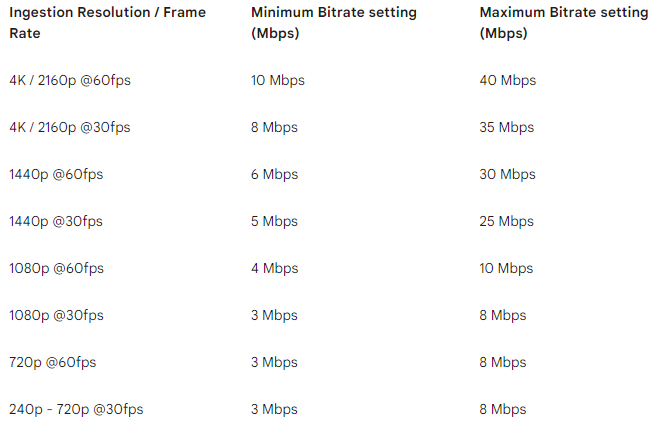
Both YouTube and Facebook require an AAC-codec audio stream. If your audio encoding is disabled or set to a different codec, adjust the settings in your camera’s “Camera” and “Audio” web interface settings. If you prefer that your stream have no audio, you can set the microphone volume to 0 or 1, ensuring the stream is silent.
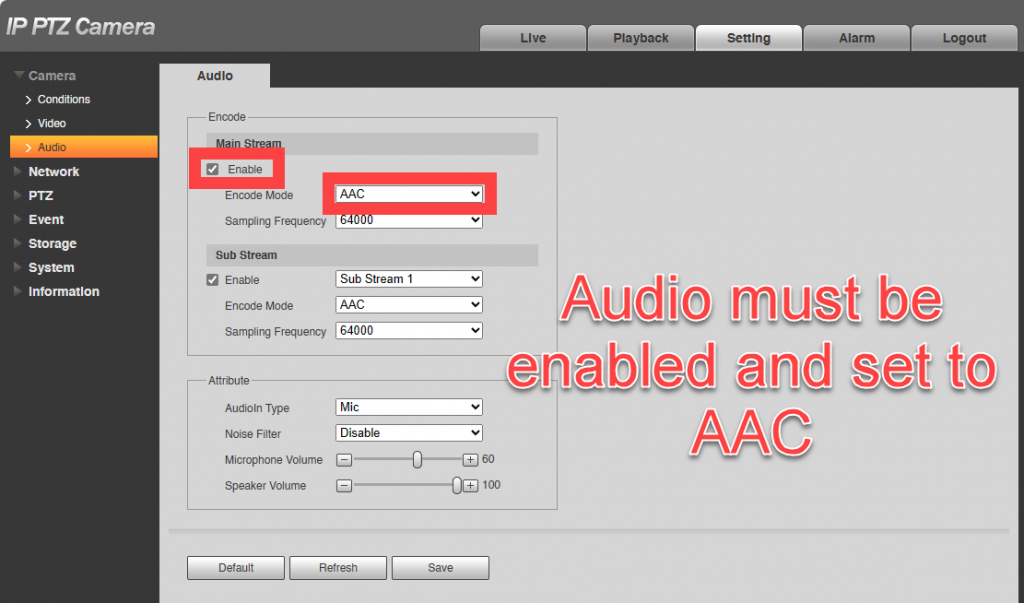
Although rare, you may need to reset your YouTube Stream Key to fix any issues on YouTube’s end that are preventing the camera from uploading video to their servers. In the following steps, we show how you can easily reset the key. You can also update the key and restart your stream remotely from a Windows computer by following our video above in the “Managing the camera while away” section.
It is not uncommon for customers to accidentally add a character or space to their streaming RTMP URL, as discussed in Troubleshooting section 4.
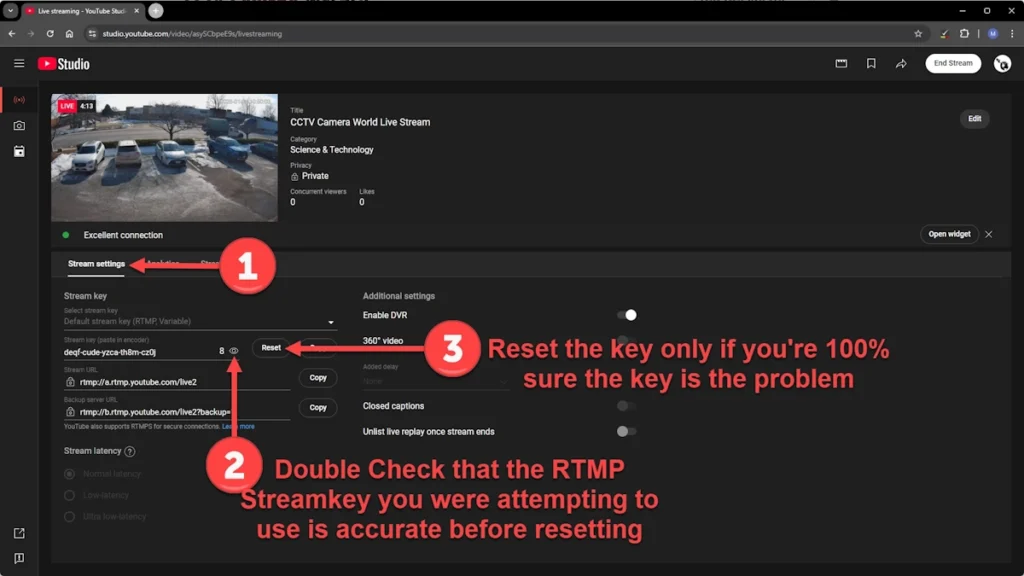
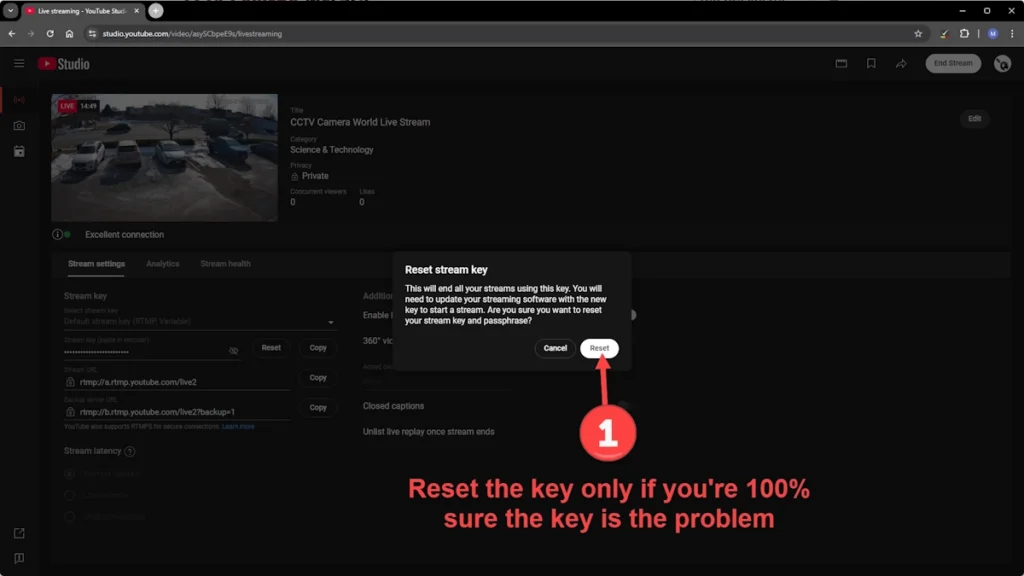
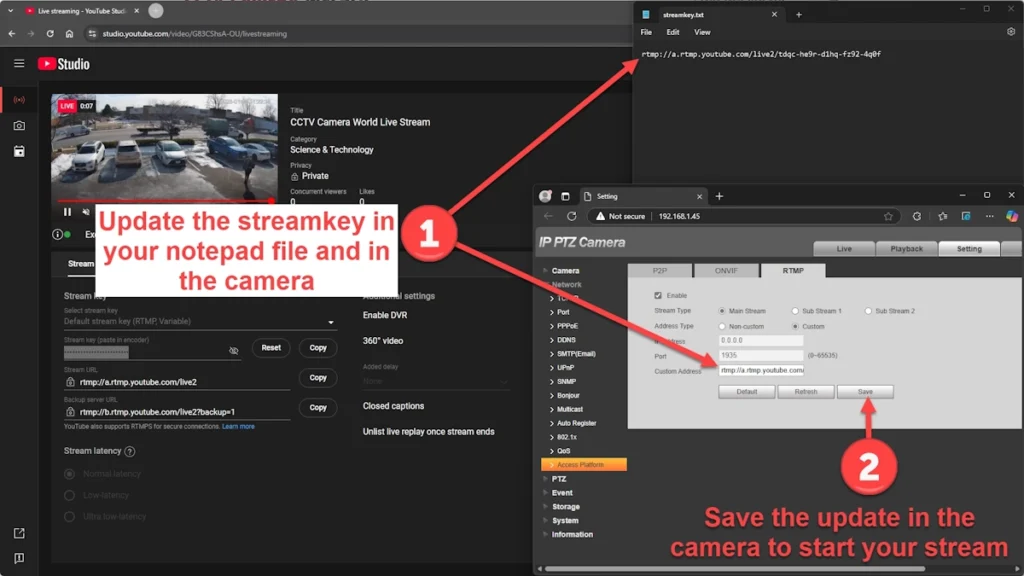
With the rapid decline of traditional media like TV, radio, and newspapers, people now get the majority of their entertainment, news, and cultural engagement from the internet. Livestreaming video on the internet to audiences has become a massive industry thanks to major players such as Google’s YouTube Live, Amazon’s Twitch, and Meta’s Facebook Live. This […]
