Most security cameras that are outdoor rated do not come with built-in microphones to ensure that no water can leak in. This means that you must add an external security camera microphone to these cameras in order to record audio. CCTV Camera World carries microphones for indoor or outdoor cameras. Most IP security cameras with audio input capabilities have an RCA audio connector on their pigtail for connecting a microphone. Some dome IP cameras have a connection block on the inside of the dome. In either case, physically connecting and configuring external microphones to an IP security camera is easy as shown in this guide.
How to tell which camera you have?
In case you are unsure, here's a quick image to help you understand which type of audio connection your IP camera has.
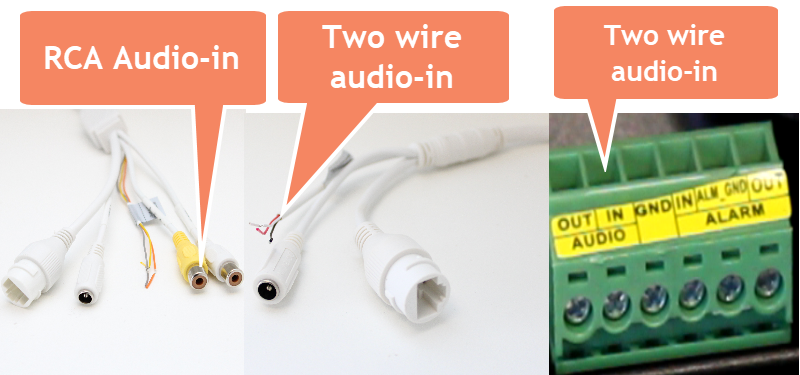
Depending on whether your camera has a RCA or two-wire line in connection, please follow the appropriate section below.
- Connecting a microphone using RCA input
- Connecting a microphone using two-lead wire
- Enabling audio-input on the camera
Setup for IP Cameras with RCA Audio Input connectors
What's needed?
Here is what you need to connect a microphone to an IP camera that has RCA audio inputs:
- Outdoor Microphone (sku 71891) or Indoor Microphone (sku 7100CC)
-
12V DC 500mA Power Supply (sku 12V5MA)
You can also use PoE Power Splitter (sku POE101D) with DC Power Splitter Cable (sku DC-PJJ) - RCA Male to RCA Male Adapter (sku RCA01)
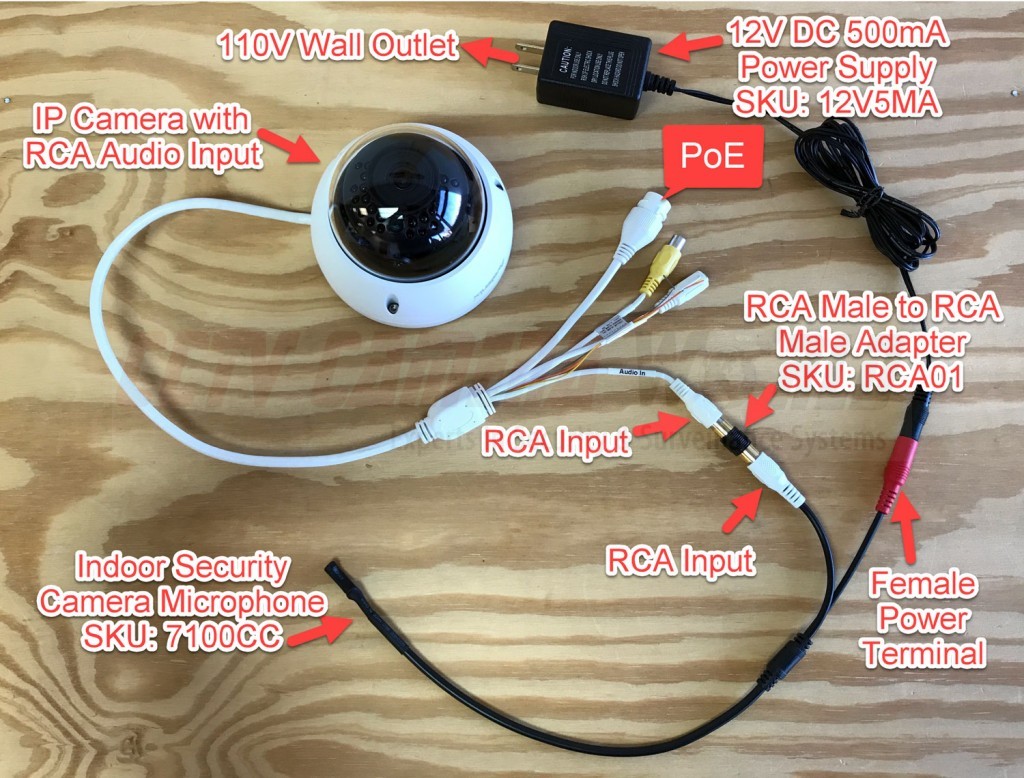
How to connect a microphone to an IP camera that has RCA audio input
Below is a diagram of how to connect an external microphone to the RCA audio connector on an IP camera.
In case you'd like to see the setup demonstrated in a tutorial video, please watch the video below that shows how to connect a microphone to a camera. The video also shows how to enable audio recording on an NVR, and how to use Internet Explorer or SmartPSS for live listening.
It is easy to connect a mic by following these easy to follow steps:
- Connect the microphone to the RCA audio input on the camera's pigtail using a RCA Male to RCA Male connector
- For longer runs between the camera and microphone you can use an RCA cable with male ends to connect the input and output.
-
Connect the power connector from the 12V DC Power Supply to the female power jack on the microphone.
Alternatively, you can also use a PoE Power Splitter with a 1-to-2 DC Power Splitter to use PoE power for the microphone and camera. Simply connect the PoE cable into the PoE splitter. Then split the power to the camera and microphone using the DC splitter. The data cable for the PoE splitter then connects to the camera for data.
After you have correctly wired the microphone to the camera you can continue to the rest of the article to find out how to enable the cameras audio input for listening and recording.
Setup for IP Cameras with Audio Line-in Input
Some IP security cameras include an internal audio line-in block or a two-wire lead that requires a two-lead connection for connecting a microphone. At first it may seem puzzling how a microphone with a RCA connection would connect to a two-wire input. As an example, in the section below we use an RCA audio balun and two-lead wire to connect the microphone to the line-in block.
What's needed?
You will need the following items to connect a microphone to a camera with a line-in audio connection consisting of two-lead cabling.
- Outdoor Microphone - (sku 71891) - It can also be used indoors
-
12V DC 500mA Power Supply (sku 12V5MA)
You can also use PoE Power Splitter (sku POE101D) - Male RCA Audio Balun (sku AudioBalunMale) or Female RCA Audio Balun (sku AudioBalunFemale)
- Two-lead Wire for the balun, you can use strands from CAT5e network wire
Briefly, here is what we did:
- Open the dome cover of the camera using the included hex-key tool. Do not use powered screwdrivers or drills or you will damage the dome.
- Connect the BNC Female to RCA Male connector to the balun.
- Connect the RCA Male tip to the RCA input on the microphone.
- Use the video balun to wire in the two lead wire, tighten the screw-downs for the wires.
- Make sure that you remember the polarity for your wires. We suggest using Red for the positive wire, and Black/Striped for the ground/negative wire.
- Having a bad connection or the wrong polarity will not record sound or have loud interference.
- Locate the small rubber insert next to the Audio/Alarm block and create a small hole for the wires.
- Slightly unscrew the screw-down for the Audio-In connector on the block. Insert the positive wire from the video balun and screw it down.
- Slightly unscrew the screw-down for the ground connector (GND). Insert the ground wire from the video balun and screw it down.
- Run the power cable for the microphone to the 12V DC power supply that is connected to a 110V AC power outlet. Connect the power supply to the microphone.
- Alternatively you can use a PoE splitter with a 1-to-2 DC power splitter.
- Connect the PoE cable for the camera to the PoE splitter. Then connect the PoE splitter to the 1-to-2 DC power splitter.
- Connect the camera and microphone to the DC power splitter connectors.
- Connect the RJ45 jack coming from the PoE splitter into the pigtail on the camera.
Once you finally have your camera and microphone connected you can continue to follow the rest of this guide to learn how to enable audio input on the camera.
How to enable audio recording on an IP camera
After everything is connected you must configure the camera to recognize and use the external microphone. This step is extremely important before trying to listen and record a camera. Do not assume that the camera is automatically recording audio when you plug the microphone in.
Using Internet Explorer to enable and modify audio settings
In the video below we show how to use Internet Explorer to login and modify the settings on an IP camera. This process requires knowing what the IP address of the camera is. To learn how to connect to a camera, or find out it’s IP address check out our guide on How to Connect an IP Camera to a Computer.
After that it is as easy as logging in and going to the Settings page. Navigate to the Camera > Audio page. There you will find the audio settings for the camera. You can enable audio for Main-stream or Sub-stream, fine tune the volume settings, and enable the noise filter. Also if a camera has a built-in microphone you can set it to use the external microphone instead.